
|
||||||
|
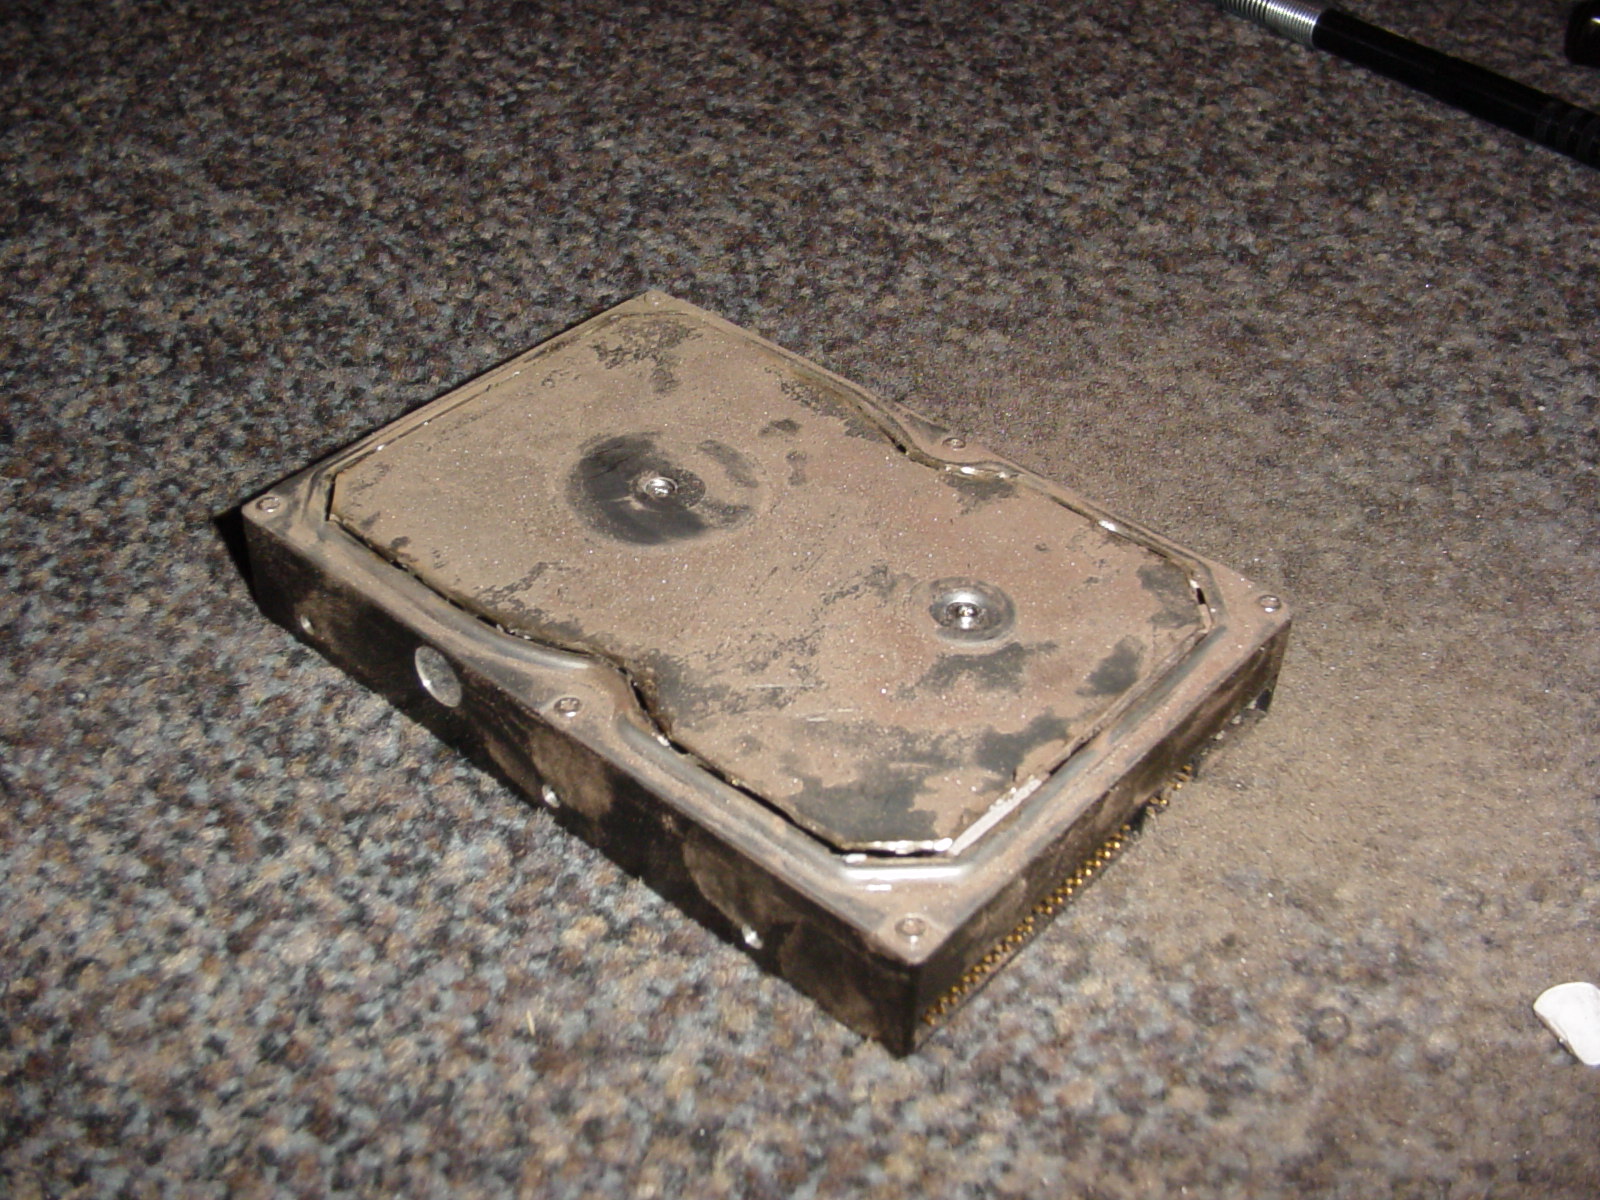
A long time ago, when I was still young, I went to a computer fare and a lot of things there impressed me as only a few things can. Seeing the newest computers, the newest toys, what was to come and so on made my eyes glow and by the end of the show I couldn’t wait until there was one more in town. But the one thing that did impress me the most was the new hard drives that was displayed with a piece of Plexiglas on top of them so that you could see everything inside, and at one point I asked a sales person "Where can I buy one of these see-trough hard drives and what will it cost me". The response I got was a bit disappointing as the sales person smiled back at me and said "These drives are only for display and do not work".
In the last couple of years I’ve seen a couple of projects which will do exactly this, replacing the lid with a piece of some kind of see-through material, but I must say that they usually look like shit, and I couldn’t be bothered about doing it if that was the result. So, as I had a couple of Maxtor drives collecting dust in the garage I thought "I can do this nicer and better" and on the following pages we will see if I’ve succeeded. I might want to stick in a comment here before I get attacked though – I’m not claiming to be the best at this and I’m not claiming to be an artist in handcraft.
On the next page we shall talk a bit over the theory. Or skip directly to page 3, that’s where the action begins! |
Hard drive, Dremel, Plexiglas, eBay, harddrive, compressor
|
What I wanted to do first was simply to take of the lid of the hard drive and simply replace the lid with the Plexiglas, but that wasn’t that as easy as I though. Why? Well when you take the lid of the hard drive you will see that the spindle from the disc and the head voice coil (=head motor) is not levelled with the edge of the hard drive. Why they’ve actually designed it this way is unknown to me but I guess it’s cheaper to make a dent in a piece of steel (the lid) to fit the higher parts, then to make the aluminium cast higher.
So what we need to then is to either mill out the shape of the spindle and head in a 7 mm piece of Plexiglas or to cut out a viewing hole in the existing lid and then place an square piece of Plexiglas on top of it. I do think that it would definitely be nicest with the first alternative but that would take some serious equipment that I don’t have access to, so I’ve decided to go the other path. Another couple of benefits of using the existing lid as a base is that you know it will fit, it already has a gasket, and the holes are definitely in the right place.
|
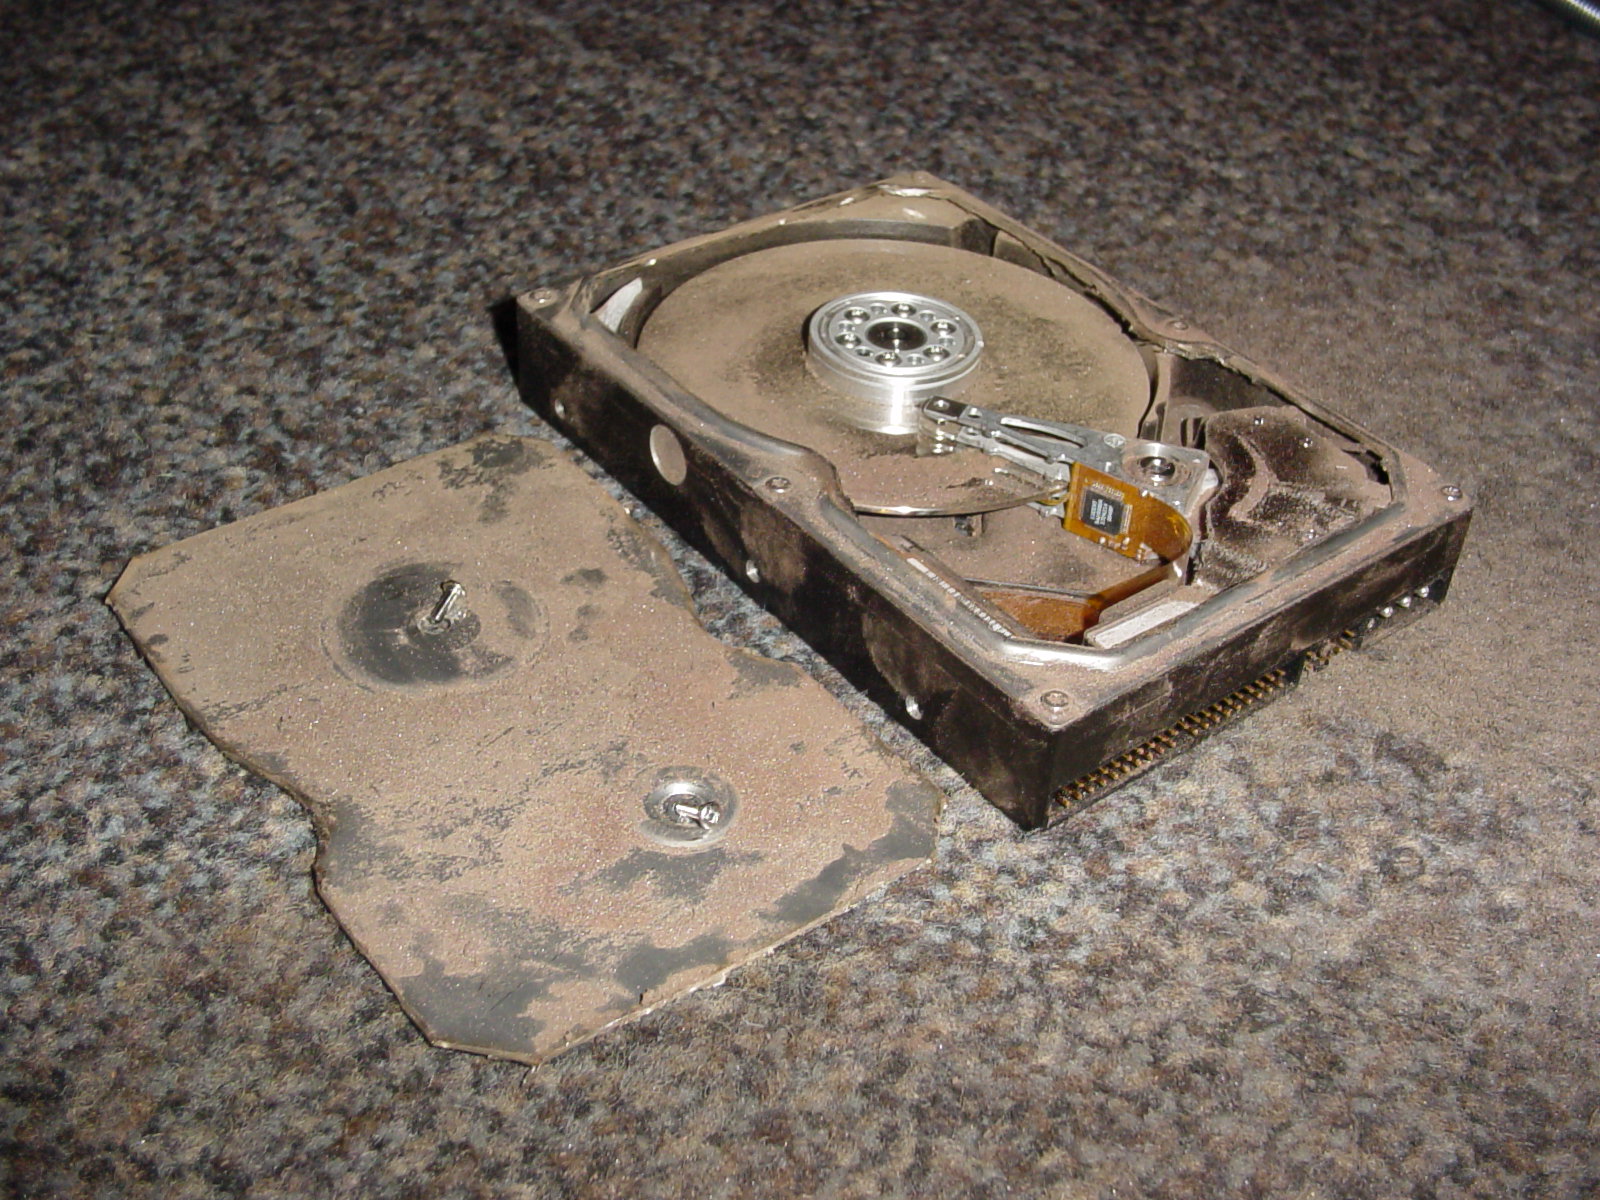
 Remember earlier on that I mentioned that I haven’t used one but two hard drives for this project? Let me explain why this is and why you actually only need one. Method 1. In an dust free area dust of the hard drive, and remove the lid. Place the hard drive (now with the lid off) immediately inside a clean dust free container (like an freezer bag). Cut out the hole in the lid and glue on the Plexiglas, then put the lid back on to the hard drive. Method 2. Use two hard drives, one as the slaughter victim and one as the hard drive to use later on. Using hard drive 1 with everything in place, cut out the hole in the lid and glue on the Plexiglas. Take of the new lid from hard drive 1 and clean the lid and hard drive 2 from dust. Then, in a dust free area, simply do a swap of the lids. Method 1 is what I’ve seen other projects do, and method 2 is what I’ll describe here. The reason for this is that the chance of the hard drive to be contaminated with dust is so much smaller with method 2. The swap, later on, in this project took only 3 seconds (loosen all screws, remove original lid, place the new one on) and this feels a lot safer then having my hard drive inside a plastic bag while I work. Another benefit of method 2 is that the frame of the lid is fixed while cutting so it won’t become skew and it will also keep the gasket undamaged. "A dust particle getting between the disc and the head inside your hard drive can be compared to a 747 flying 5 meters above the ground and ‘bumping’ into a tree" |
Enough talking!! Let’s get down to business. Get the screwdriver and the hammer!!
Hard drive, Dremel, Plexiglas, eBay, harddrive, compressor
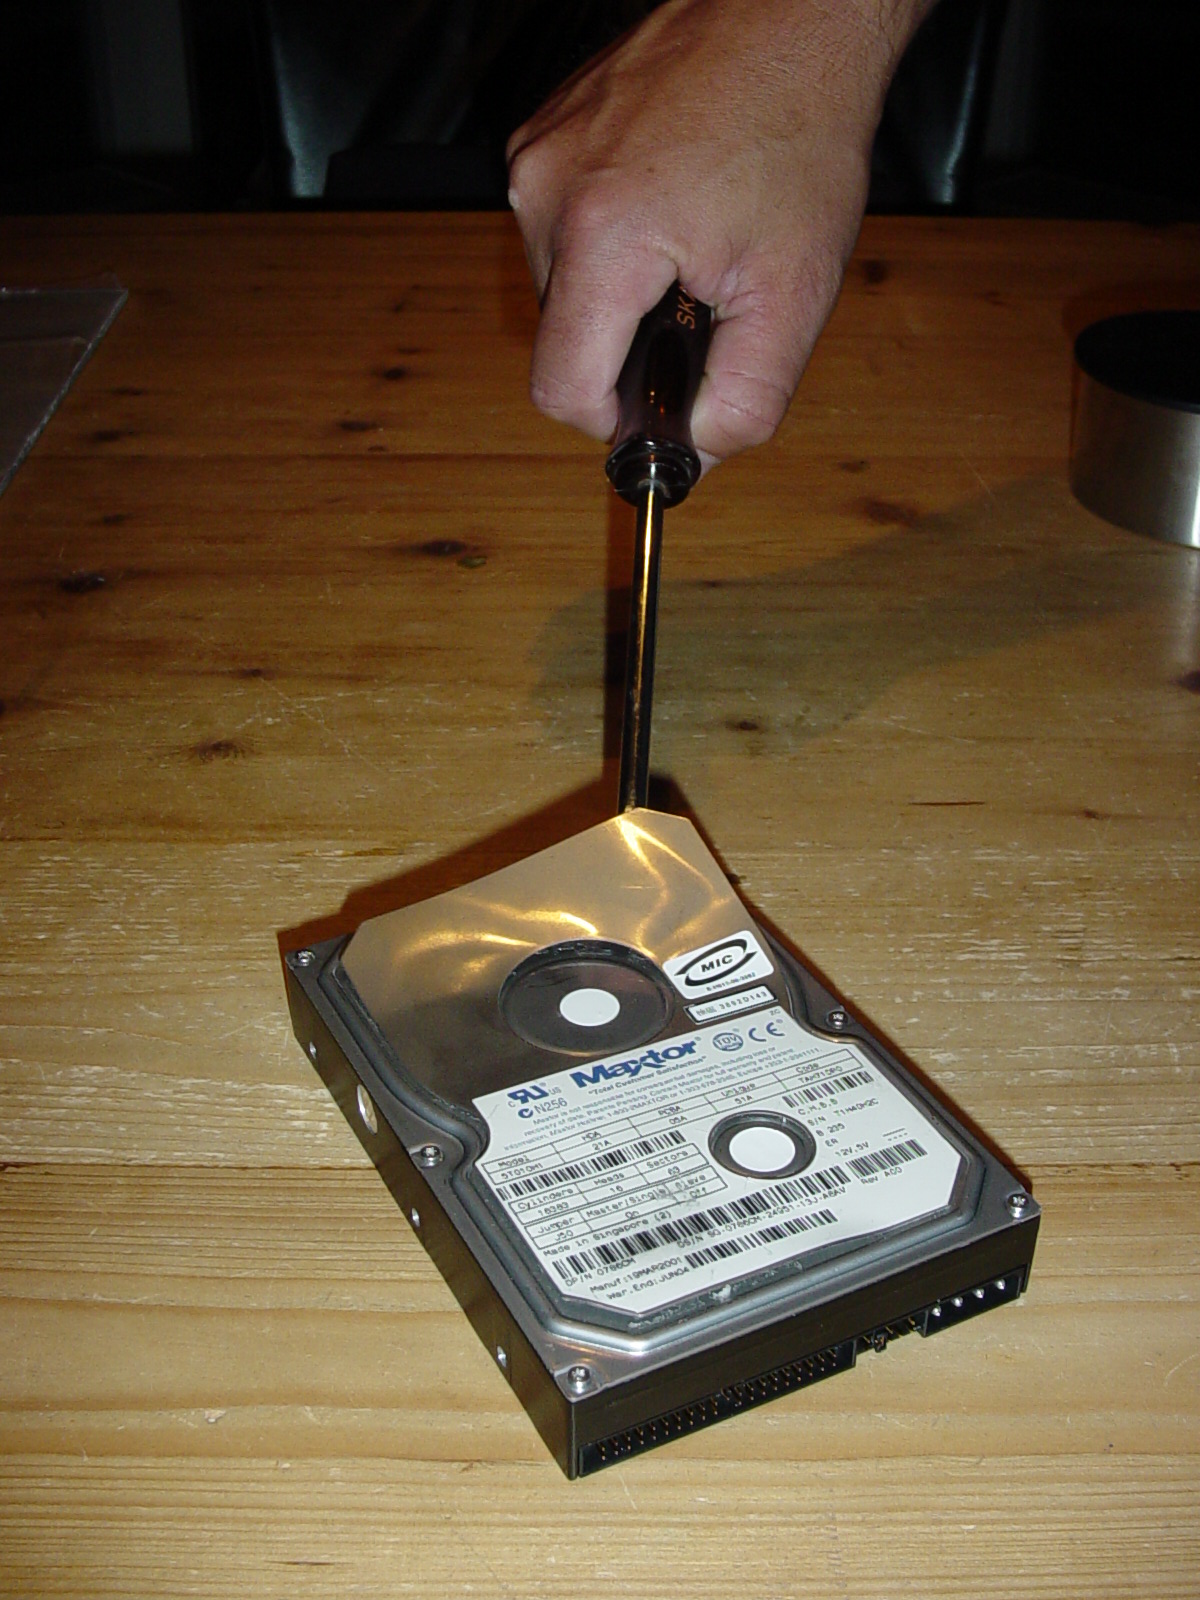  Let’s get down to it. As this particular hard drive, and many many others, has a vibration damping extra piece of steel on top of the lid we need to remove this first so that we don’t have to use the Dremel to cut trough an extra 1.5mm.
Disclaimer: If you don’t know what you’re doing then don’t do it. You will loose any warranty you have and you might render the device useless. |
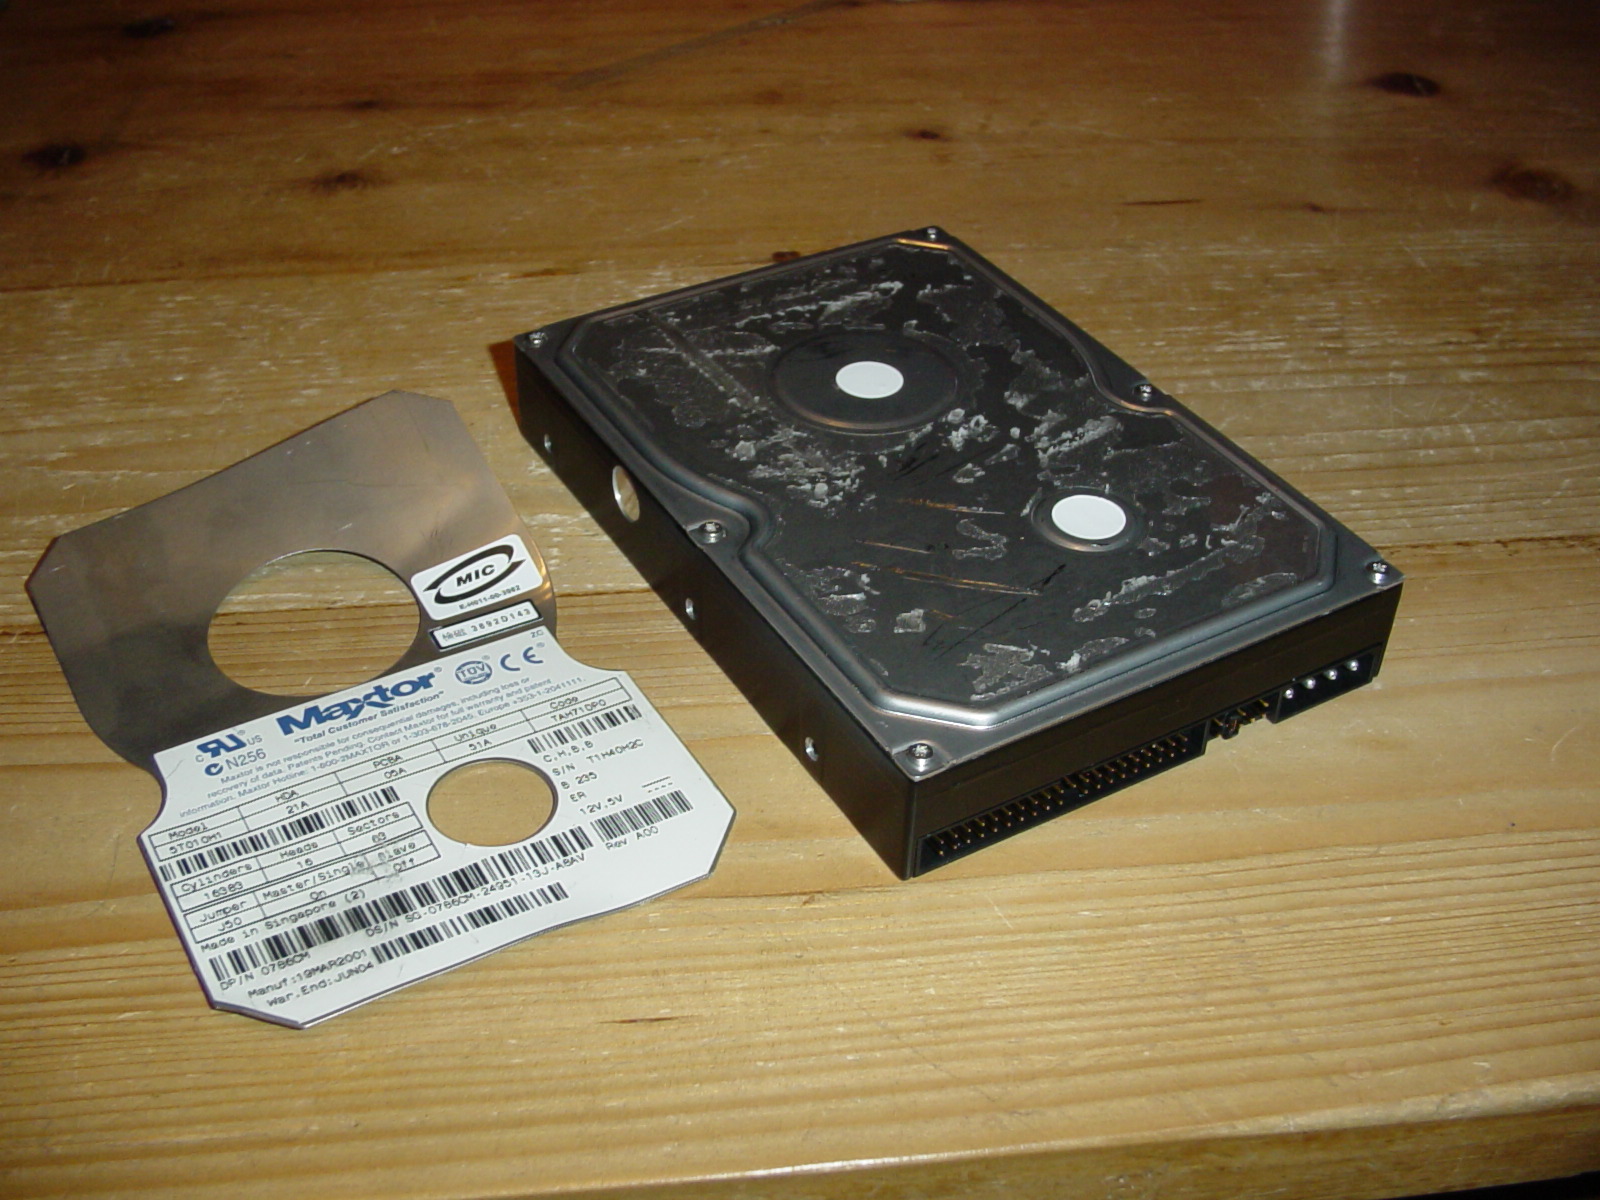
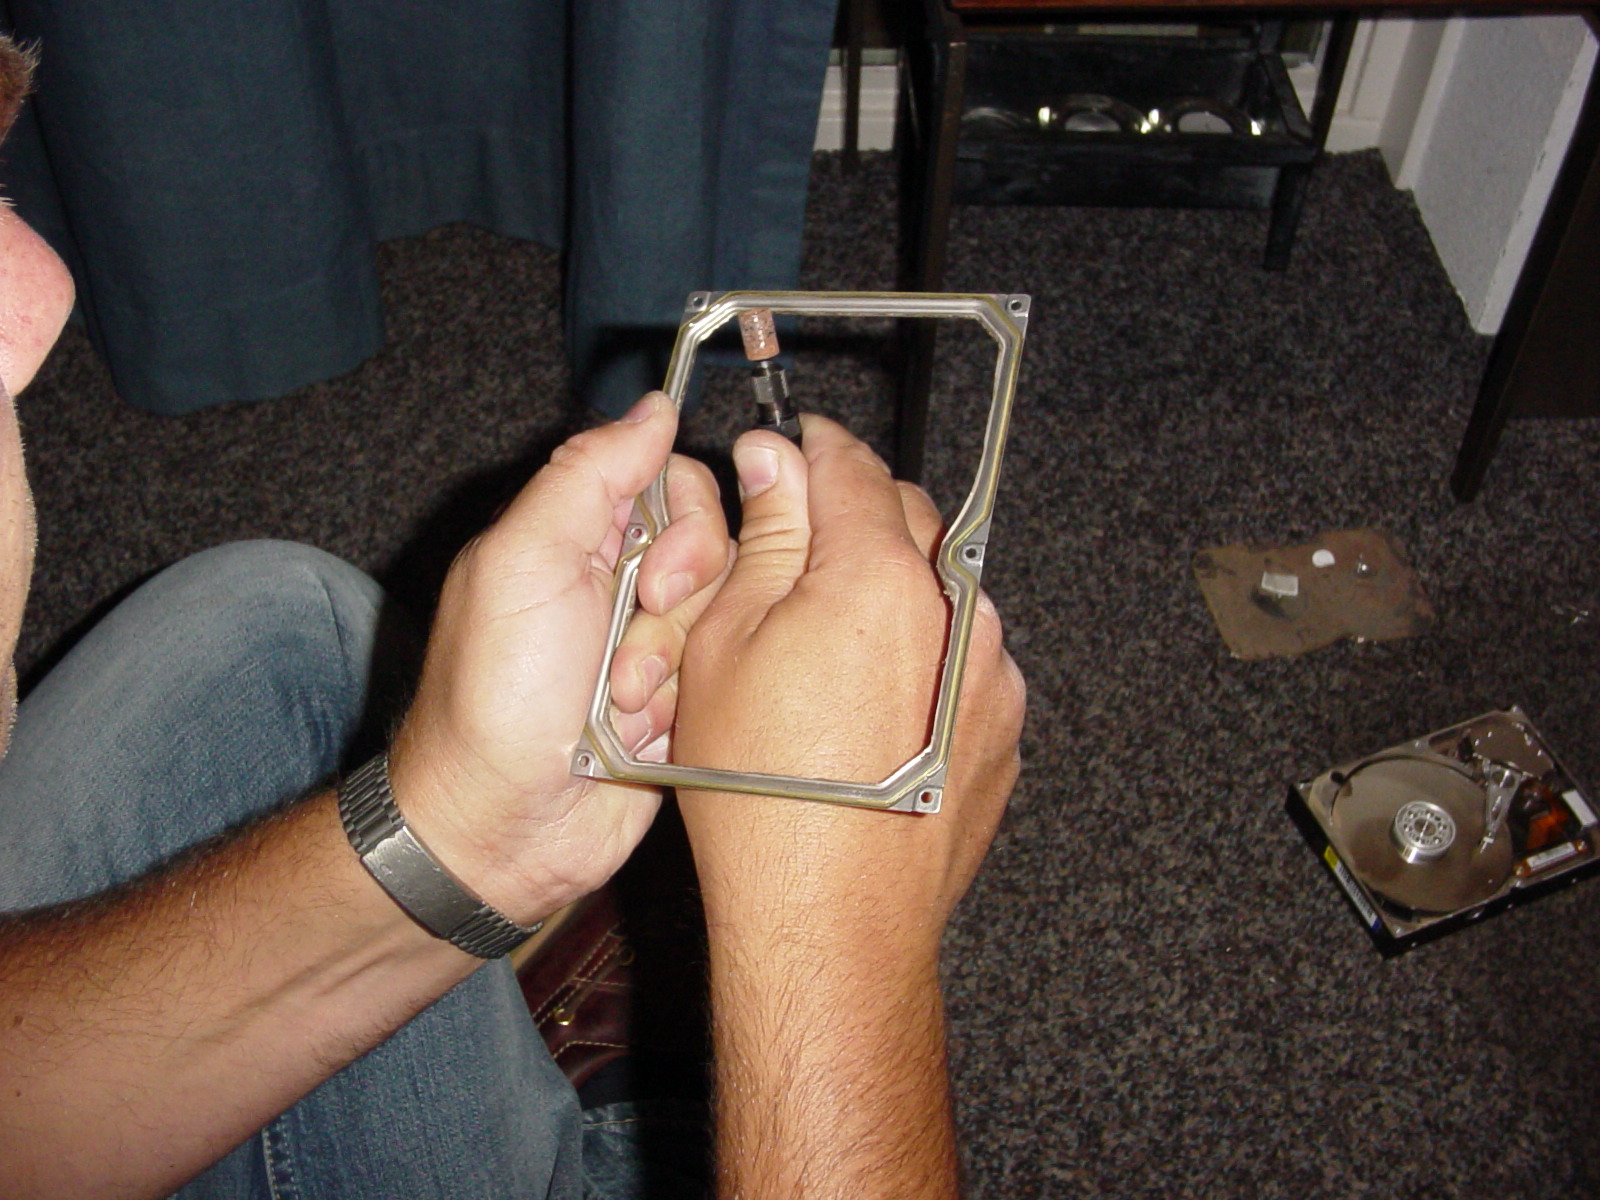
 Next remove the lid from the hard drive and use it as a template for cutting out a piece of the Plexiglas. I had it in place when cutting but you can of course also take a knife and scratch the lines in the plastic before cutting. The benefit of having the lid in place while cutting is that you will get nice straight lines and it will be in the right size. The drawback is that you might scratch the edge of the lid if you’re not careful. A word about taking the lid of. There is almost always more screws then meets the eye. They hide screws often under stickers, and on this hard drive the hidden screws was under the two white stickers. |
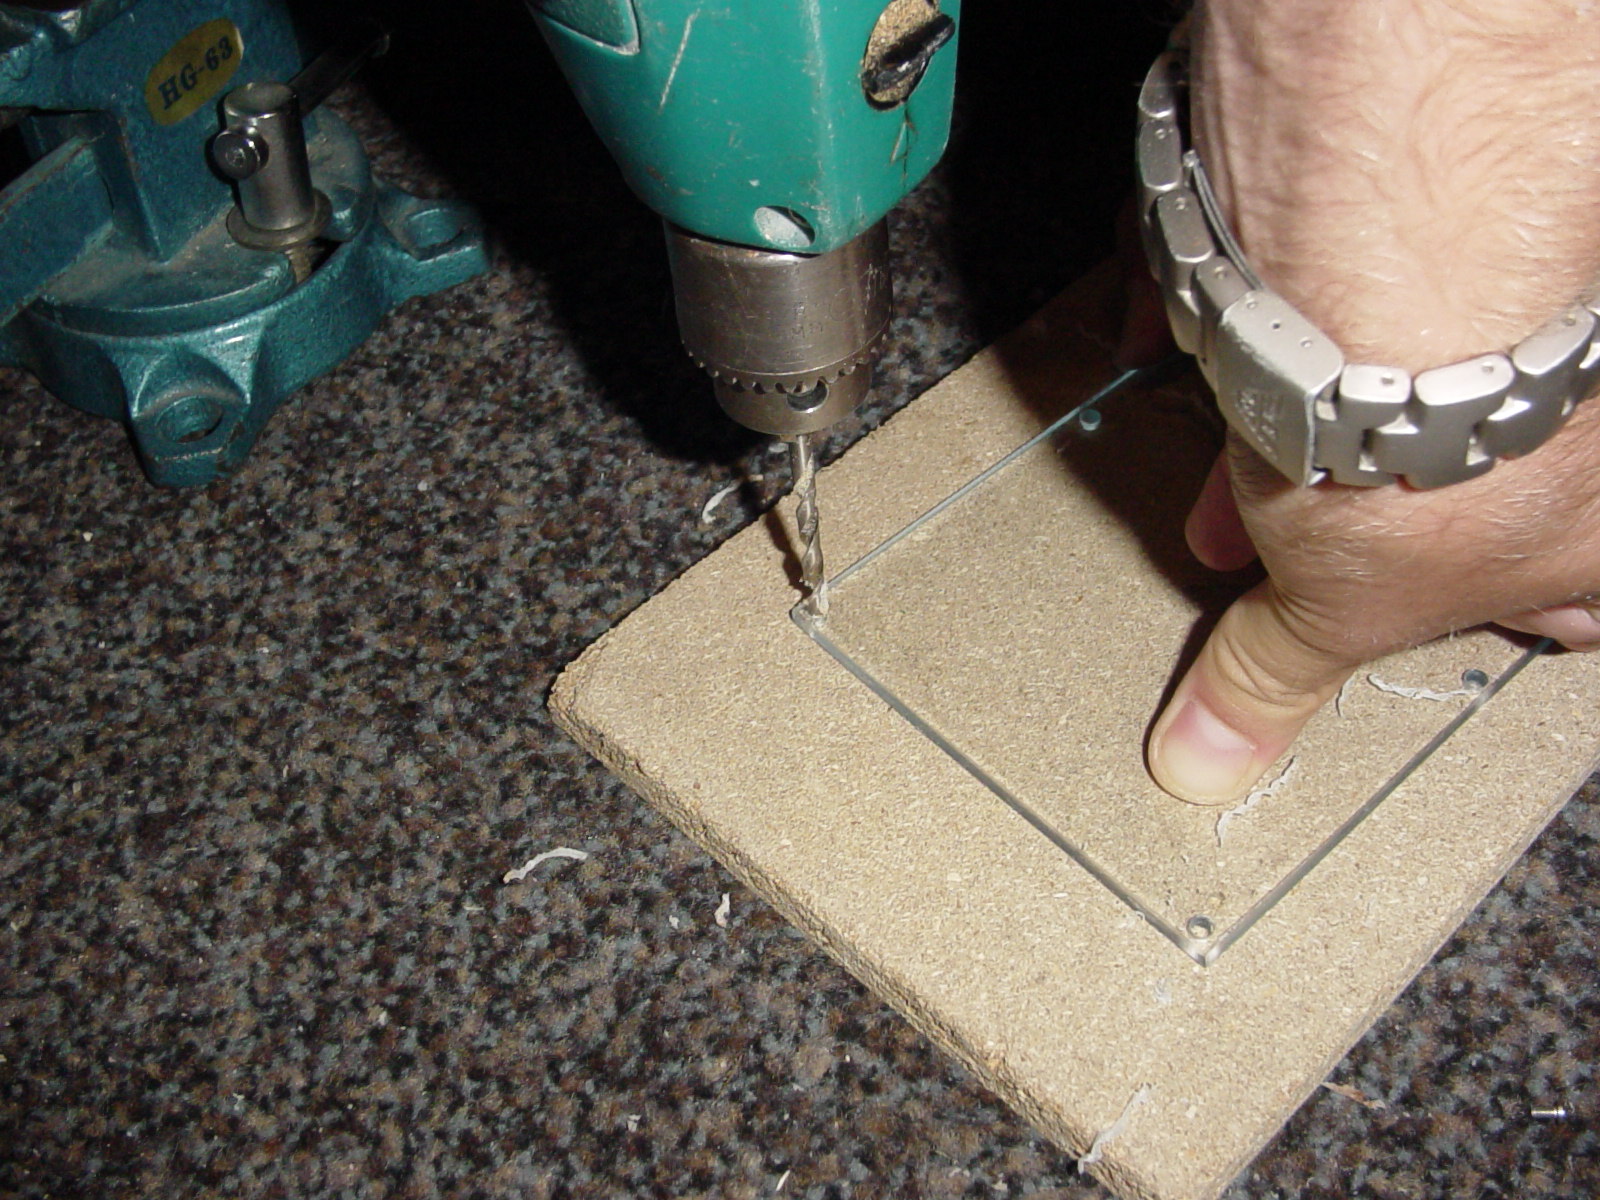 Polish of the edges and put the lid in place again and mark the holes on the plastic. Then drill holes that are big enough for the head of the screws for the lid to fall trough. Don’t use to much pressure while doing this as the plastic might crack otherwise as it’s close to the edge. |
To cut or not to cut?! On the next page will we start cutting steel!
Hard drive, Dremel, Plexiglas, eBay, harddrive, compressor
 Now comes the fun part – cutting out the viewing hole. Remember that you need to cut away the flat area, and not the raising edge that we’re going to use as the support for the Plexiglas. This part was a bit frustrating actually, because the discs to the Dremel were used up very quickly. To cut out the hole which is a total of maybe 25cm we used up 6 discs. It was a good thing that we removed the extra piece of steel first. |
 I wonder if my warranty is still valid? |
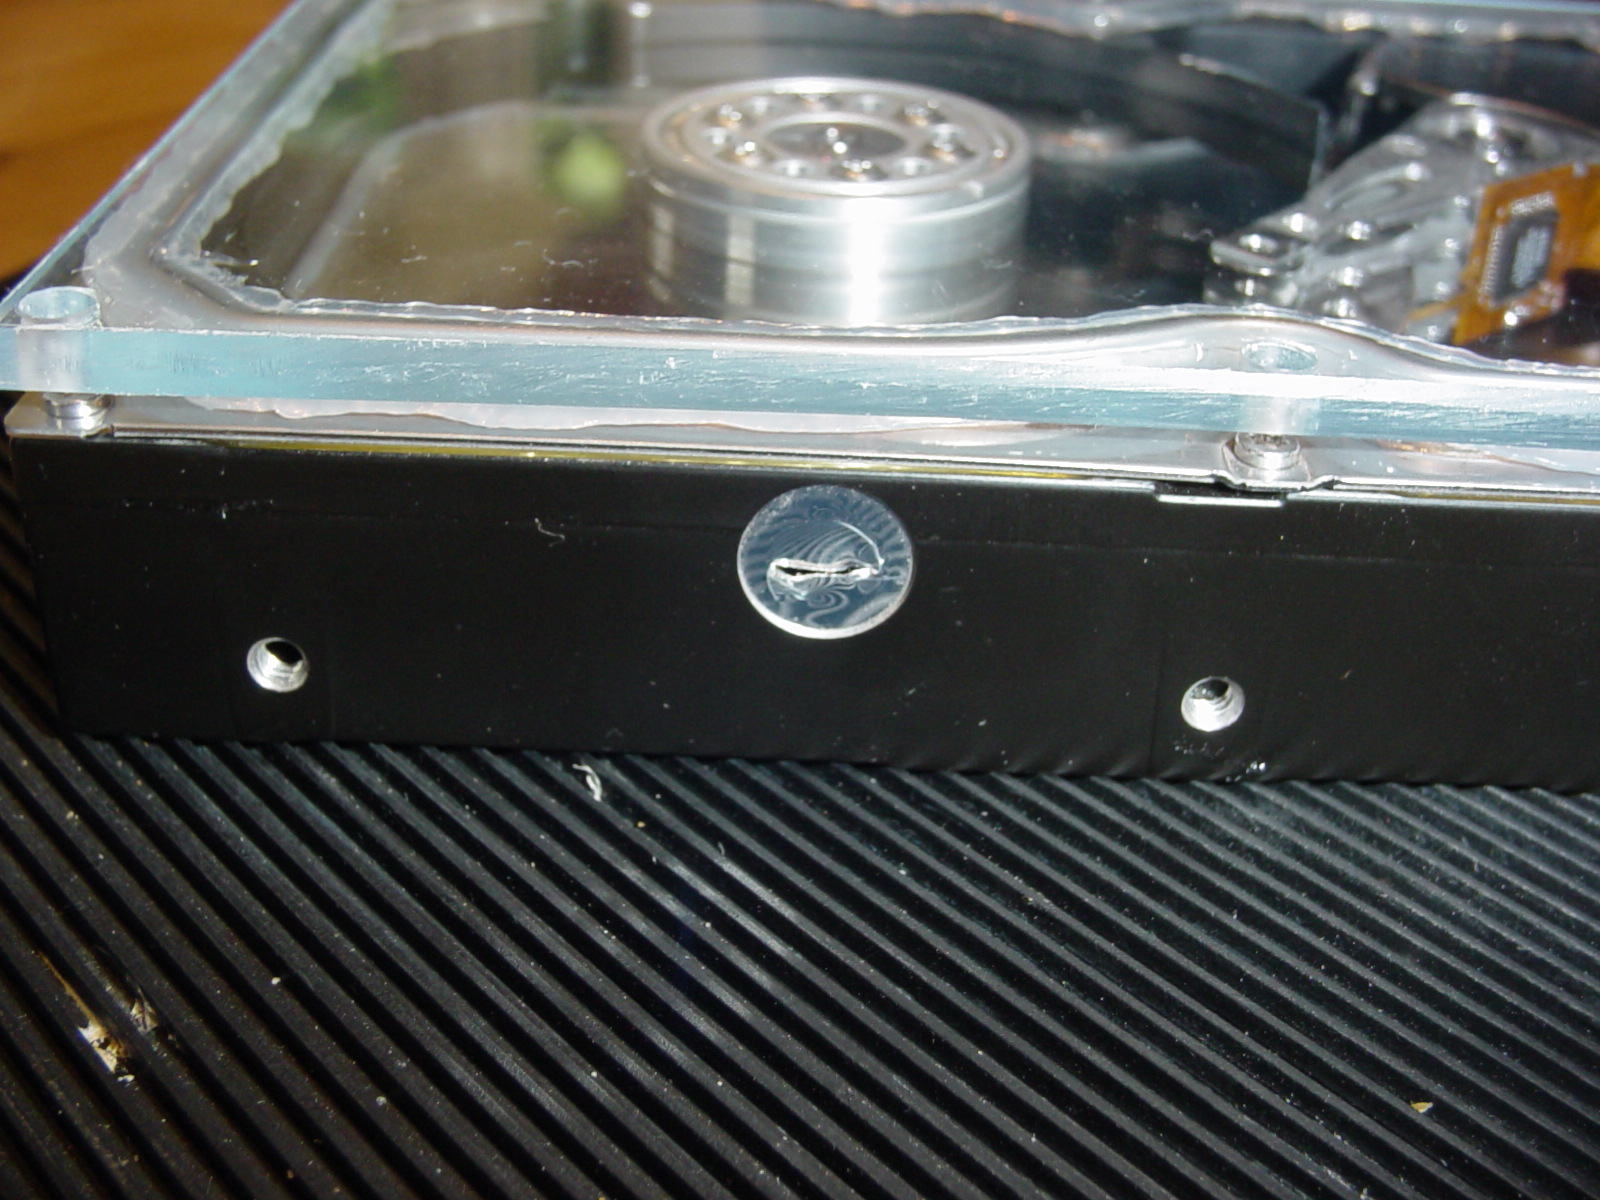
 Remove the lid and polish off the edges using your Dremel and make sure you don’t have any rough threads hanging on. You can just imagine what would happen if one of those got loose inside your finished hard drive after a couple of weeks. |
Let’s apply some serious silicone! On the following page.
Hard drive, Dremel, Plexiglas, eBay, harddrive, compressor
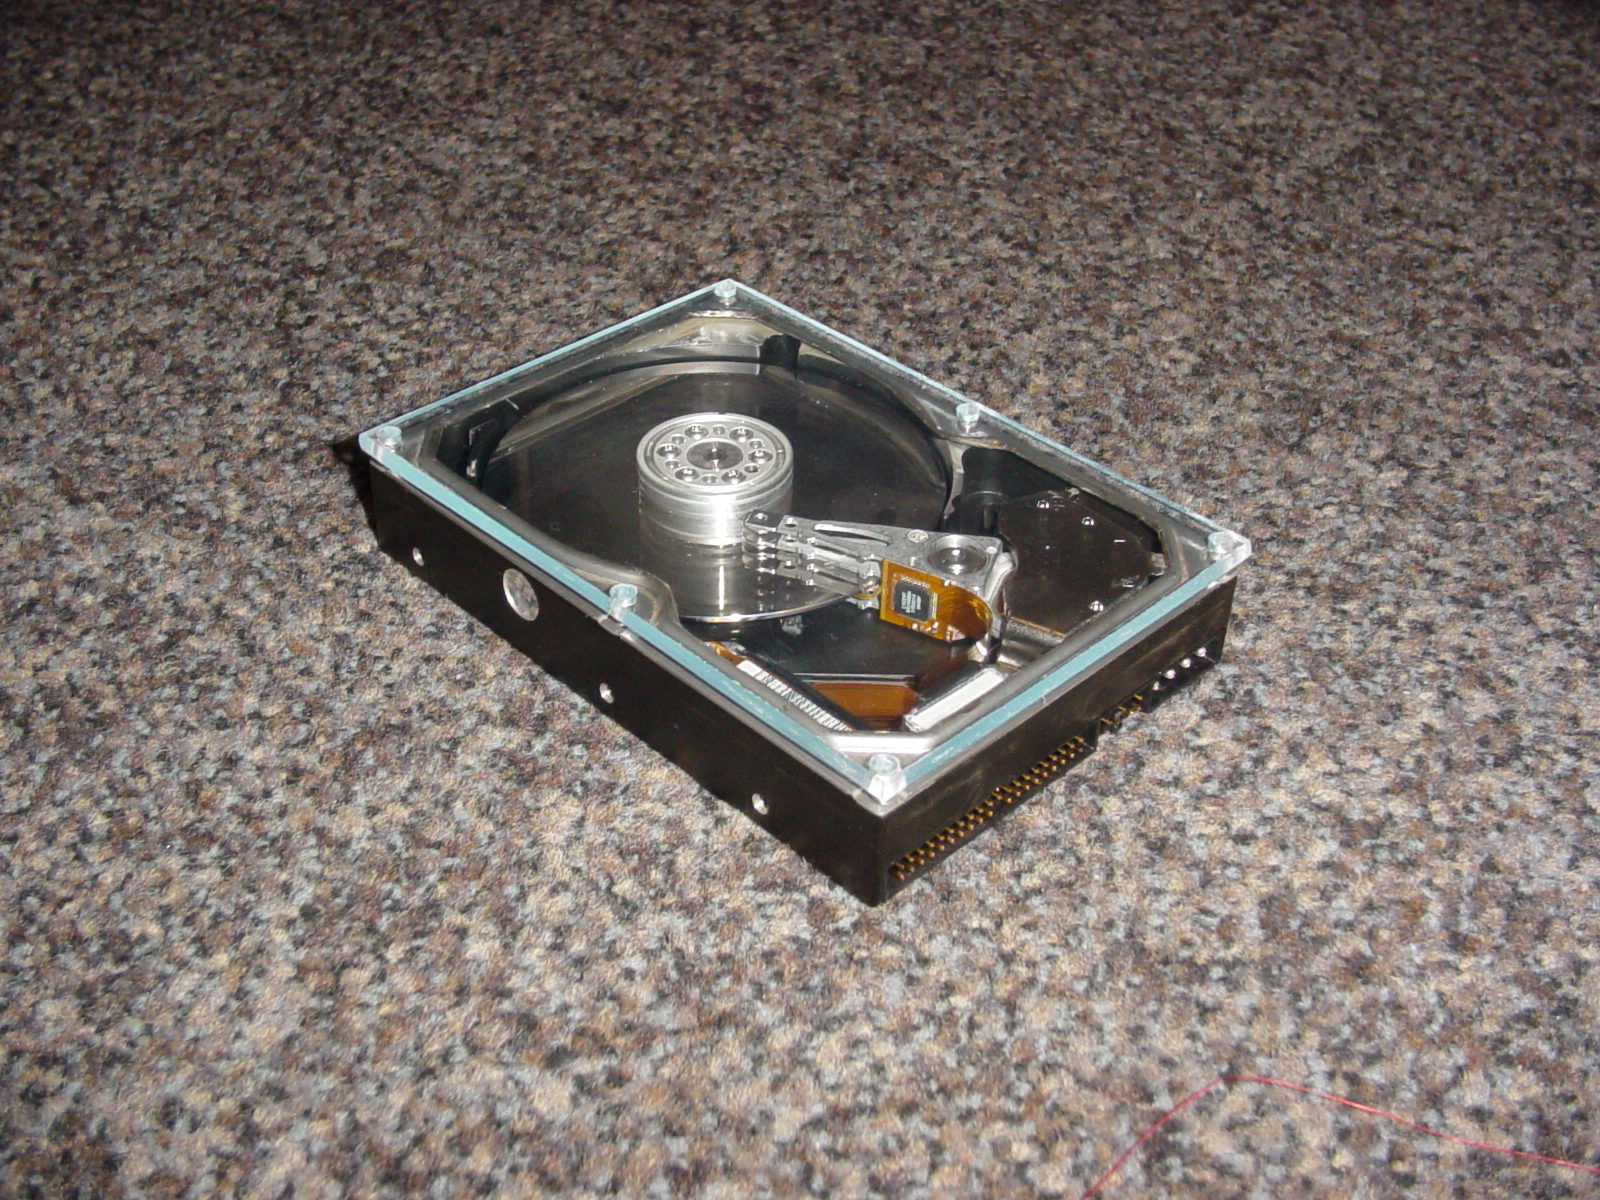 Place the Plexiglas on the frame and check that you can drop the screws into their holes. Attach the screws. Then polish off the edges on the plastic so that it looks nice and clean. Clean the drive (still using the ‘old’ one), the frame, and the Plexiglas extremely well preferably by using high pressure air. |
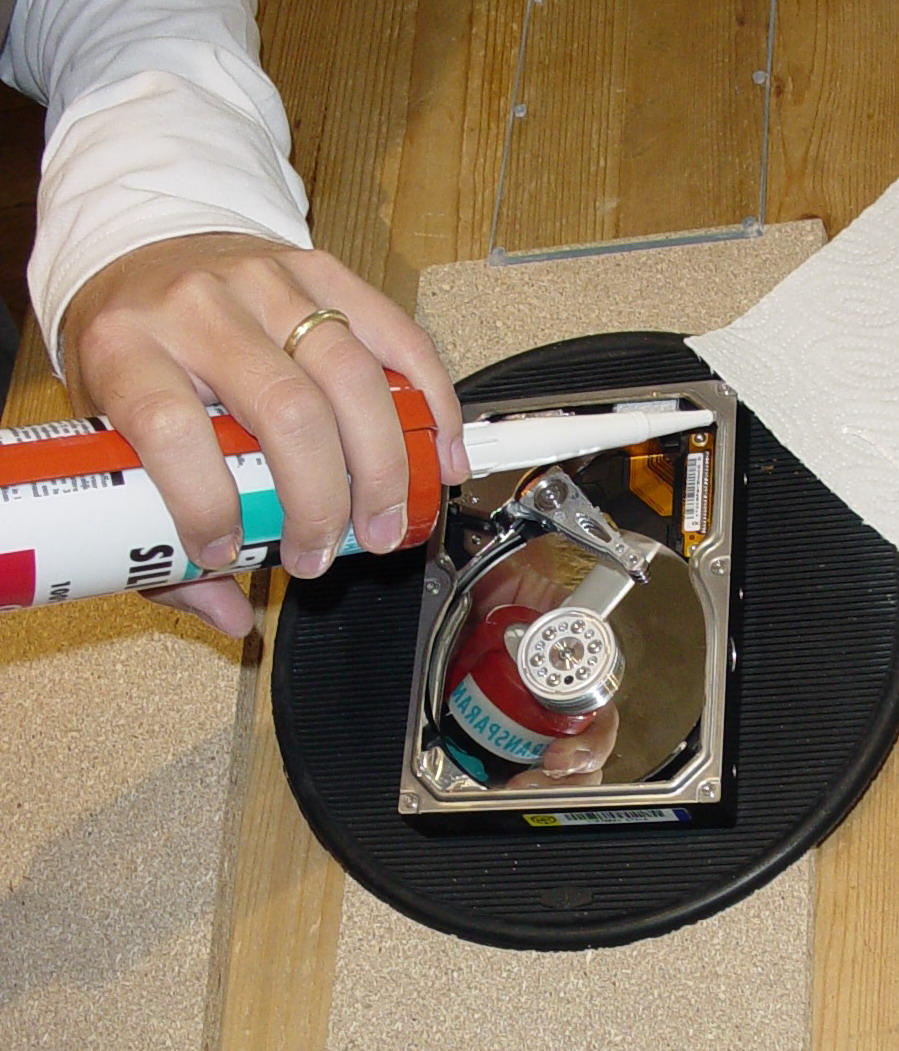 In preparation, before we do the actual gluing of the glass we need to keep one thing in mind, namely pressure. When placing the glass on top of the frame with the glue in place we will create an over pressure inside the hard drive and this will cause the glass to float. This is no good. To avoid this you will need to puncture one of the stickers covering the holes, like the one on the picture above. You can see it on the left side, a round silver coloured sticker.
Use a transparent kit, any kind should do, but I’ve used a kind of silicone that is usually used for aquariums. This kind of silicone is temperature and chemical resistant, and it will flex when the hard drive gets warm. |
 Put on a thin, 3 mm, continuous string in the middle of the edge of the frame. Then carefully place the Plexiglas in place and press it straight down not using to much force. The silicone should slide out both inside and outside the frame. On this picture you can also see the punctured sticker allowing the over pressure to escape. |
You’ve made it this far – the next page is the last!
Hard drive, Dremel, Plexiglas, eBay, harddrive, compressor
 The silicon I used needed 24 hours for it to dry 2.5mm, so I waited 36 just to be on the safe side.
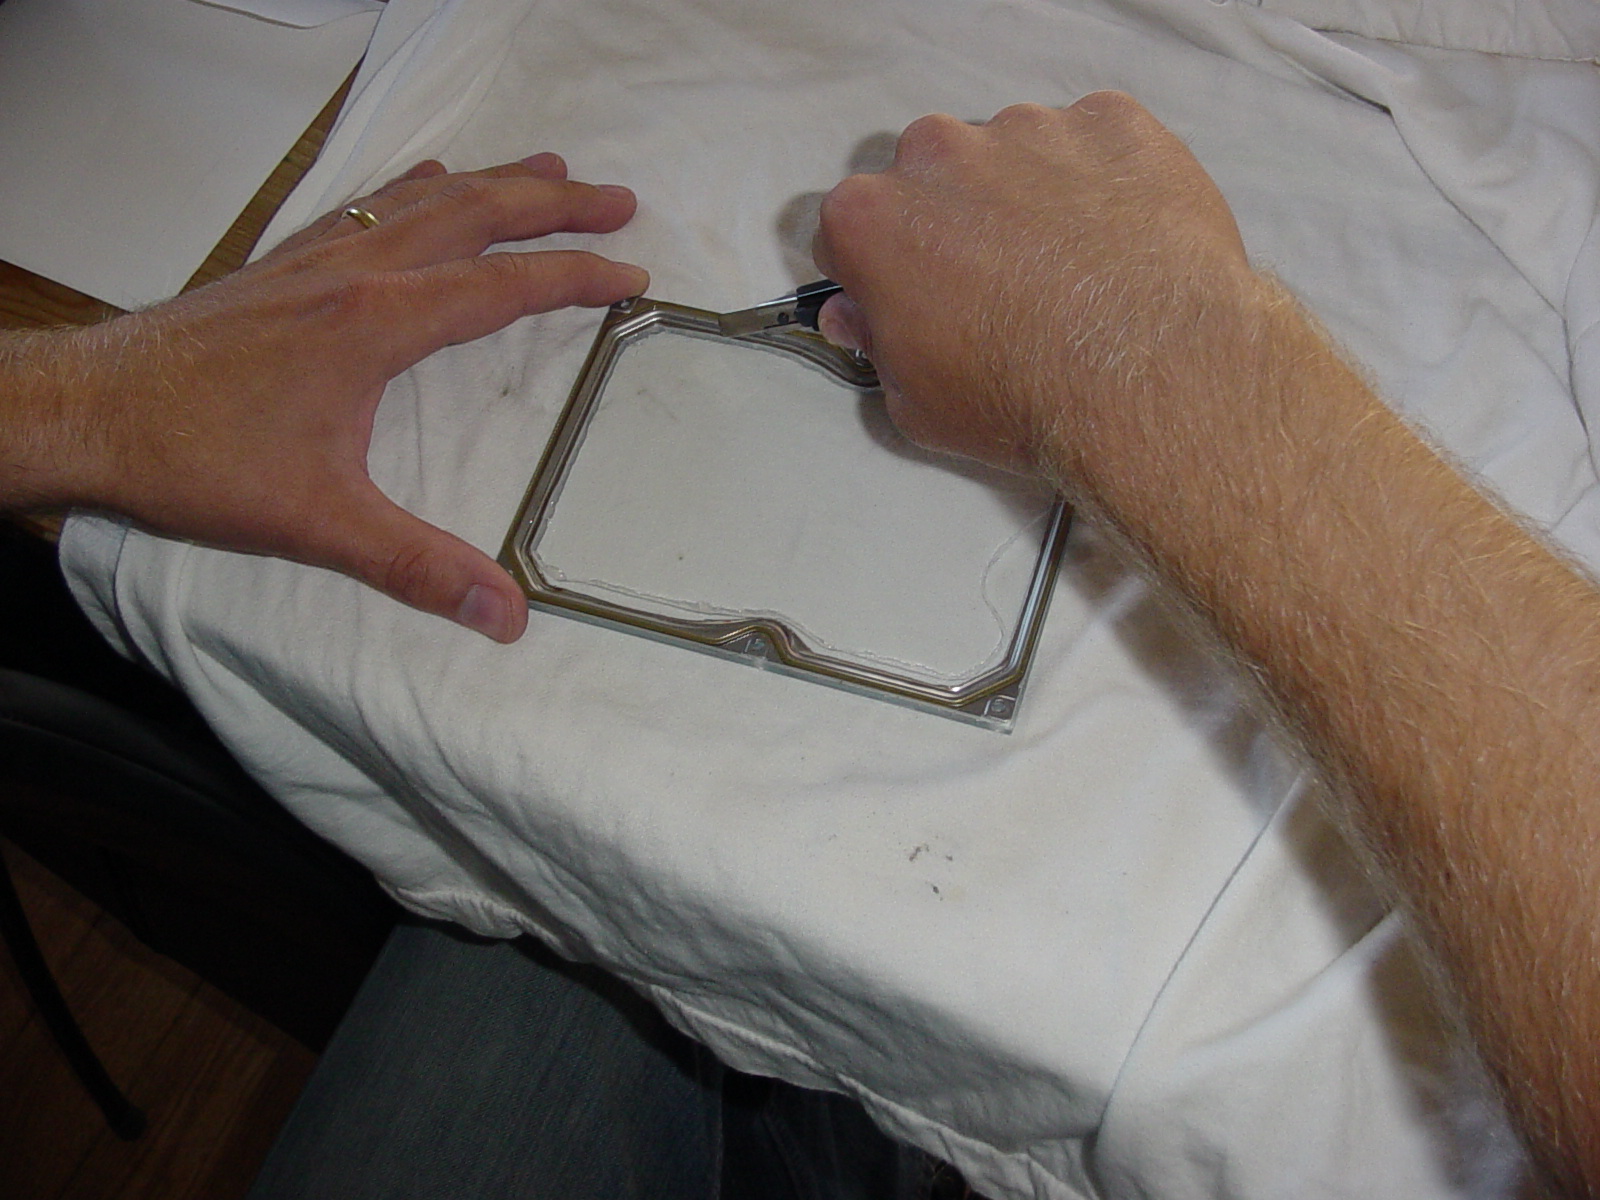
Using a sharp knife you then need to cut out the excessive silicon on the inside of the frame. Just cut in an continuous line using enough pressure to get trough the silicon, but not hard enough to scratch the plastic. Take your time as you don’t want to slip with the knife ruining your work. |
|
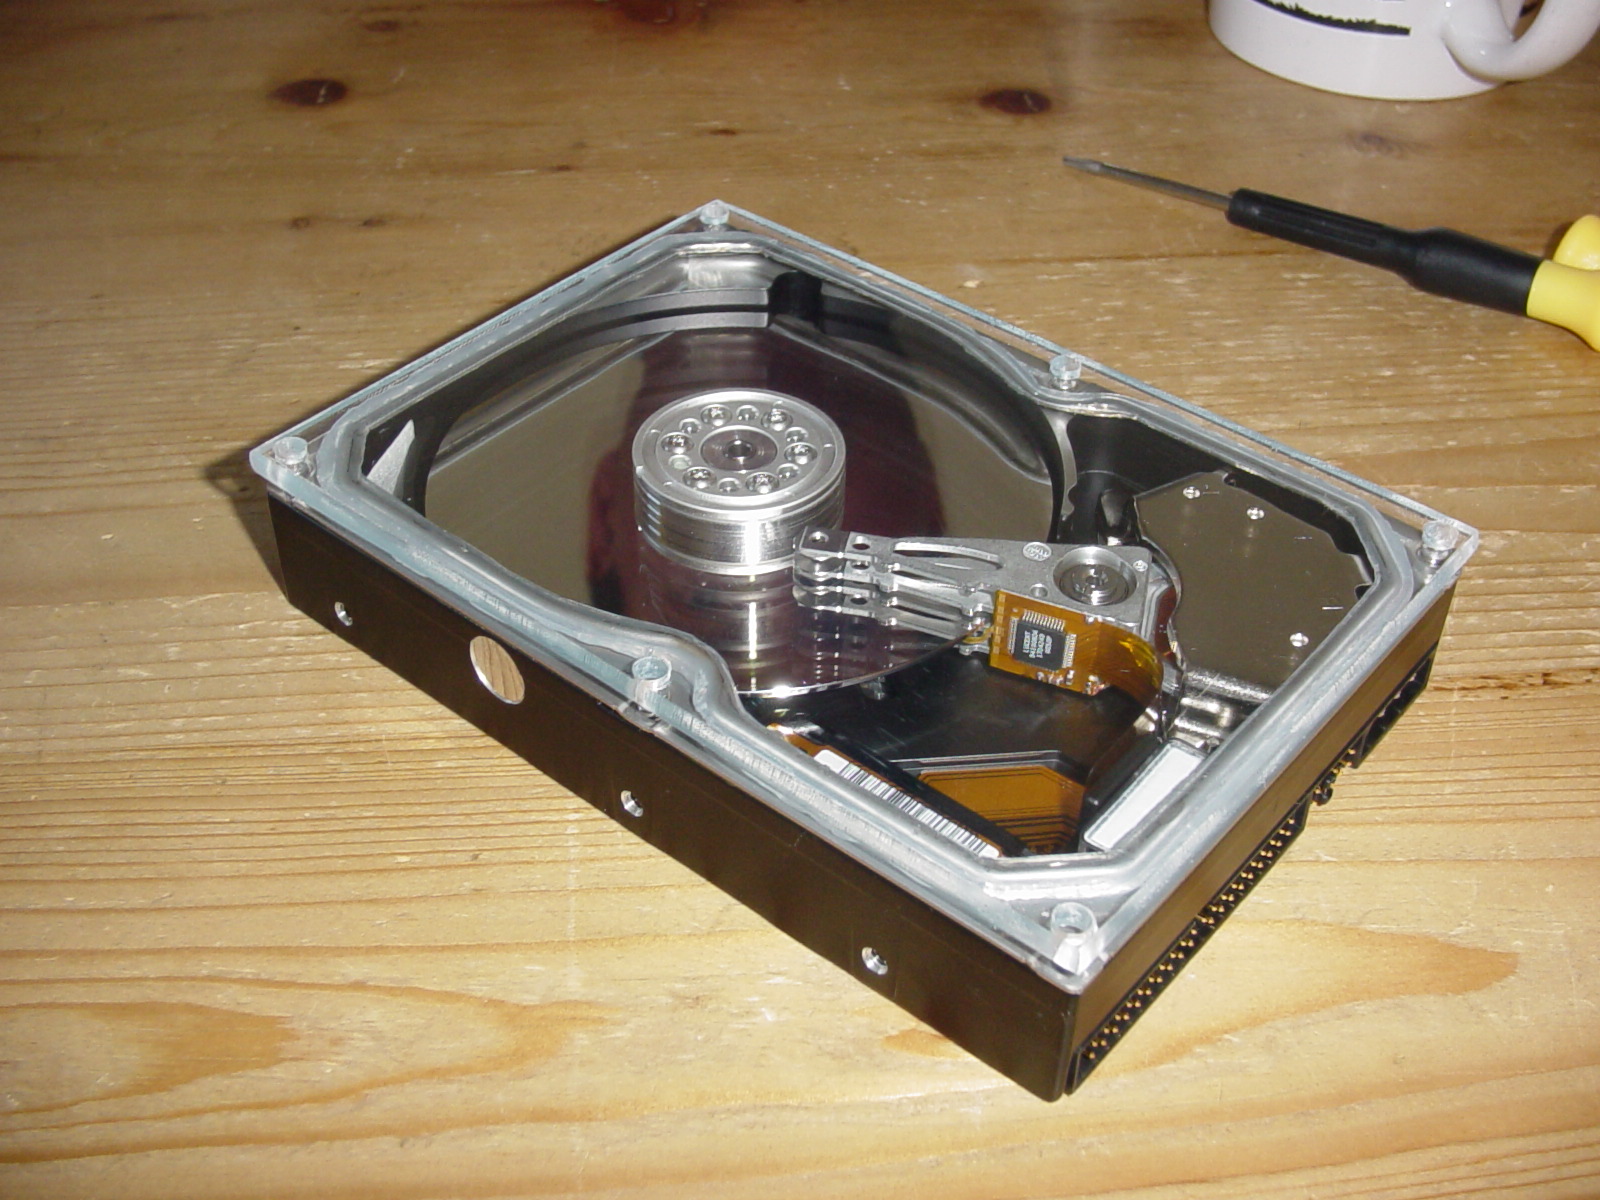
Clean the new hard drive and the your window lid thoroughly. Again, preferably use high pressure air for this. Clean any finger print smudges of the inside of the window. Loosen all top screws on the new drive and remove them, and then carefully and slowly do the swap of the lids to your new window lid. If everything went ok then you should be left with the result below. |
|
|
| After this there is actually not that much more to then to connect it to your computer and watch the magic begin! |
You must be logged in to post a comment.
Help us continue our work with a donation
 Forum {beta} Forum {beta}Hatch ideas and help others with their ideas. |


18 queries. 0.213 seconds
September 3rd, 2005 at 12:04
Make a plexiglas hard drive window
Chris writes “Well, we have seen this before – or have we? This project is not unique in terms of mounting a viewing window on top of the hard drive, but what makes this project stand out is the detail of it and the full description on how you should…
September 3rd, 2005 at 16:00
Pimp Your Hard Drive
Man, I don’t even want to think about this “mod.” I’ve lost 5 hard drives in the past month but if you feel like going nutty with your 80GB, go for it. Grynx, which is the sound your computer will…
September 3rd, 2005 at 17:02
Why?? Too much time on one’s hands. Reminds me of the plexiglass covers on dishwashers in department stores years ago. Clever, but would hold my attention for about 3 minutes. Again….Why?????
September 3rd, 2005 at 17:40
Doing this with larger capacity drives can destroy the drive. The center screw is often used to stablize the platters and even taking it out and replacing it can shift the platters enough to render it useless. It may work for a short time though.
September 3rd, 2005 at 18:51
Why? Once the drive is installed you can’t see it anyway. What a waste of time.
September 3rd, 2005 at 19:48
can we get a video of this in action?
September 4th, 2005 at 1:08
man, you need to get out more.
September 4th, 2005 at 6:22
Dont listen to the haters. this is pimp’n
September 4th, 2005 at 16:04
nice job, well done! spend your time how you want don’t listen to the rest the dont understand art or the creative process.
September 4th, 2005 at 16:15
Why do it? Why not your money your time! I like the idea not that I have the skill balls time or money but it├óŌé¼Ōäós a cool idea!
September 5th, 2005 at 17:14
Joshua: I know this is kind of russian roulette with the hard drive, but mine has been up running now for a week. Sure, a week is only a week and time will tell.
Gary: Well, you can see it if you have a see through casing. Duh!
Michael: Because you can?
September 6th, 2005 at 7:19
Well… hmmm.. This certainly has been attempted and failed several times in the old MFM/RLL days. (way before IDE) I am CPM/Punch-card reel-to-reel old…
So to give you the short, if you want this to actually work, you will need a particulate air filtration system and some sort of an oxygen tent that is air tight. A uniform that won’t allow anything on you to become airborne wouldn’t hurt either… hey, this sounds a lot like the facilities they use to manufacture hard drives! haha…
Too bad hard drives are such a shitty technology… it works so why re-invent the wheel I suppose. However we really should look into more modern methods of data storage. I-Omega had a good start with magneto-optical storage but they abandoned it because the zip series was so profitable. Jazz drives are about as advanced as the industry will care to take us… This is something that will have to be adopted at the manf. level.
September 6th, 2005 at 7:22
If it wasn’t for Heisenburg we’d not need to worry about exposing the damned thing…
September 6th, 2005 at 16:32
Cool idea :), the fist thing I thought about is:”Why there is no LEDs inside?” I think, that it would be nice to see lights inside ¤śē
September 7th, 2005 at 2:46
What is really really amazing is that no HD manufacturer so far, is selling a pimped up harddrive… at least with a transparent housing or better yet, with leds in it :p
September 7th, 2005 at 6:25
dumb stuff
September 9th, 2005 at 9:46
Nice project!
September 12th, 2005 at 13:38
I have done this and it works fine. I teach IT and have a full computer laid flat on a board so students can see the whole computer at work. This adds another dimension, yes in a normal computer useless but my way it looks great.
Thanks for the idea.
Oz
September 12th, 2005 at 14:00
├É┼Ī├æŌé¼├æŲÆ├æŌĆÜ├É┬Š!├É?├É┬Š ├æ? ├æŌĆÜ├É┬░├É┬║ ├É┬┤├É┬Ą├É┬╗├É┬░├æŌĆÜ├æ┼Æ ├É┬Į├É┬Ą ├æ?├æŌĆÜ├É┬░├É┬Į├É┬║, ├É┬┐├É┬Š├æŌĆÜ├É┬Š├É┬╝├æŲÆ ├æŌĆĪ├æŌĆÜ├É┬Š ├É┬▒├É┬Š├æ┼Į├æ?├æ┼Æ ├É┬Ė├æ?├É┬┐├É┬Š├æŌé¼├æŌĆÜ├É┬Ė├æŌĆÜ├æ┼Æ…
October 1st, 2005 at 8:22
Hmmm. It has potential for some, but not for me.
October 12th, 2005 at 7:31
Go back to the beer cooler, at least that has a use.
No matter how stupid it is.
If you need to pimp a computer YOU NEED A GIRLFRIEND! (or a whore.)
October 25th, 2005 at 8:02
Nice mod! i am thinking of doing it, but not yet.
To answer some of you guys above, Most PCs i have
seen with this mod incorporate a customisedm bracket
that holds the HDD on its side, so u can see it through
your window kit
October 26th, 2005 at 2:48
would look real nice in a nice custom case.
October 30th, 2005 at 7:52
Top plate of the harddrive have the most important funnction like getting air from out side so the heads can glide over the platters. etc.. The tinny holes on the top plate probably said “Do Not Cover” also.
October 30th, 2005 at 10:08
zaw: But there you’re wrong! Look at the picture at the first page, and look in the lower left corner and you’ll see a white rectangular thing. That’s the air filter which has it’s outlet between the drive and the controller board.
December 8th, 2005 at 18:35
Nice job. Is this drive still running (3+ months later)?
December 9th, 2005 at 2:19
Ed Tapanes: Yes, it actually works just fine. I know a lot of people were sceptical when I first did this and what I said back then was ‘Only time will tell’ and I guess it has done just that in the end.
Doing this operation and switching the lid is very much a question of a clean room and a bit of luck.
January 22nd, 2006 at 4:22
Too bad western digital just realised an official clear cover hard drive. Makes this project a moot point.
February 1st, 2006 at 1:36
Well, as we know, this is pimp and glamorous, but do we really need this? i mean , the HD is always with the plexyglass windows to the top and it will be another HD in there. so, will you be using a computer or just looking how the HD make faster. what we want to see? when the HD explode? or when it start to make sounds like an airplane hahahah, that was when i was eighteen years old, now im 18. but sounds cool, like a window with a led inside, but will we just put another plexywindow in the PC case to see the innerwindow of the hard drive? and what’s next? hey friend, look inside my computer, i have two windows in there, it isn’t awesome? yeah dumbass. is ridiculous but is amazing. now what’s next?
Nice project man. congratulations. i’m in the two IDE 2 hundret Gigabytes HD’s and a 80 GB operating systems. sorry, i can’t do it even if i want
March 31st, 2006 at 3:41
If you like video of this plexi stuff working, head to http://www.dragonsteelmods.com/wst_page7.html and look for two video links below. There is also a see through CD/DVD drive mod available at that site so if you sorta liked see thru HD, why not see thru CD? Too bad about the CD drive because about the LASER HITTING YOUR EYES :)!
July 17th, 2006 at 7:04
I second that, don’t listen to them. They don’t get that the fun isn’t in the done it’s in the doing. Awsome, but all that dust in the drive makes me want to cry.
November 3rd, 2006 at 17:59
this is excellent. I need to do this for an art project. thanks for sharing it.
November 6th, 2006 at 18:37
I have done this with a 10gb hard drive that i pulled out of a old junk PC and i decided to do it i put 4 LED’s and it looks nice but the only problem is i got a piece of plastic dust on the platter when i screwed it in and it has a error on a sector.
November 15th, 2006 at 13:03
All these people just trying to find something wrong, so childish. We all now you are just jealous because you don’t have the guts or ingenuity to do something like this.
I think it is awesome!!
I have a completely clear acrylic computer case and this would look sweet and be easily visible from the front of my pc. Ignore the haters, awesome job!!
January 26th, 2007 at 7:05
REALLY COOL
(i want to built in leds as well but were can I connect them
And why to do it?
because you can’t spend the whole day with your girfriend or school and you can show it to your friends and say look what I’ve made and then they will response ooooh cool how did you do that
(my english is probably quite bad that’s because I’m from Holland)
July 27th, 2007 at 18:22
Don’t listen to the haters,man!It’s actually quite a decent idea.Okay,I agree it’s not something to be taken lightly.There are a myriad number of ways it would wreck your HDD.But so what?If you have the skills and equipment necessary to do this,then go for it!Hell,you should patent the idea.As far as I know,nobody has done this before.Apple would probably go crazy for an idea like this.A home made transparent HDD with all the possible problems?No.A properly manufactured one?YES.Awesome idea.Keep up the good work.
August 8th, 2007 at 13:39
Western Digital sells a drive with a window now ,but its no where near as cool as yours. I’m going to try this my self soon. Any one trying should keep in mind any dust or dirt or what ever that gets in the drive once you pull the cover of will likely destroy the drive. Also the new cover needs to have a vent hole which you would cover with tape. the hole is to allow for changes in atmospheric pressure.
One more thing
Whats with all the negative comments? I mean I might not want to try this with a brand new drive,But any one trying probably has couple of dozen old drives lying around. I’m guessing the negative stuff is coming from people who bought their computers from a chain like Best buy or Dell. If you built a computer your self (maybe the case too) you might see how a mod like this could look great.
November 22nd, 2007 at 18:21
A must 4 a see-thru case!!!!! Why so negative just sitting there it looks like a million. Keep up the good work.
October 1st, 2008 at 11:33
Awesome. I probably would not buy that new drive with the Plexiglas cover, but doing it myself would be cool. I have 6 drives from 2-10 GB doing nothing. And to all against this, what’s the big deal. Like some of the others said, the fun is trying to successfully mod a drive.
March 10th, 2009 at 23:26
10 sheets of colored plexiglass 4 inchesx 6 inches, $8.69:
http://www.eplastics.com/Plastic/Samples/SAMPLE-ACRYSIGNCOLORS
or, lots of other colors: http://www.eplastics.com/Plastic/Colored_Plexiglass_Acrylic_Sheet_Transparent
April 24th, 2009 at 1:54
Hey this is great. I just finished doing it to my 1 terabyte hard drive. Ya kinda gusty. Well all went well until I was putting it back to gether and the head of one of the tiny screws broke off. To make matters worse it was the screw that holds the arm that goes over the platters on. Now the arm wont work correctly. Any idea how to get this screw out? Just look at a pick of a Western Digital WD10EACS and you can see what I mean. I can post pics of that would help. Please let me know if any of you guys have any ideas. I’m really not happy right now.
May 26th, 2009 at 6:41
I wanna do the same, but in stead of the frame on wich you siliconated the plexi, i’ll use another layer of plexi. Can you e-mail me and tell me the enviroment you;ve swiched the tops?
August 2nd, 2009 at 10:19
Ye goodness, that is seriously good! That would be extremely useful for demonstrating to students etc. the operation of the drive. Bet it looks good when spinning.
August 20th, 2009 at 5:54
you could do both method 1 and method 2 at the same time. like take the lid off hdd#1 put the plexi glass on it do the swap with hdd#2 take hdd#2’s lid and put plexi glass on it and put it on hdd#1. then run them in raid 1 so theres twice the chance of your data surviving (not that id trust data to survive on one of those)
I want to make one of those so bad and ive got 3 spare hdds at my feet right now plus one in my silverware drawer i just don’t know if any of them work