
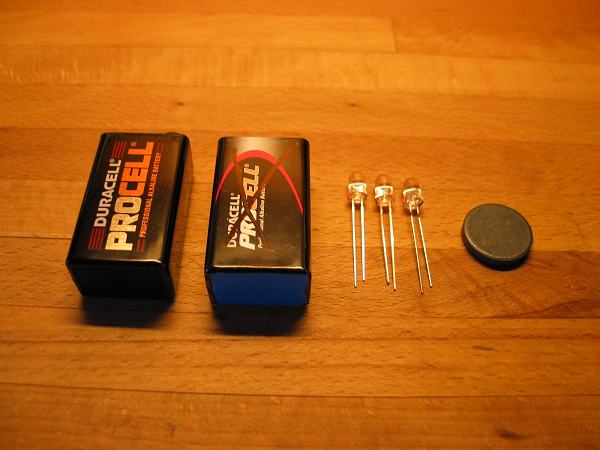
 It’s the same thing every time, no lamp in place when you need one – so why not build a lot of these – always in place ! You need: * 1 fresh 9 Volt battery Start with localising the anode (+) and cathode (-) of the LED. Mark them up as I did (with a felt-pen), red for anode (the longer leg) and black for cathode (shorter leg and phased edge on the bottom of the plastic of the LED). I will in the following text write red and black. |
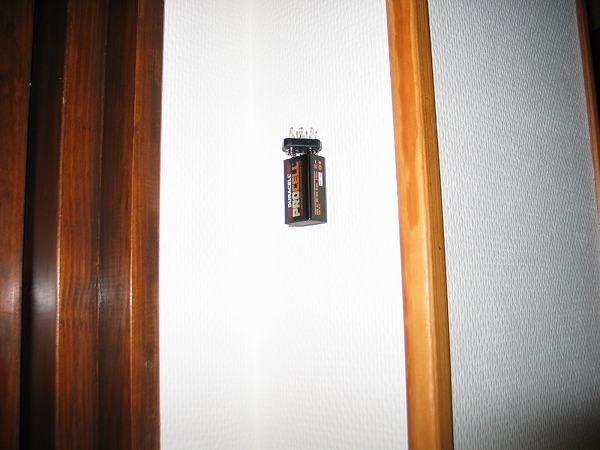
 Then you need to open the old battery, as we will use the plastic part with contacts on the top. Don├óŌé¼Ōäót forget to throw the rest in recycling for batteries. |
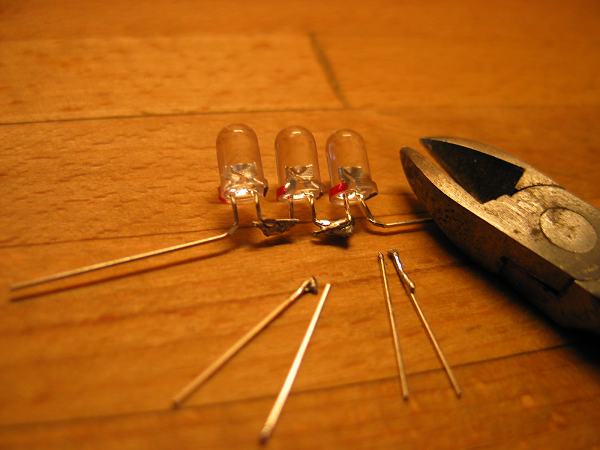 Now to the LED’s. Carefully bend the legs towards each other, hold between the plastic and bending point with a prier as you see in the picture. Solder the legs together, with red to black in all three LED├óŌé¼Ōäós, put them as tight as you can and solder quickly, |
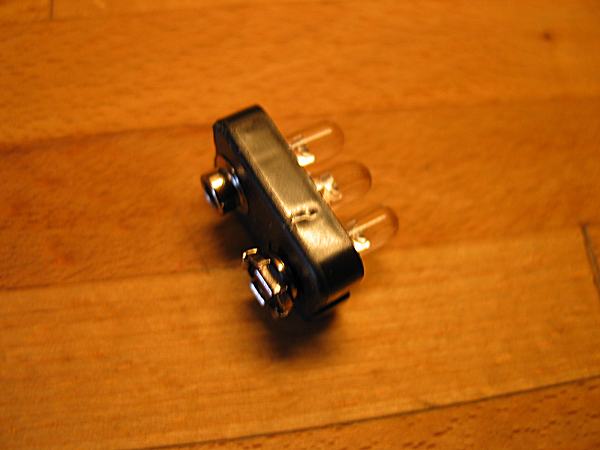 Place the LED-packet in the plastic top, trim and adjust the black and red legs so they fit to the back of the contacts. The red connects to the contact which have openings, and the black to the round contact (opposite to the fresh battery) and solder carefully and quickly (the LED├óŌé¼Ōäós don’t like the heat and the plastic can melt). Adjust the LED├óŌé¼Ōäós so they point forward nicely, and check once more that no short circuits have appeared. |
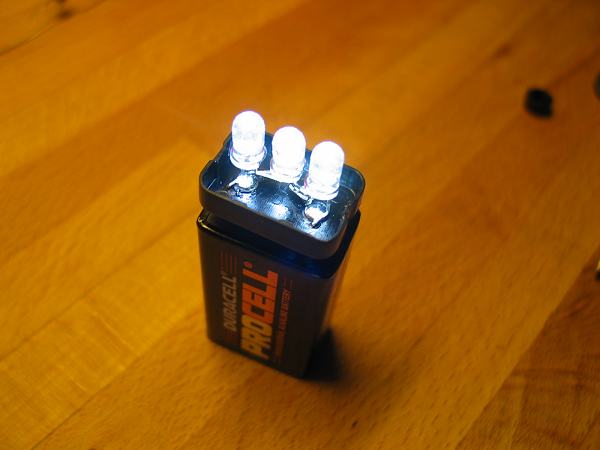
 Put just one contact together with the battery, and swing the LED-box over the other contact – and see – the three LED├óŌé¼Ōäós light up! Just swing back – and you have an integrated switch. |
 The LED├óŌé¼Ōäós in this application will not light up fully, they need almost 4 Volt to do that and here they get only 3 Volt – but I think it’s enough, three LED├óŌé¼Ōäós give a lot of light. If you are brave (and rich) why not test with only two LED├óŌé¼Ōäós, they will not have a long life – but one hell of a light. |
 What about the magnet? Yes, glue it up on the wall, and your lamp will stick on it – and you always know where the lamp is. But don’t do as I did – I put my lamp on the magnet before the glue was dry and so I had to pick it all up from the floor (but nothing broke – the construction is now tested in both function and strength). Greetings from P.O. in Sweden – comments welcome for the project, but not to my spelling and grammar ¤śē |
You must be logged in to post a comment.
Help us continue our work with a donation
 Forum {beta} Forum {beta}Hatch ideas and help others with their ideas. |


18 queries. 0.086 seconds
April 18th, 2006 at 13:45
Great idea. I had never thought to use the battery connector from an old battery. You can feel good about recycling too
April 18th, 2006 at 15:01
Great DIY! Far cheaper than buying a flashlight and batteries. Simple and functional. I might try it myself. We don’t have those same 9V batteries here in Canada, but I should be able to find a sutable 9V battery connector at the electonics store.
April 18th, 2006 at 19:12
You show a total ignorance of basic electronics.
LEDs are not resistive devices like lightbulbs, they are semi-conductors. That 3.5V rating or whatever is not a measure of what you need to apply to light the LED, it’s a forward bias voltage drop.
There is a very narrow voltage range where the LED switches from opened to closed circuit (in a theoratically ideal LED, this would be 0, in the real world there’s a small range).
At best your circuit will have highly variable brightness, as the battery weakens a little, the LEDs will dim a lot and you’ll seem to have a dead battery when it’s mostly good. At worst, you’re destorying the LEDs.
April 18th, 2006 at 19:30
I think it is a great DIY. It isn’t an engeneering feat or anything of the like and has an obvious fault, but for the application it is a perfect solution. If I improved anything I would snip off one of the “tabs” of the connection with the “holes” (very technical) so that the connectors can slide smoothly over each other for a quick beam of light. Great job!
April 19th, 2006 at 6:32
electronics 101, instead of having a go the project why don’t you suggest a way of improving it. It would be more constructive and you’d look like less of a d**k.
April 19th, 2006 at 7:44
Great project. If you connect the leds in parallel with a 150ohm resistor you get great light, longer led life, and extended battery life(3 days of constant on time). You an also cut part of the metal top off of the disgarded battery to use as a case for more complex projects that will work in the same manner. Sand the paint off for a cool metal look.
April 19th, 2006 at 9:20
Maybe you could fill the base of the LED holder with epoxy. That way there won’t be any shorts later on and it’ll be really sturdy. It appears to be a nice cup shape already.
The parallel LED suggestion seems like a good modification too.
April 19th, 2006 at 15:32
simple and useful…congradulations
April 20th, 2006 at 17:44
what is the website where I can buy the 3 LEDs?
April 20th, 2006 at 20:09
Check out Sciplus.com and search through the electronics area. They’ve got led’s, peltier heat
pumps, project boxes, etc. Nice prices, too.
April 21st, 2006 at 8:52
Is this├óŌĆĀŌĆÖ http://www.sciplus.com/singleItem.cfm?terms=11319&cartLogFrom=Search%20%2D%20Category%20Filter
what I am supposed to be buying? Are these the correct ones to buy? Have other people bought these and worked?
April 21st, 2006 at 15:57
Ethan, those look like they’ll work, but the price is obscene. You can usually get a 50 pack for under $10 shipped. Try ebay, I’ve ordered from the Chi-Wing Led shop there several times.
April 21st, 2006 at 22:48
You’re right, E101, Chi-Wing does have better prices on their LED’s, and 2x-3x the light output. But you can’t beat Sciplus for variety of merchandise and witty item descriptions.
April 22nd, 2006 at 9:22
Another nice places to buy leds from:
http://www.besthongkong.com/ (China – high S/H)
http://stores.ebay.nl/LEDSEE-electronics (China – always ├óŌĆÜ┬¼ 3 S/H)
http://upplyst.se/ (Sweden – always 10 SEK S/H)
April 22nd, 2006 at 12:01
Thank you, but Chi- Wing does not carry this one. Can somebody give me an exact URL of where this item is located?
April 22nd, 2006 at 13:29
Check #14 – more links !
April 22nd, 2006 at 14:46
├óŌĆĀŌĆś├óŌĆĀŌĆś├óŌĆĀŌĆś And this means what?
April 23rd, 2006 at 4:01
Ethan, it means you are far to stupid to be allowed to play with batteries or solder – did you eat a lot of both when you were younger?
April 24th, 2006 at 1:57
Ethan (#15), if you are looking for cheap shipping we have low shipping rates and high quality LEDs. $3.00 shipping anywhere in North America (a bit more for the rest of the planet) for 100 or less LEDs.
http://alan-parekh.vstore.ca/product_info.php/cPath/4_6/products_id/14
We welcome small orders
April 24th, 2006 at 13:43
Actually, putting the 3 LEDs in series across a 9V battery should work OK, sorta. An LED is a current-driven semi-
conductor device, meaning that light output is proportional to current, not voltage. The 3.5V or so mentioned in
connection with a white LED is its forward voltage, at which current starts to flow. Above that, the LED looks like a
short circuit (in theory), so putting 9V across a single 3.5V LED will result (again, theoretically) in 3.5V across the
LED and 5.5V across the remaining wire. Since theoretical wire has zero resistance, infinite current will flow.
The saving grace here is noting has theoretically zero resistance. The LED has some internal resistance, as does the 9V
battery. Also, the 3.5V is a “soft” number (hence, the “or so” earlier”), and some light will be emitted at a lower voltage.
And a fresh 9V battery will typically measure out at more than 9V. So, between the squishy voltages for the LEDs and
battery, and the internal resistances in everything, the LEDs and 9V battery will come to some mutual agreement as to
how much current to flow. For typical 5mm LEDs and a standard 9V battery, things should be OK. 9V worth of D cells would
be a different story: less internal resistance, more current through the LEDs, a brief, glorious lifetime before eternal
darkness. BTW, the resistor should be connected in SERIES, not parallel! to limit current where supply voltage is higher than
total forward V of the LEDs, and this is the preferred way to insure running the LEDs within their rated current. Consult
Ohm’s Law for further details on this.
April 26th, 2006 at 4:28
@dpocius:
Can you make a circuit sketch for the common people?…
April 26th, 2006 at 6:43
LOL for one anyone gets stuck in a room with poor lighting
April 26th, 2006 at 15:00
No ! David (#21) If you need a circuit sketch ? Why don’t do it yourself, read the text (my description – carefully) then take a pen (is it sharp? – or else sharpen it) and a piece of paper (this explanation must be very exact :-)).Try to follow my description of what is (+) or (-) and battery polarity, then draw exactly what I am telling. Think the next problem is to execute the drawing in ‘real life’ – Same problem when my daughter whant me to dress her Barbie-doll …
April 28th, 2006 at 18:29
Any recommendations on where to obtain and how to insert a simple on/off switch to this project? Thanks.
April 29th, 2006 at 8:11
There is a switch ! “Put just one contact together with the battery, and swing the LED-box over the other contact” Thats a ‘swing’ switch
May 4th, 2006 at 3:31
I use a similar configuration, only 2 LEDs in series wit a 100 ohm resistor (1/4 watt) and a 1N4148 diode. With a fresh 9V battery you have 20 milliamps that is the desired maximum current for the usual LEDs.
I try to make a drawing
+ ——|>—|>—-|====|—-|>—— –
led led 100 ohm 1N4148
And, vhen you dismount the dumped battery, pick too the plastic bottom, make two 5 mm holes with your solder iron and put this piece like a cover over your lamp with the upper part of the leds protruding out of the holes. Carefully you can fix well the leds and close all with epoxy or, in my case i had used hot glue (aiii it is hot!!!). If you desire is possible to fix on a side of the cover a little loop realised with iron wire, so you can connect your lamp to a lanyard (to me happens to drop the head of the lamp in the darkness, so better to have a lanyard). For the switch i use the #25 method, swing switch BUT fix well everything with the glue or the torsion can break the internal leads of your circuit.
Sorry for my english but is not my mother language.
Ciao.
Alberto from Brescia (ITALY)
May 4th, 2006 at 6:36
Not a beautiful drawing. I try again
+ ———–|>|———–|>|————|=========|————>|——– –
Battery+…..LED………..LED…………..100 ohm……..1N4148 diode…. Battery –
the diode 1N4148 is required to protect the leds from an eventual reverse tension, 98% of the times is not necessary …. but Murphy…..
May 8th, 2006 at 13:05
As Alberto posted it would be easier with 2LED’s glowing and a resistor in place.
But you won’t need the Diode because LED’s are Light Emitting Diodes, so when you reverse the voltage they just won’t emit any light…
I’mdefinatly building this next week
great idea !
Greetz,
Wim
May 9th, 2006 at 12:40
My intention was to use all battery energy to light (no burning of energy in a resistor)- But perhaps you can use that burning energy in the resistor as a ‘handwarmer’.
May 20th, 2006 at 9:32
Any idea how long the light output is usable?
What about usable light versus a commercial light, or versus the modification of using the resistor with two led’s?
Thanks.
May 22nd, 2006 at 6:23
This is great, I will make this instead of the Tic tac light. This is easier to make for me
May 27th, 2006 at 17:42
Nifty project…but what’s up with the quick-tempers?! Does playing with 9v batteries give you some sort of rage issues? Be nice, people.
June 13th, 2006 at 1:08
To be Truthful.. if you have a bunch of spare LEDs kickin around.. why not? it beats running out, spending an insane
amount of money on a long-overdue concept like High-Powered (50,000-100,000 candela) LED based flashlights, when quite
often you only need to use it for a short period of time (say for instance.. *omitting the magnet of course*.. lighting
up your computer case if it’s under a desk/workstation, hey with a little modifications, you could actually make a
‘pivot point’ allowing you to shine the light where ever you need to. It’s cheap, it’s easy, it’s a great idea for
quick and you probably have most, if not all of the parts at home (ok.. maybe you need to get the actual LEDs from a
store.. unless you want to ‘butcher something that is broken, but has 2, 3 or even 4 hi-output white LEDS in it.
: I agree.. it’s a great project.. although, I would use 3 AAs and wire the LEDs in parallel instead of a 9V
and putting them in series. that’s just me though. (plus, 3 AAs (even rechargables) will last far longer than a 9V.
as for ‘playing with 9V cells causing quick tempers, only if you stick the ends on your tongue for a long period of
time.. hehehehehe.
: I can read an electronic textbook too.. hah hah.. 4 years of Electronics in High School, and over 20 years
of ‘work’ relating to everything from Automotive electronics to computer network security, Low Lux/IR-LED enhanced
security camera systems, designing, building, configuring and optimizing computer systems ranging from ‘high capacity
file servers to simple Dumbterms to Multimedia editing systems to ‘high-end gaming systems.. and everything in
between.. all based on the customers ‘wants, needs and budgets’.. I have found that ‘slagging’ an idea that someone
has come up with, is infantile and tactless. do us a favor.. Please use your knowledge and not your attitude.
Now that I have been ‘sufficiently’ tempted by the idea of the project in general, I am gonna go and add 2 Hi-Output
Blue and UV LEDs to the headlight area of my RX-7 RZ body on my Team Associated RC-10L (running off of 3 AAAs and all
in parallel).. and if the 3AAAs don’t hack it.. I will go with 3 rechargable AAs.. Hmm.. maybe even Bright reds
for the tail lights too..
Thanx for the motivation Chris!
August 29th, 2006 at 10:10
Hi all,
The August, 2006 issue of Popular Science magazine has an article in it’s
“Cheap Tricks” section (p 83)that’s basically the same thing as this,
only with more detail about the resistors, and nice pictures of
‘exactly’ how to make it. (That’s great for an absolute novice like me.)
They call it an “LED Candle.”
Chris J, your idea of using the top of an old 9v battery is very clever.
Better,IMO, than using a 9v battery clip, with its’ attending wires.
I just made 8 of them and I had to tape it all together; though they
are still pretty cool. I got all the parts from various vendors on eBay.
The epoxy idea is great, too.
I think the PopSci article may have the polarities reversed, though,
but I am too much of a novice to say for sure.
Marvin
August 30th, 2006 at 12:06
I just built the PopSci LED candle today (mentioned above by Marvin, #34) and found this article while looking for modifications. Love the old battery top idea. The PopSci method requires no soldering, which is nice.
Ethan, I got everything but the batteries at alan parekh’s online store, mentioned above by, ahem, alan. It was the store mentioned in the PopSci article. I actually paid $8.65 in shipping for 40 LED’s, but I also got 20 each of battery snaps, 220 ohm resistors, 100 ohm resistors, and wire connectors. (P.S. Thanks, Alan!)
I’m not sure why the project on this page requires no resistors to protect the LED’s from burning out, even after reading the comments here…
August 30th, 2006 at 12:21
Oh, and Marvin, I’m also a novice but Popular Science clearly did get the polarities wrong, as you said: they made the red lead of the battery snap (battery clip) negative, but I knew from Alan’s website that RED is positive. I also had to google to learn that the LONGER LED lead is usually the positive one.
August 30th, 2006 at 12:34
Sorry for the multiple post: this picture should help my fellow novices.
http://en.wikipedia.org/wiki/Image:Led.PNG
August 30th, 2006 at 14:29
Thanks for the feedback, Dave. I thought the polarities were backwards.
Maybe someday Popular Science Magazine will put the plans for the LED candle on the web,
but they haven’t as of yesterday. Now I have “candles” for hurricane season, and apparently,
with the right resistors, these LED candles will last virtually a lifetime.
The wiki article was helpful also, Dave. Thanks.
Marvin
August 31st, 2006 at 5:04
great Idea, It’s all about having a go! and at least you are. Some people commenting truely need to get some manners or mix with people. Thanks for the effort and the idea.. I agree
with the variation, re- LED’s in parallel with the 150 ohm resistor.. cheers
November 26th, 2006 at 8:20
This was awsome! All kinds of great ideas and knowledge. I found a great place to get all your led’s and resistors for a really good price try digikey.com, you buy in bulk but way cheaper than ebay;) thanks everyone.
November 29th, 2006 at 12:37
One more thing, dont forget to recycle old batteries and electronics, they are extremly toxic on the enviornment. Just one cell phone battery can pollute 168,000 gallons of water! Just one! Thanks Ray Jr
January 27th, 2007 at 0:22
hey please explain, how did you put the LED in the plastic socket?
please email me at superinggofan@yahoo.com.ph please!
March 8th, 2007 at 11:44
do you have an engeineering sketch of components and assembly of the flash light
June 4th, 2007 at 9:54
i am interested in taking this project one step further, but am an EE newb. can anyone help with design for maybe a rechargeable batt with solar cell and say a photocell to have this light up at night? its a big addition to the project, but seems like an interesting idea. TYIA
February 23rd, 2008 at 0:58
how stick the led to the plat ( battery clip ) ??? – romania
July 4th, 2008 at 10:20
I’ve been crazy about this for awhile and had to take it one step further. Kimmer, start with an old solar yard light that quit working. Take it apart and clean the contacts. Radio shack sells circuit/contact cleaner in a spray. I replaced the little LED with a 10mm led! Then I replaced the battery. Next, I sprayed silver/chrome paint on anything that looked like it was going to be reflecting the light that is emitted. I now have a solar charged light that is bright! It has lasted a year in the yard. One the occasions that power goes out, I have a 4″x4″x2″ block of wood with a hole drilled in it. The post from the light sits in it so I can use it indoors at night if I need to.
I started collecting old solar yard lights from neighbors for free and rebuilding them. Then I give them back as gifts!
July 12th, 2008 at 8:40
Hi, about 1 year ago i went to my electonics store got a RED led and a 9Volt battery and a switch, i tied all the wires and swirches together by hand, used no solder. Then I ran the light 24/hrs a day .. being told it would run out after 2-3 days max. But the last bit of light faded away.. 3 months later after being on 24hrs a day 7 days a week. Is this normal?? Because that would make it one effivient light. I but it on my camping chair in the back porch and people used it to roll their cigarettes at night. lol
January 8th, 2010 at 7:26
Does anyone know where I can buy very inexpensive 5mm 365nm – 375nm UV Led’s, everyone seems to want lots of money.