
 Slashdotted on 2005-06-20 |
by Christoffer J├ā┬żrn├ā┬źker All pictures are clickable for |
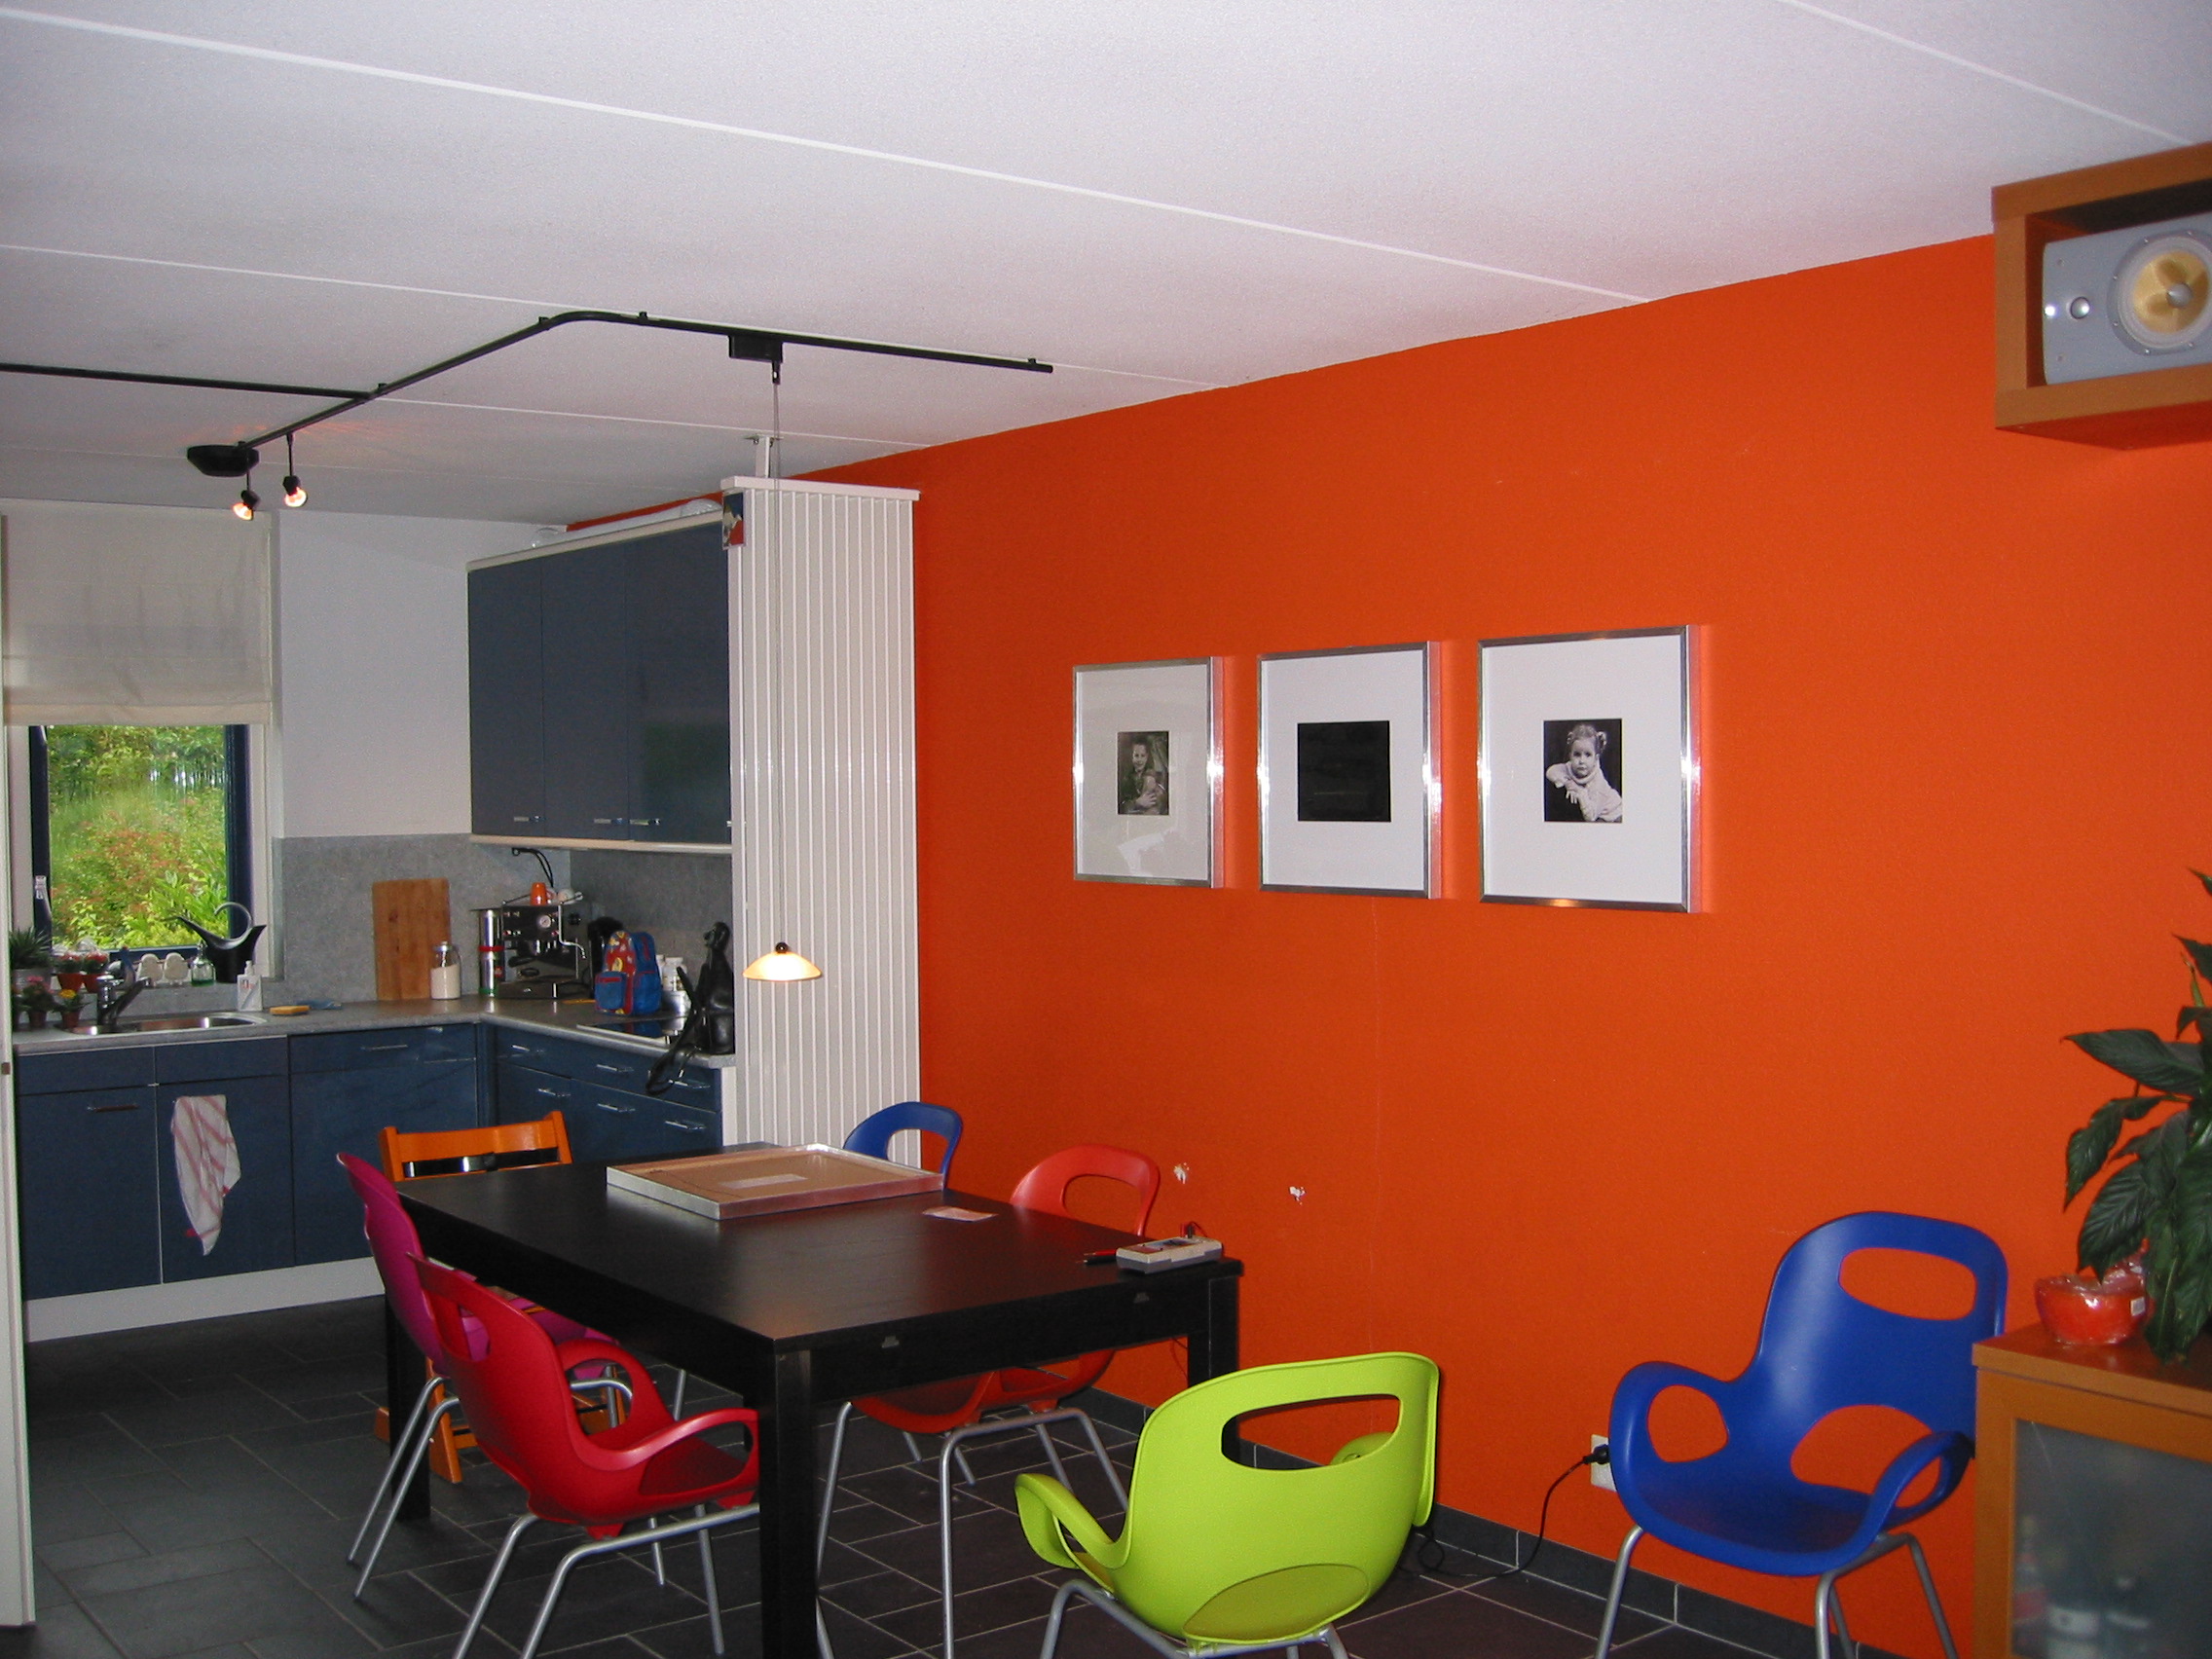
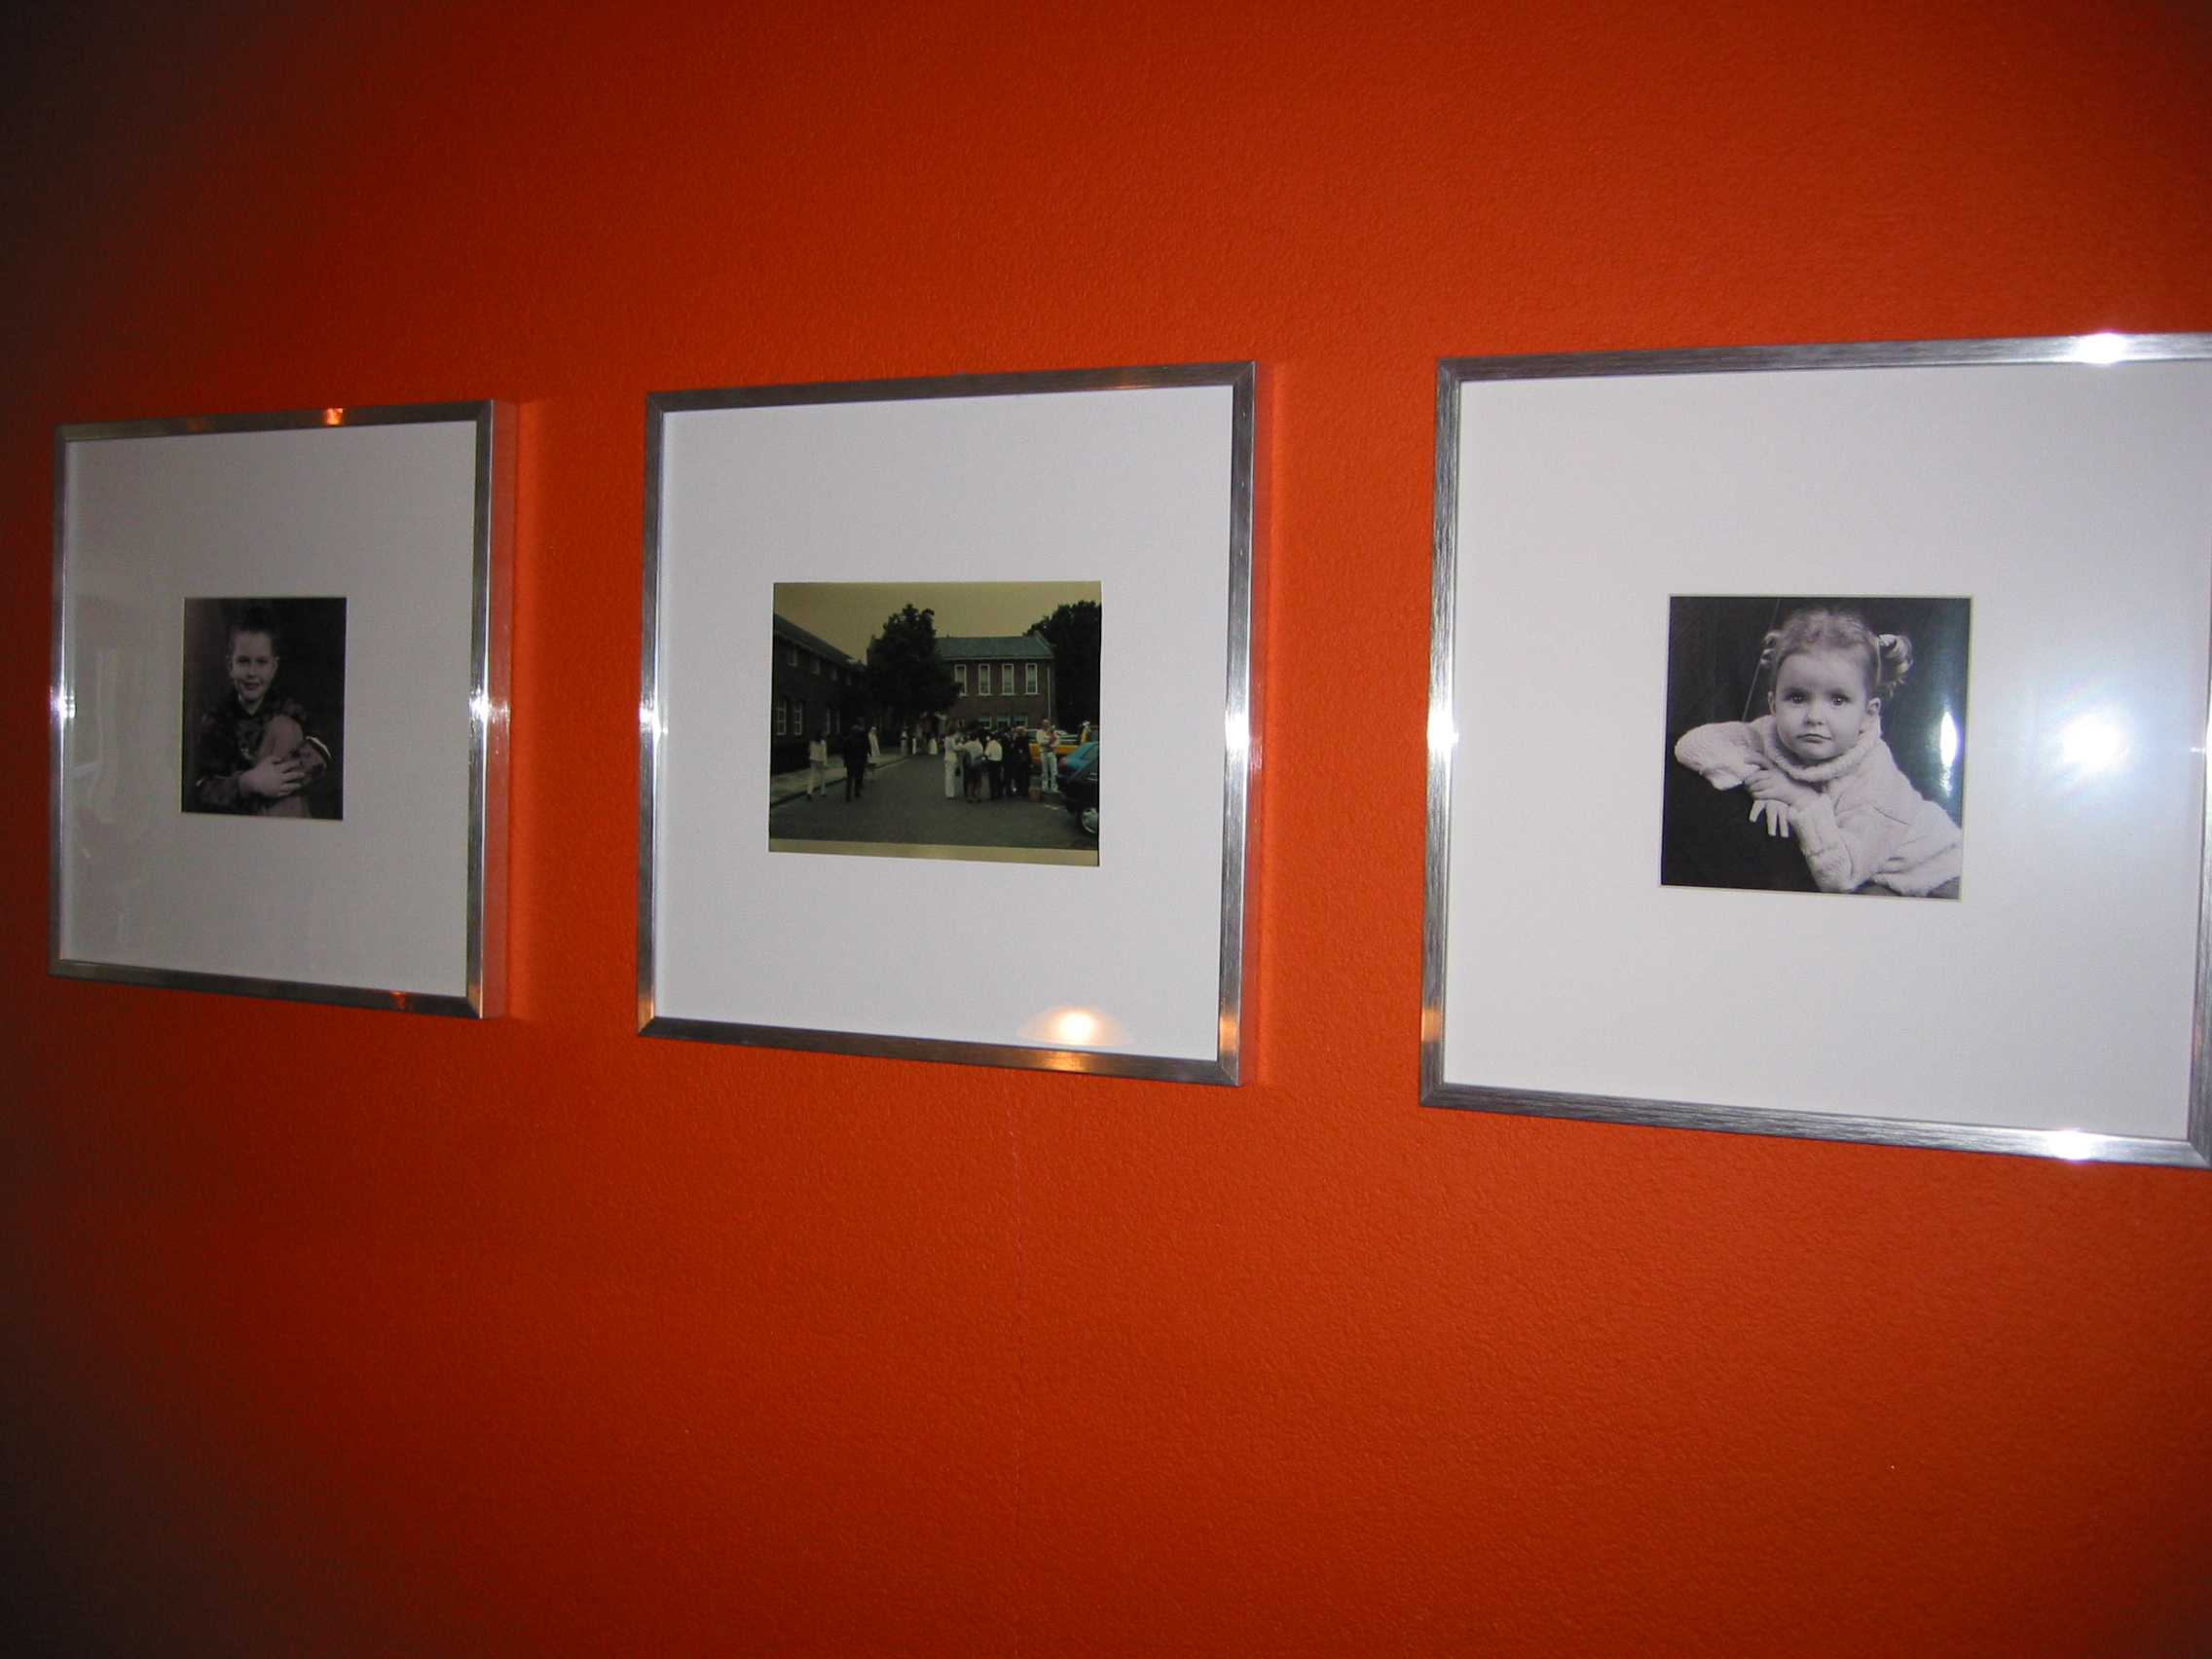 Welcome to my guide on how to convert a laptop into a walltop (that is what is hanging in the middle frame). First, let’s clear out the expression walltop. It’s comes simply from a laptop that is mounted on a wall instead of being ‘mounted’ on your lap. In general it could be a laptop just screwed into the wall, but it could also be a laptop converted into something else like a being mounted inside a regular picture frame. And that is exactly what I did. Starting in the right end of the story, how did I come up with this? Well, I’ve had an old Dell Latitude CSx (500Mhz 128Mb) that just refused to work on IDE0.  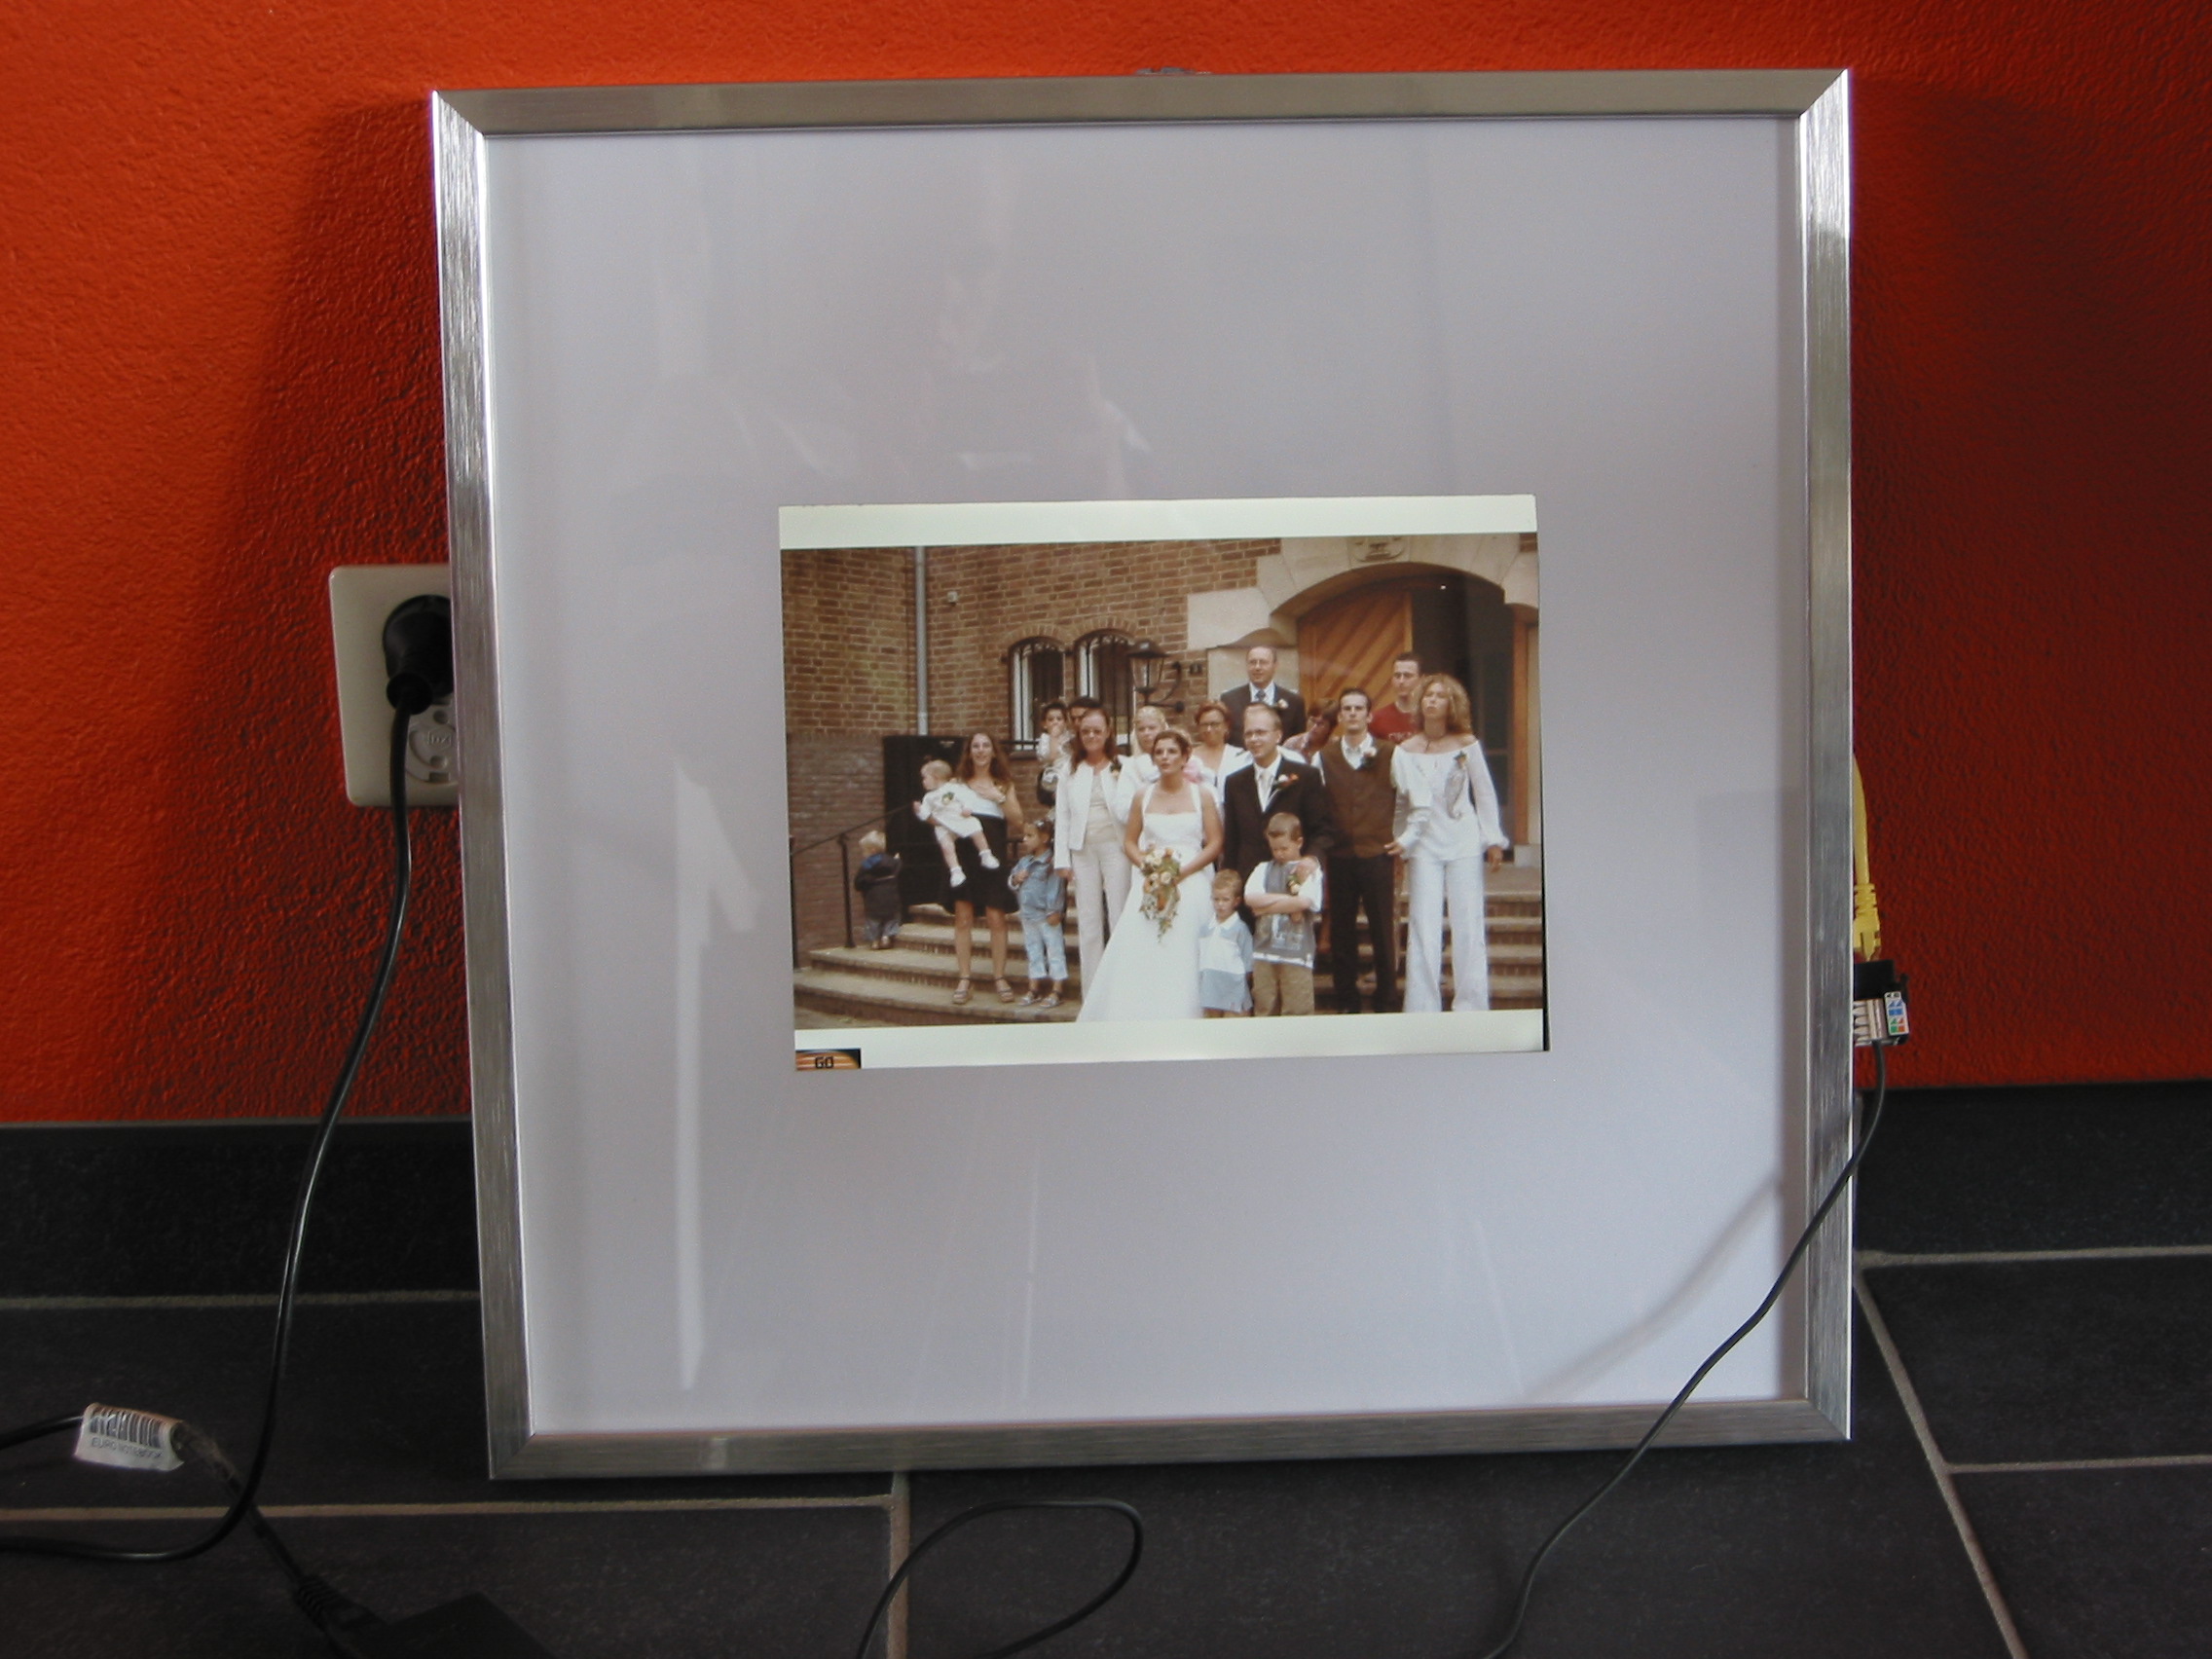 Meaning that using it with an hard drive was out of the question, but the rest was working fine. So, I had this laptop booting on a CD with XPE (Windows XP Preboot Environment) made with BartPE to provide me with the log files from my servers. That was basically it. But it soon took up too much space on my desk and ended up in a corner where it was never used or looked at. But hey – why not take this old laptop, break it down to it’s pieces, mount it into a frame and hang it in the living room showing a slideshow?? It’s definitely silent as it doesn’t have an hard drive. Well, first I was sceptical myself. Power cable and network cable would be difficult to hide, and drilling an hole into my neighbours living room wouldn’t solve anything. Hmm, but let’s go wireless and replace the original power cable with an thin cable in the same colour as the wall!! So I did. |
On the next page we’ll have a look at the software. Not that exiting, but we can’t really do without it.
Digital Picture frame. Second hand laptop. Touch screen, lcd frame. Modern art! eBay. geek, seconhand, used, cheap. Flat panel. LCD Monitor. Plasma
The software. To start with, before I took my laptop into the land of no return, I wanted to see if it worked at all to boot my laptop on cd, find and configure the network card, map a network drive, and start the slide show. BartPE that I used works fine out of the box so to speak. It’s a free package and you only need to add Windows XP sp2 and any network drivers you might need. The network drivers proved to be the biggest problem to me, as I was using a 3com CRWE777A pc card, which is actually a PCI card with an pc card adapter. I did have some oem Prism2 drivers to the pc card that I’ve managed to use previously with another laptop, but then I had the choice of forcing windows to use these drivers and windows insisted on using the 3com drivers (which of course only worked in conjunction with the PCI card). But by changing the device ID inside the .inf file solved this and XPE found the card. I also managed to put in the wireless SID and WEP code inside the .inf so the card defaults to my network as soon as it’s started.
echo Map to Z: server
net use z: \server\bartpe /user:mydomain\myuser mypassword
z:
call launch.cmd
It maps the drive and then tries to start the launch script that is on my server. And this makes it very very flexible. If I’d like my walltop to display let’s say the stock exchange and weather instead, then it’s just up to me to adjust the script accordingly. As it is on the server, the only thing I’ll need to do is to change the script and restart my walltop.
Right now I have the launch script change the screen resolution ( x:\Programs\Nu2Menu\setres.exe h1024 v768 ), then kill the start button ( pskill nu2menu.exe ) and then start the slide show ( \slide\slide.exe ). The slideshow has been made with IrfanView which is a freeware picture viewer.
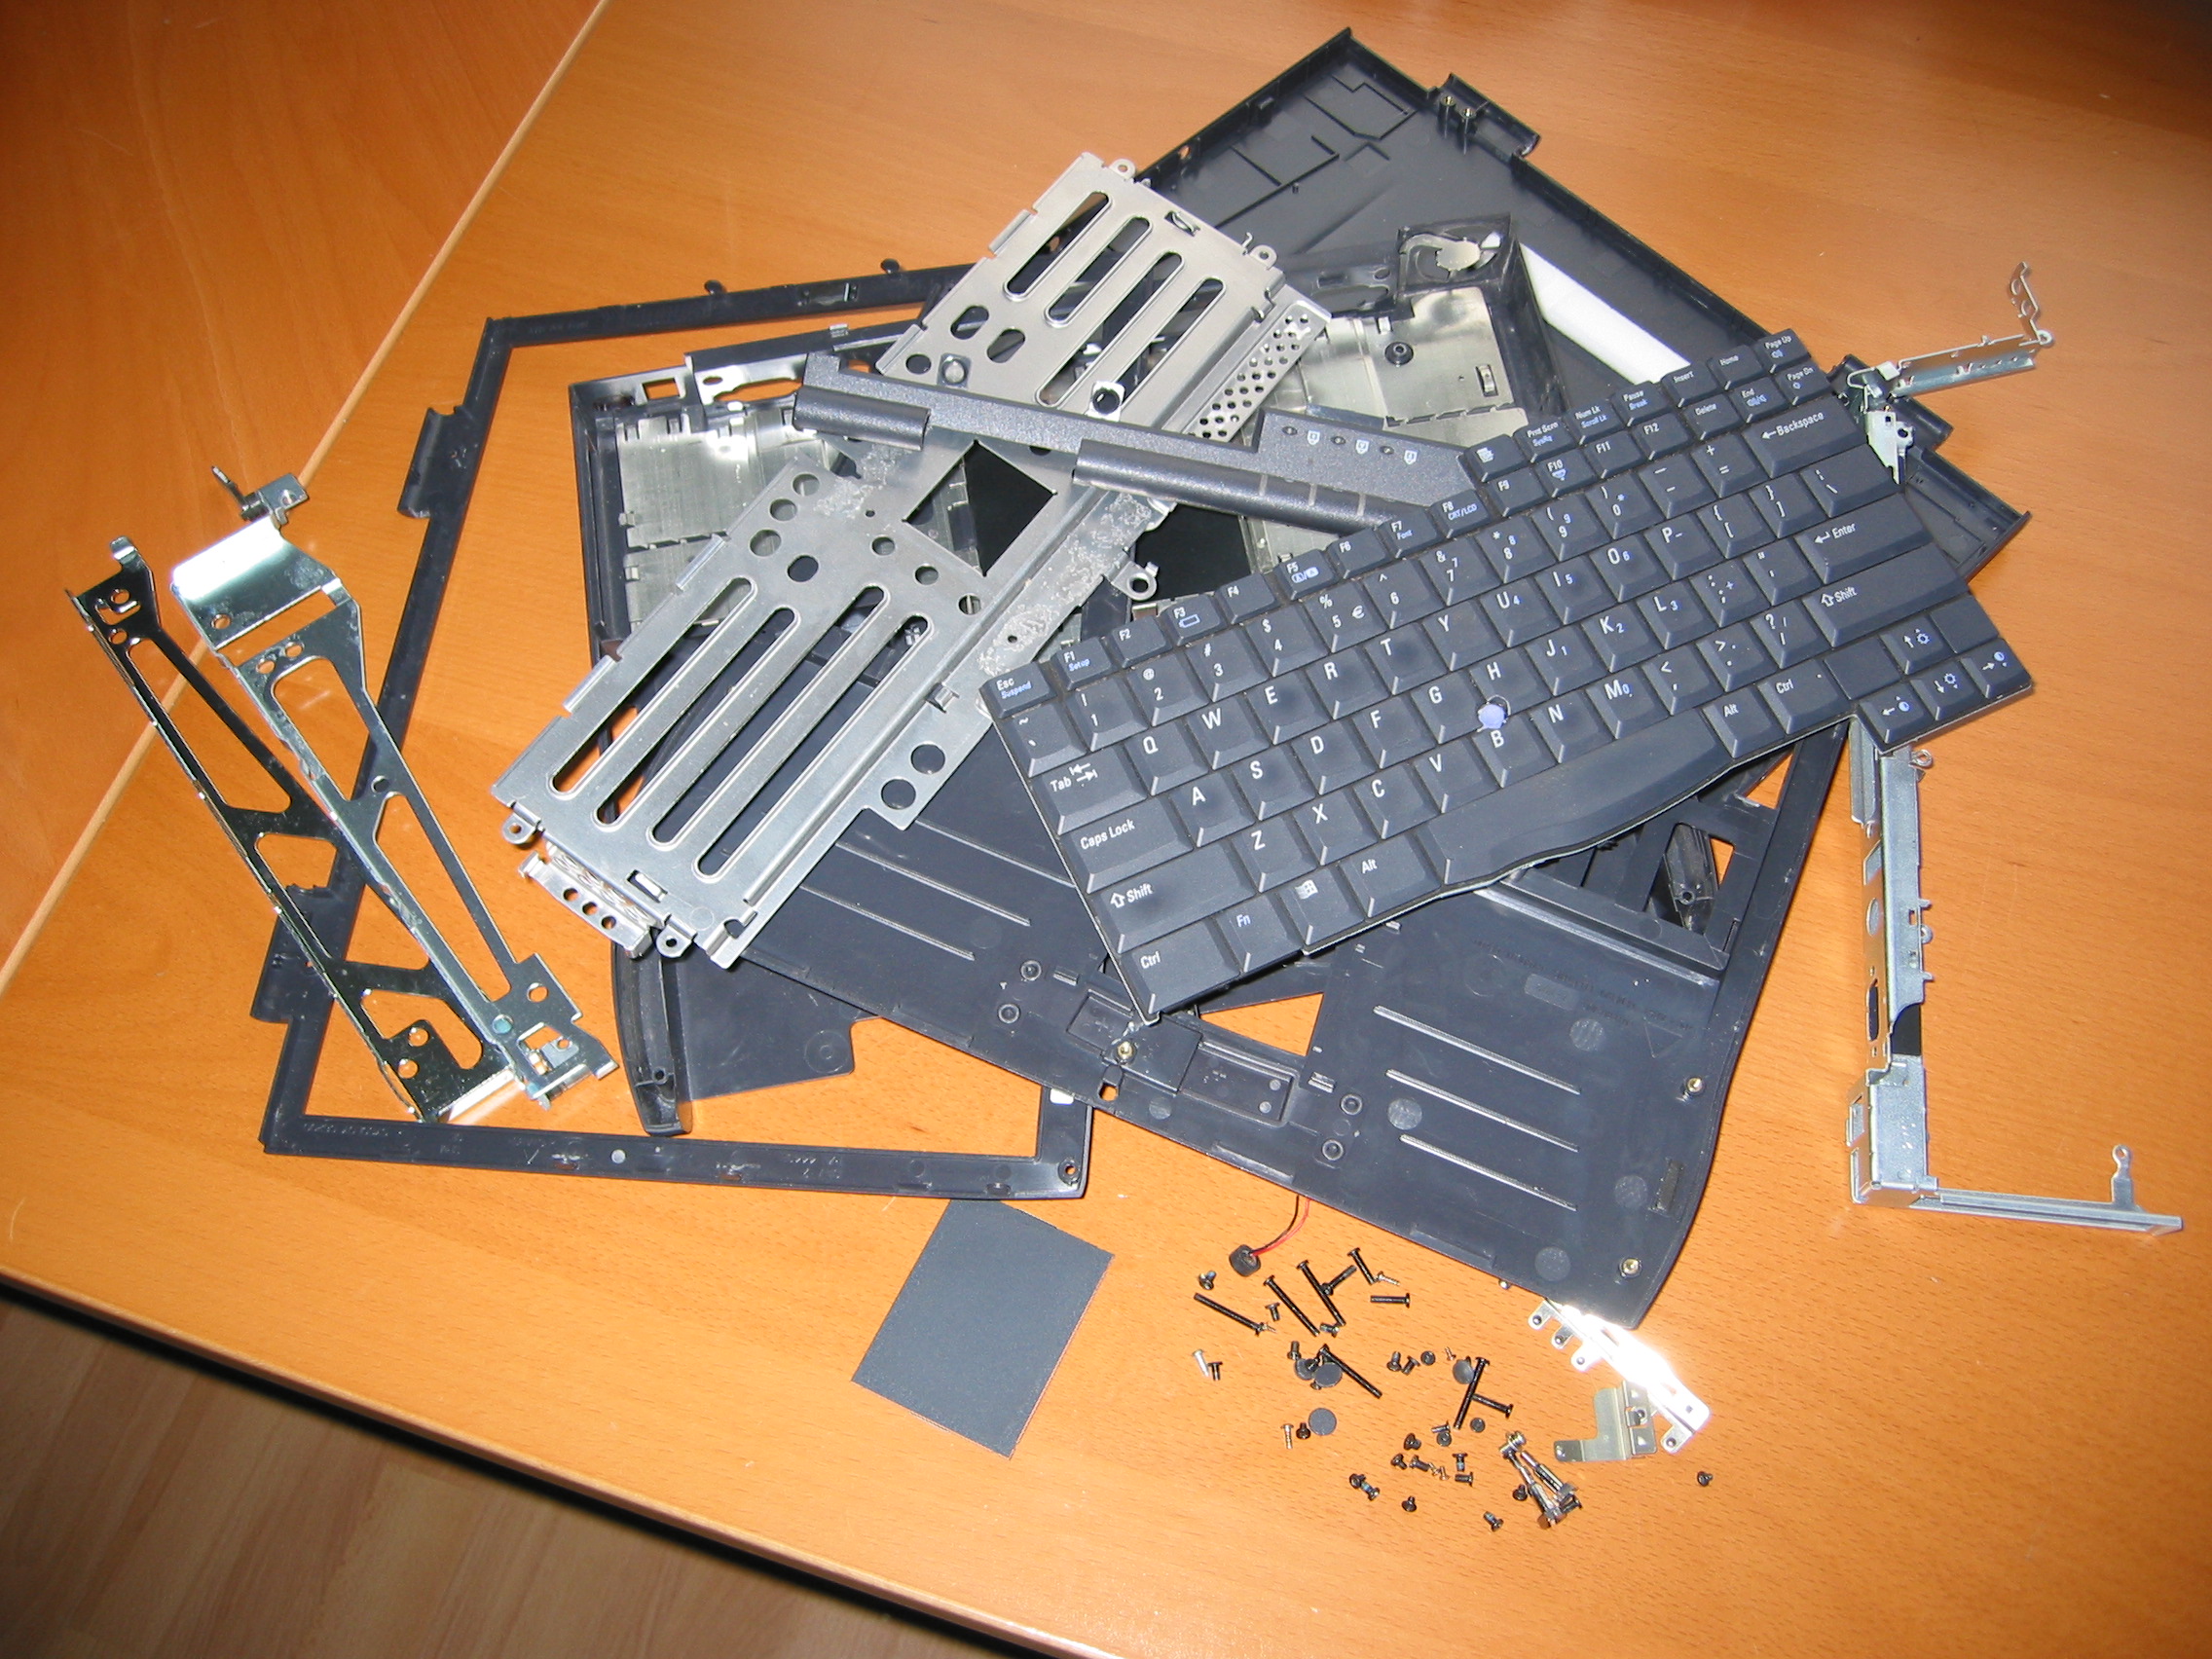
Now to the fun part! Let’s disassemble the laptop! That is… on the next page.
Digital Picture frame. Second hand laptop. Touch screen, lcd frame. Modern art! eBay. geek, seconhand, used, cheap. Flat panel. LCD Monitor. Plasma
|
|
|
|
The next page is about the preparation of the frame. Again… not that exiting – but it has to be done.
Digital Picture frame. Second hand laptop. Touch screen, lcd frame. Modern art! eBay. geek, seconhand, used, cheap. Flat panel. LCD Monitor. Plasma
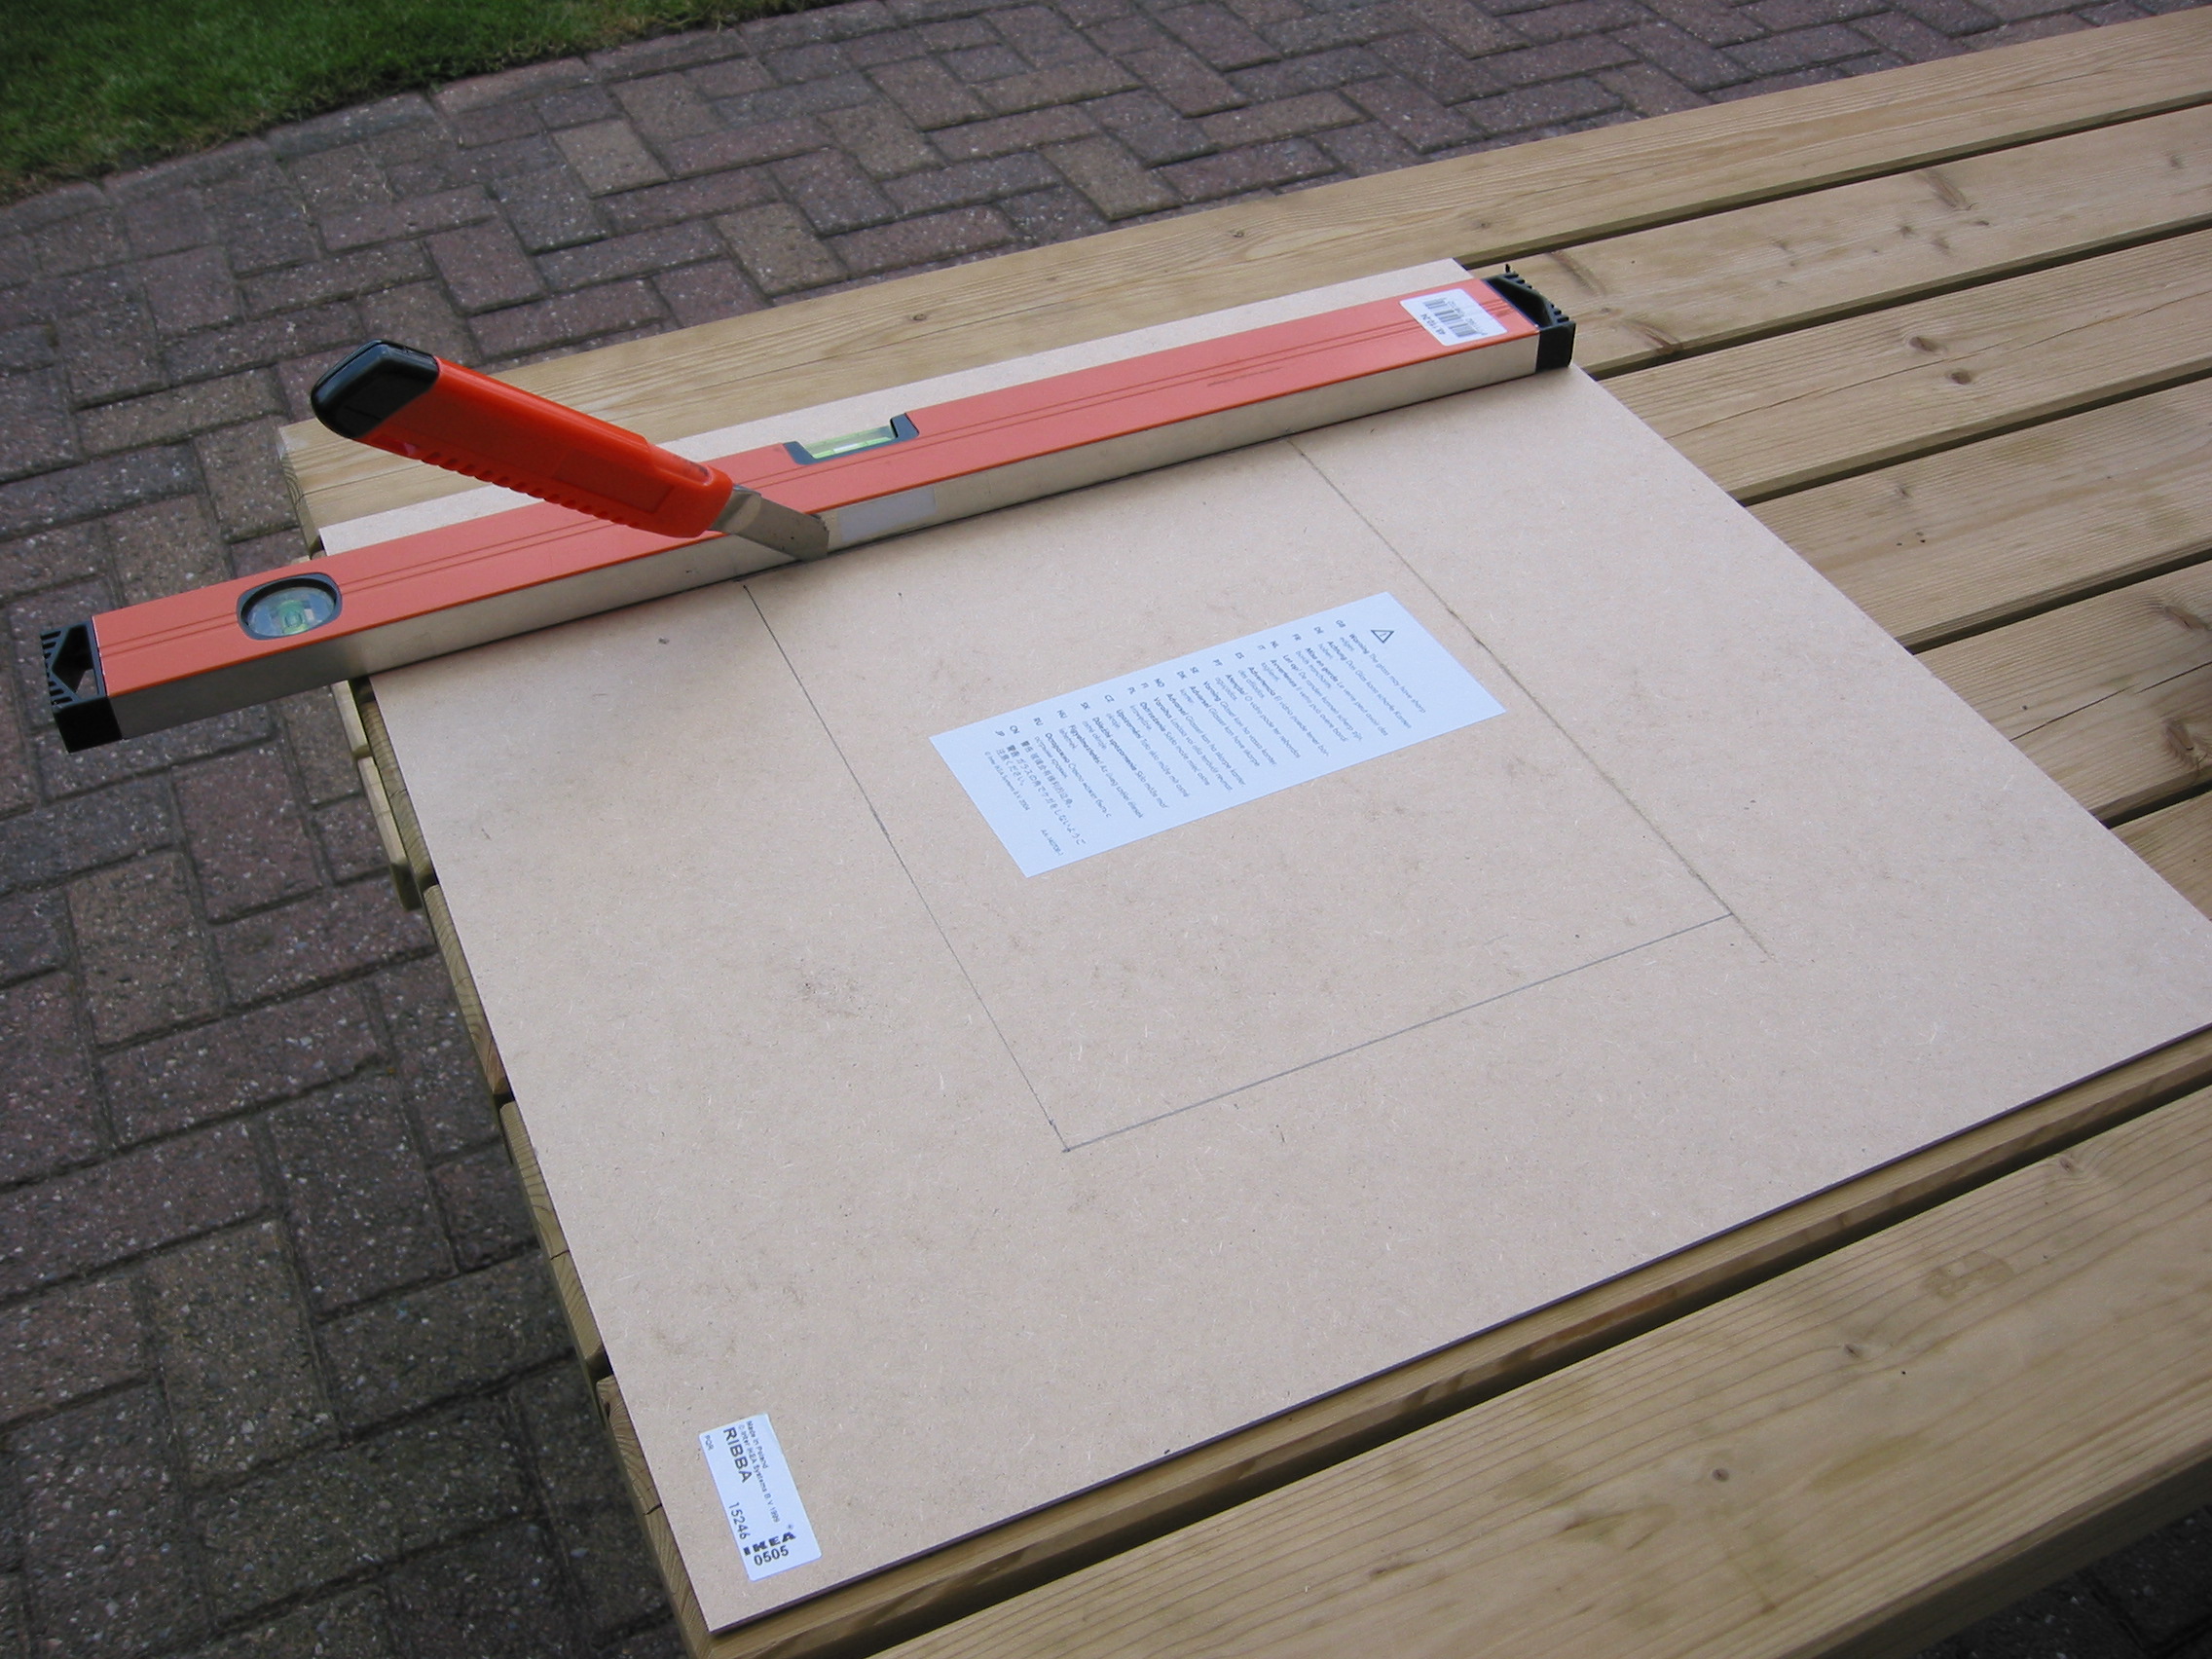 Preparing the frame. I choose Ribba (├óŌĆÜ┬¼20) from IKEA as this is the kind of frame that we use in our living room. Measuring the size of the LCD (H*W) and the size of the backplane (h*w) I could calculate where exactly to make the hole for it. ( h/2 – H/2 = the distance from top and bottom where the hole should start ) and ( w/2 – W/2 = the distance from left and right that the hole should start ). After making some nice lines on the backboard I used an straight piece of metal and a Stanley knife and starting cutting. And cutting. And cutting. |
Let’s get busy mounting the LCD display and the motherboard – on the next page
Digital Picture frame. Second hand laptop. Touch screen, lcd frame. Modern art! eBay. geek, seconhand, used, cheap. Flat panel. LCD Monitor. Plasma
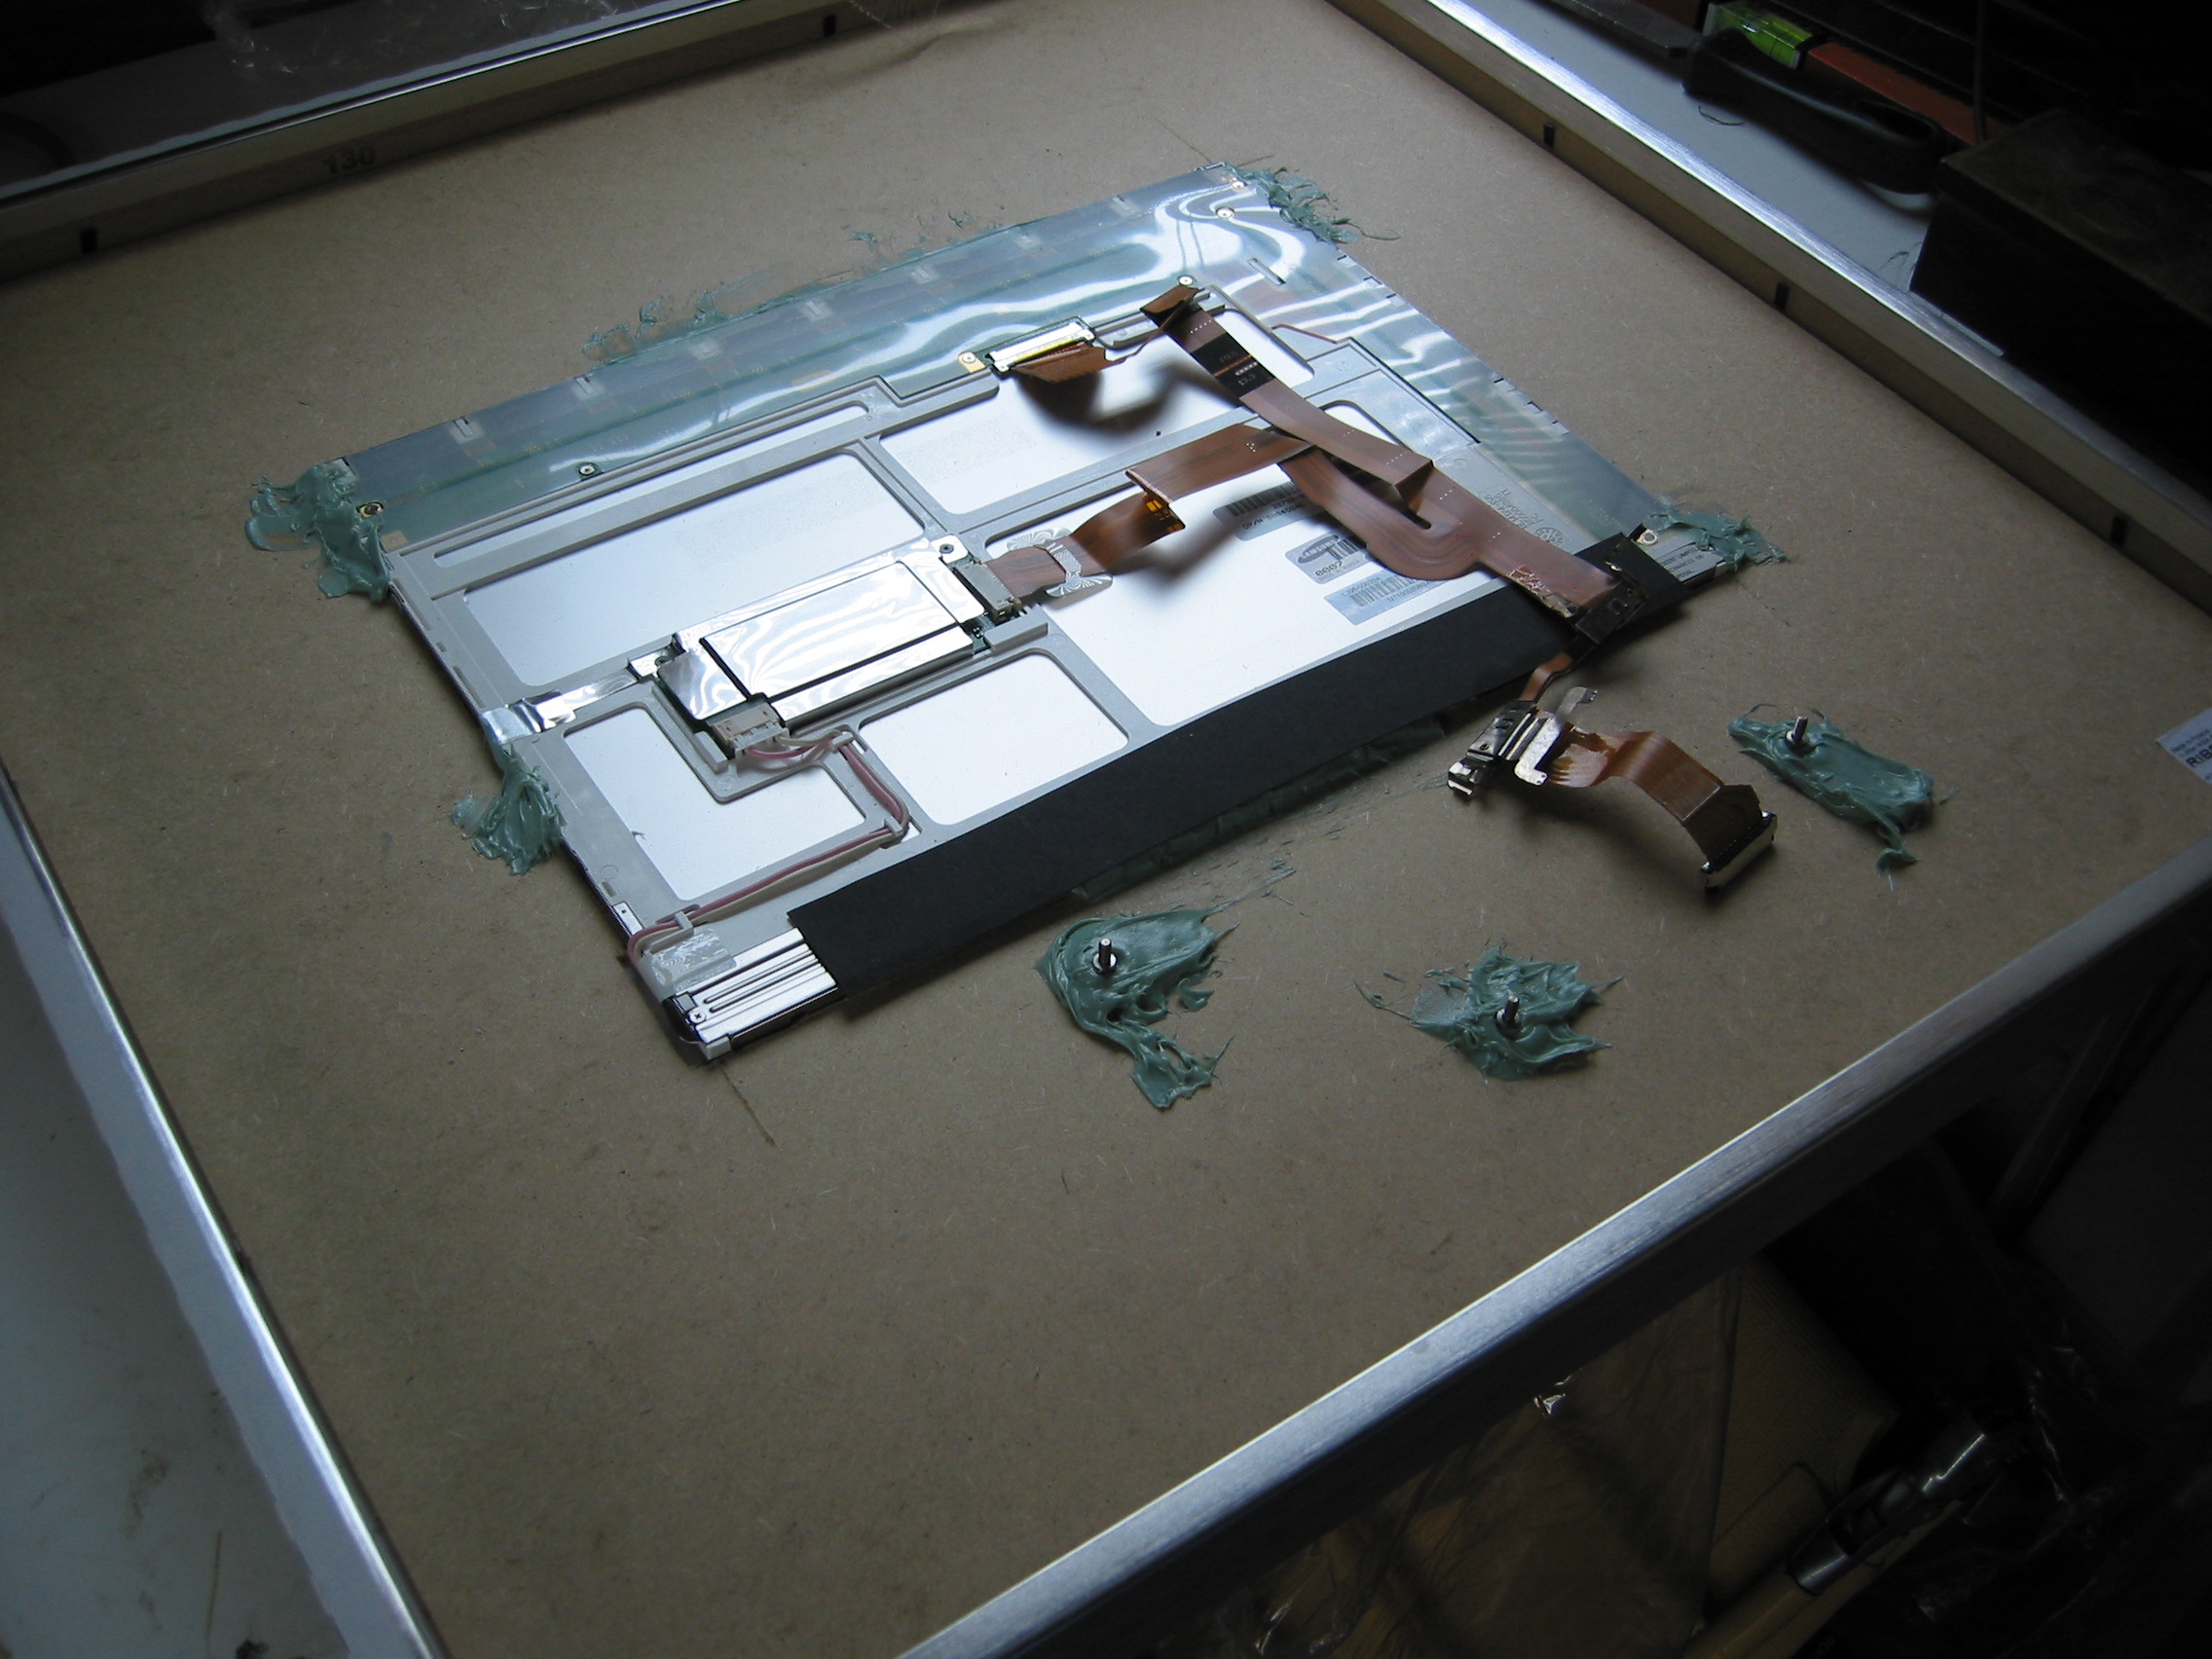
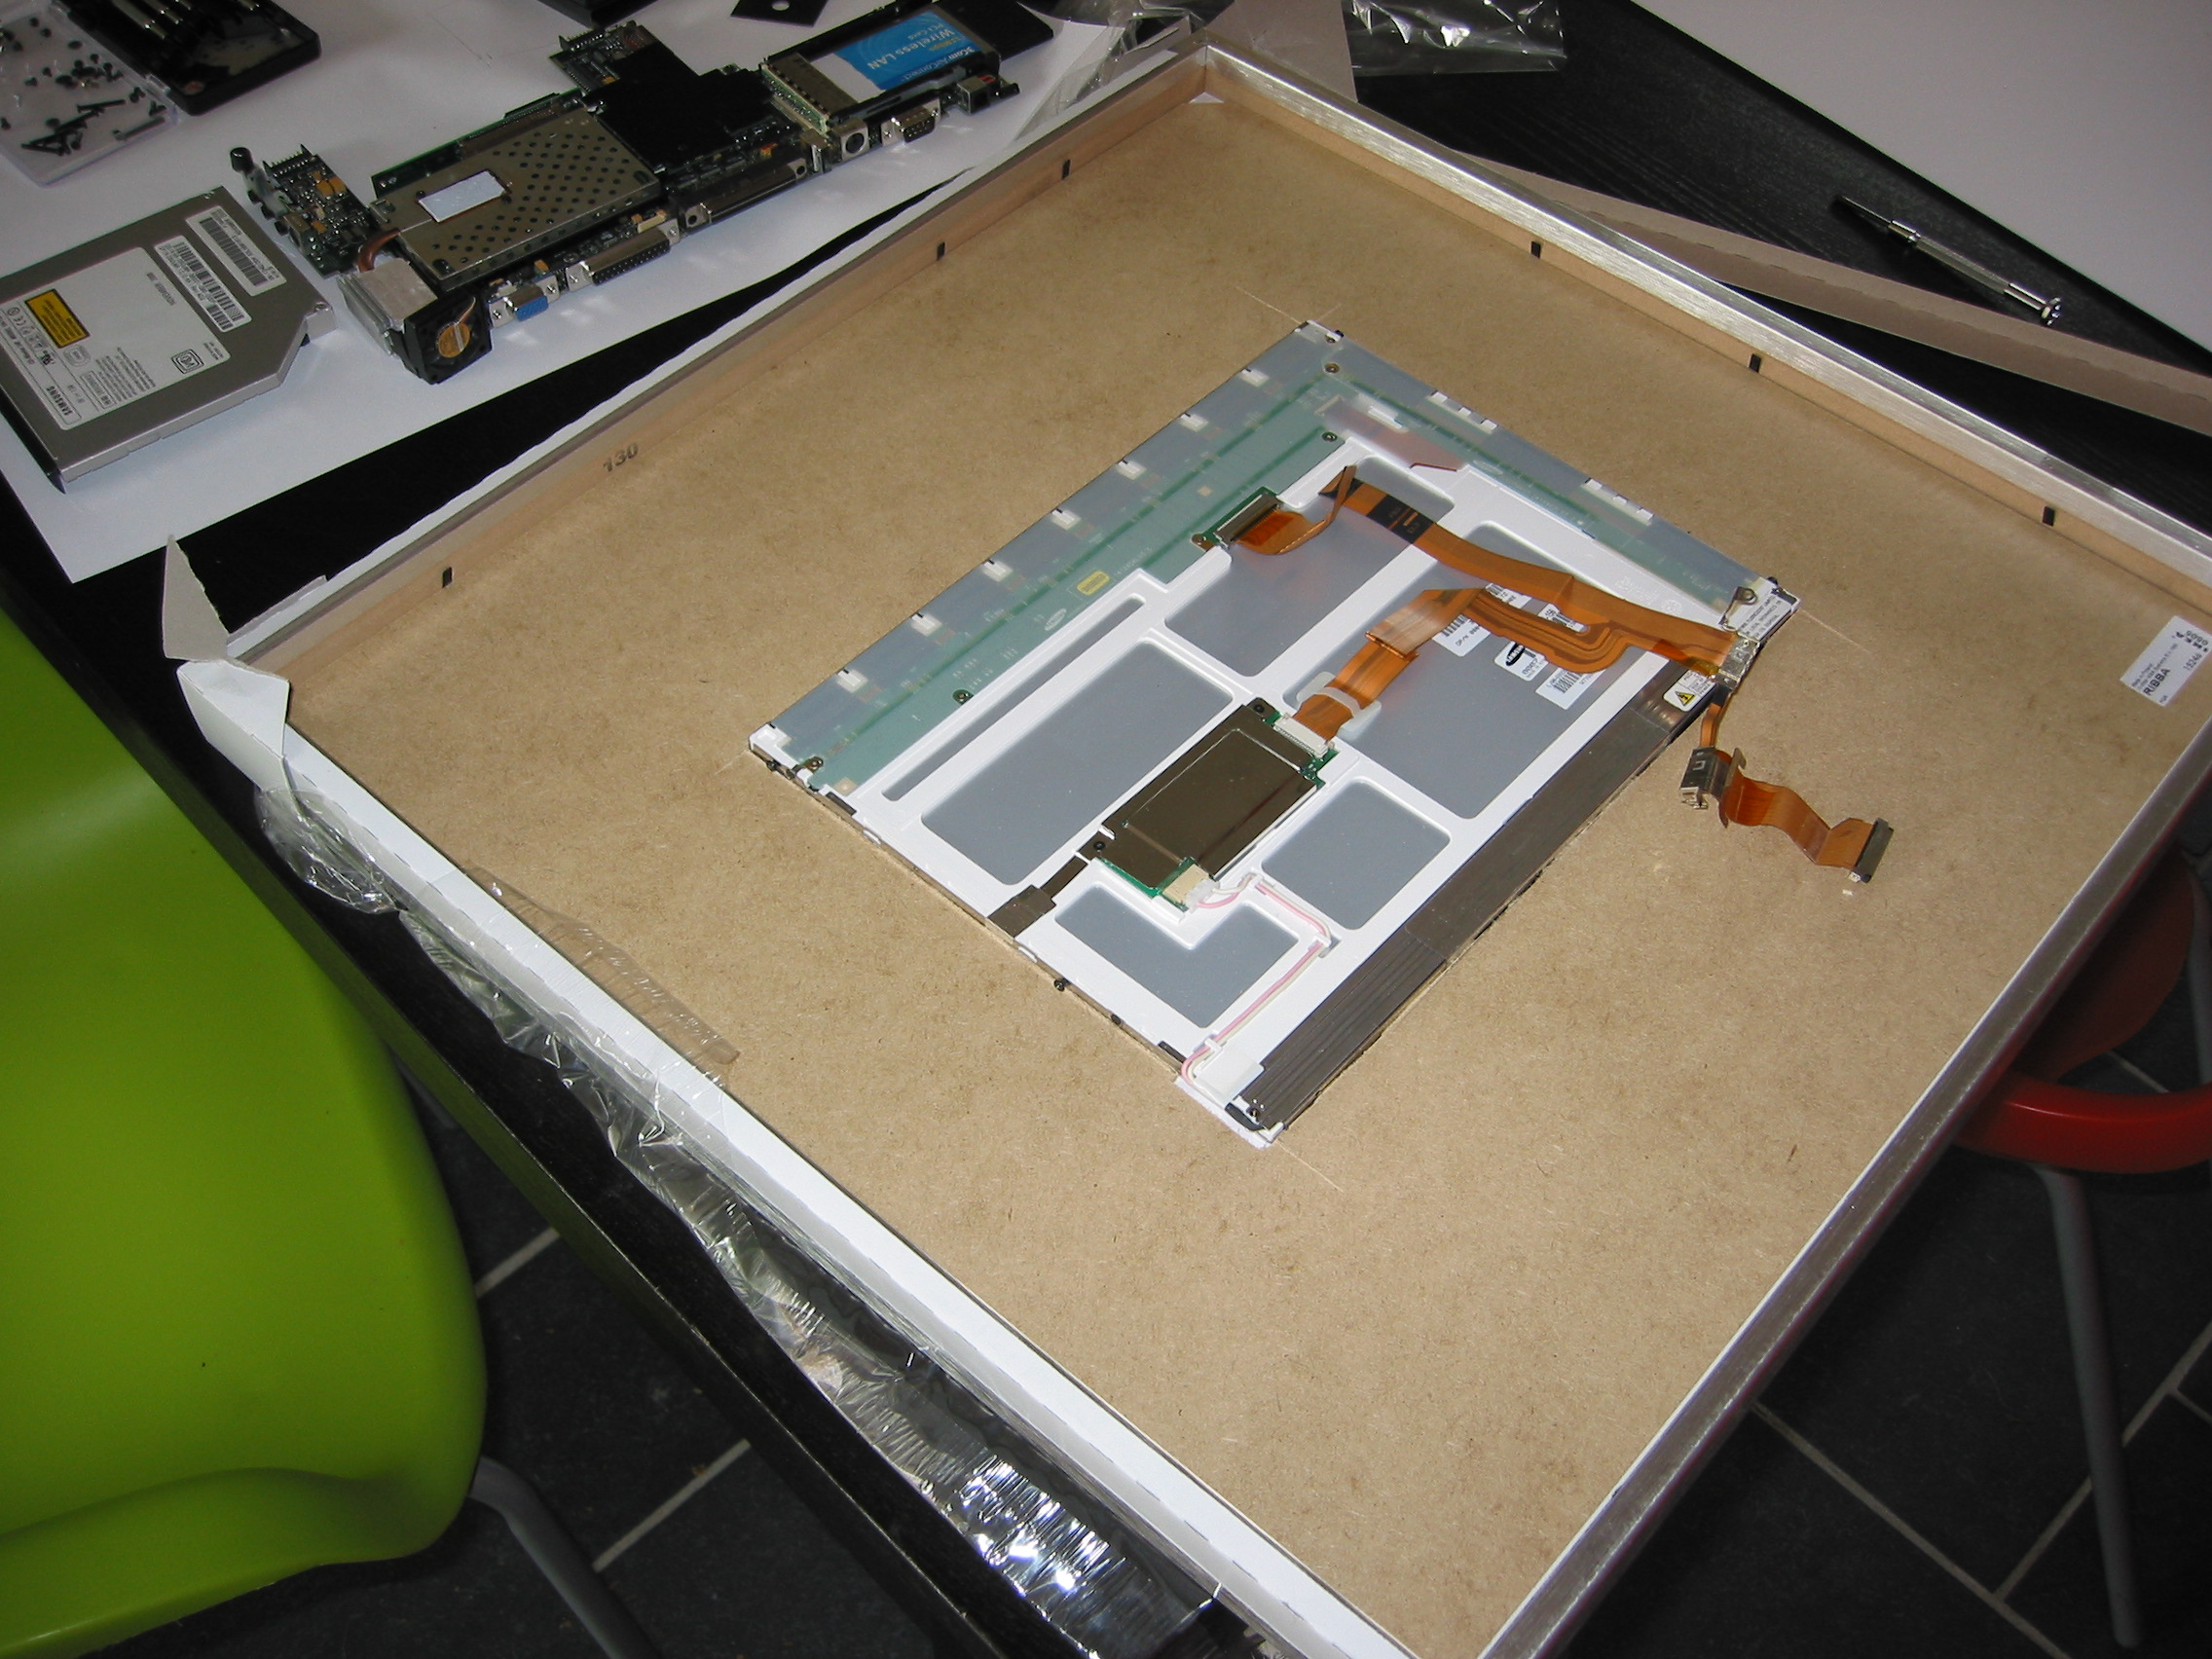 Mounting the LCD. The drawback of not owning a a Dremel is using a knife to cut in wood… Slowly but surely I managed to get a hole out and started to fit the LCD. After a little bit of adjusting the hole, especially for the cables in the lower left corner on the picture, I got it to slide in nicely. When you do this then make sure that you don’t create any tension in the screen. It should have a perfect fit, and plop into the frame without force. I mounted four screws on the sides to prevent the screen to go to far in, and to later on apply glue here. |
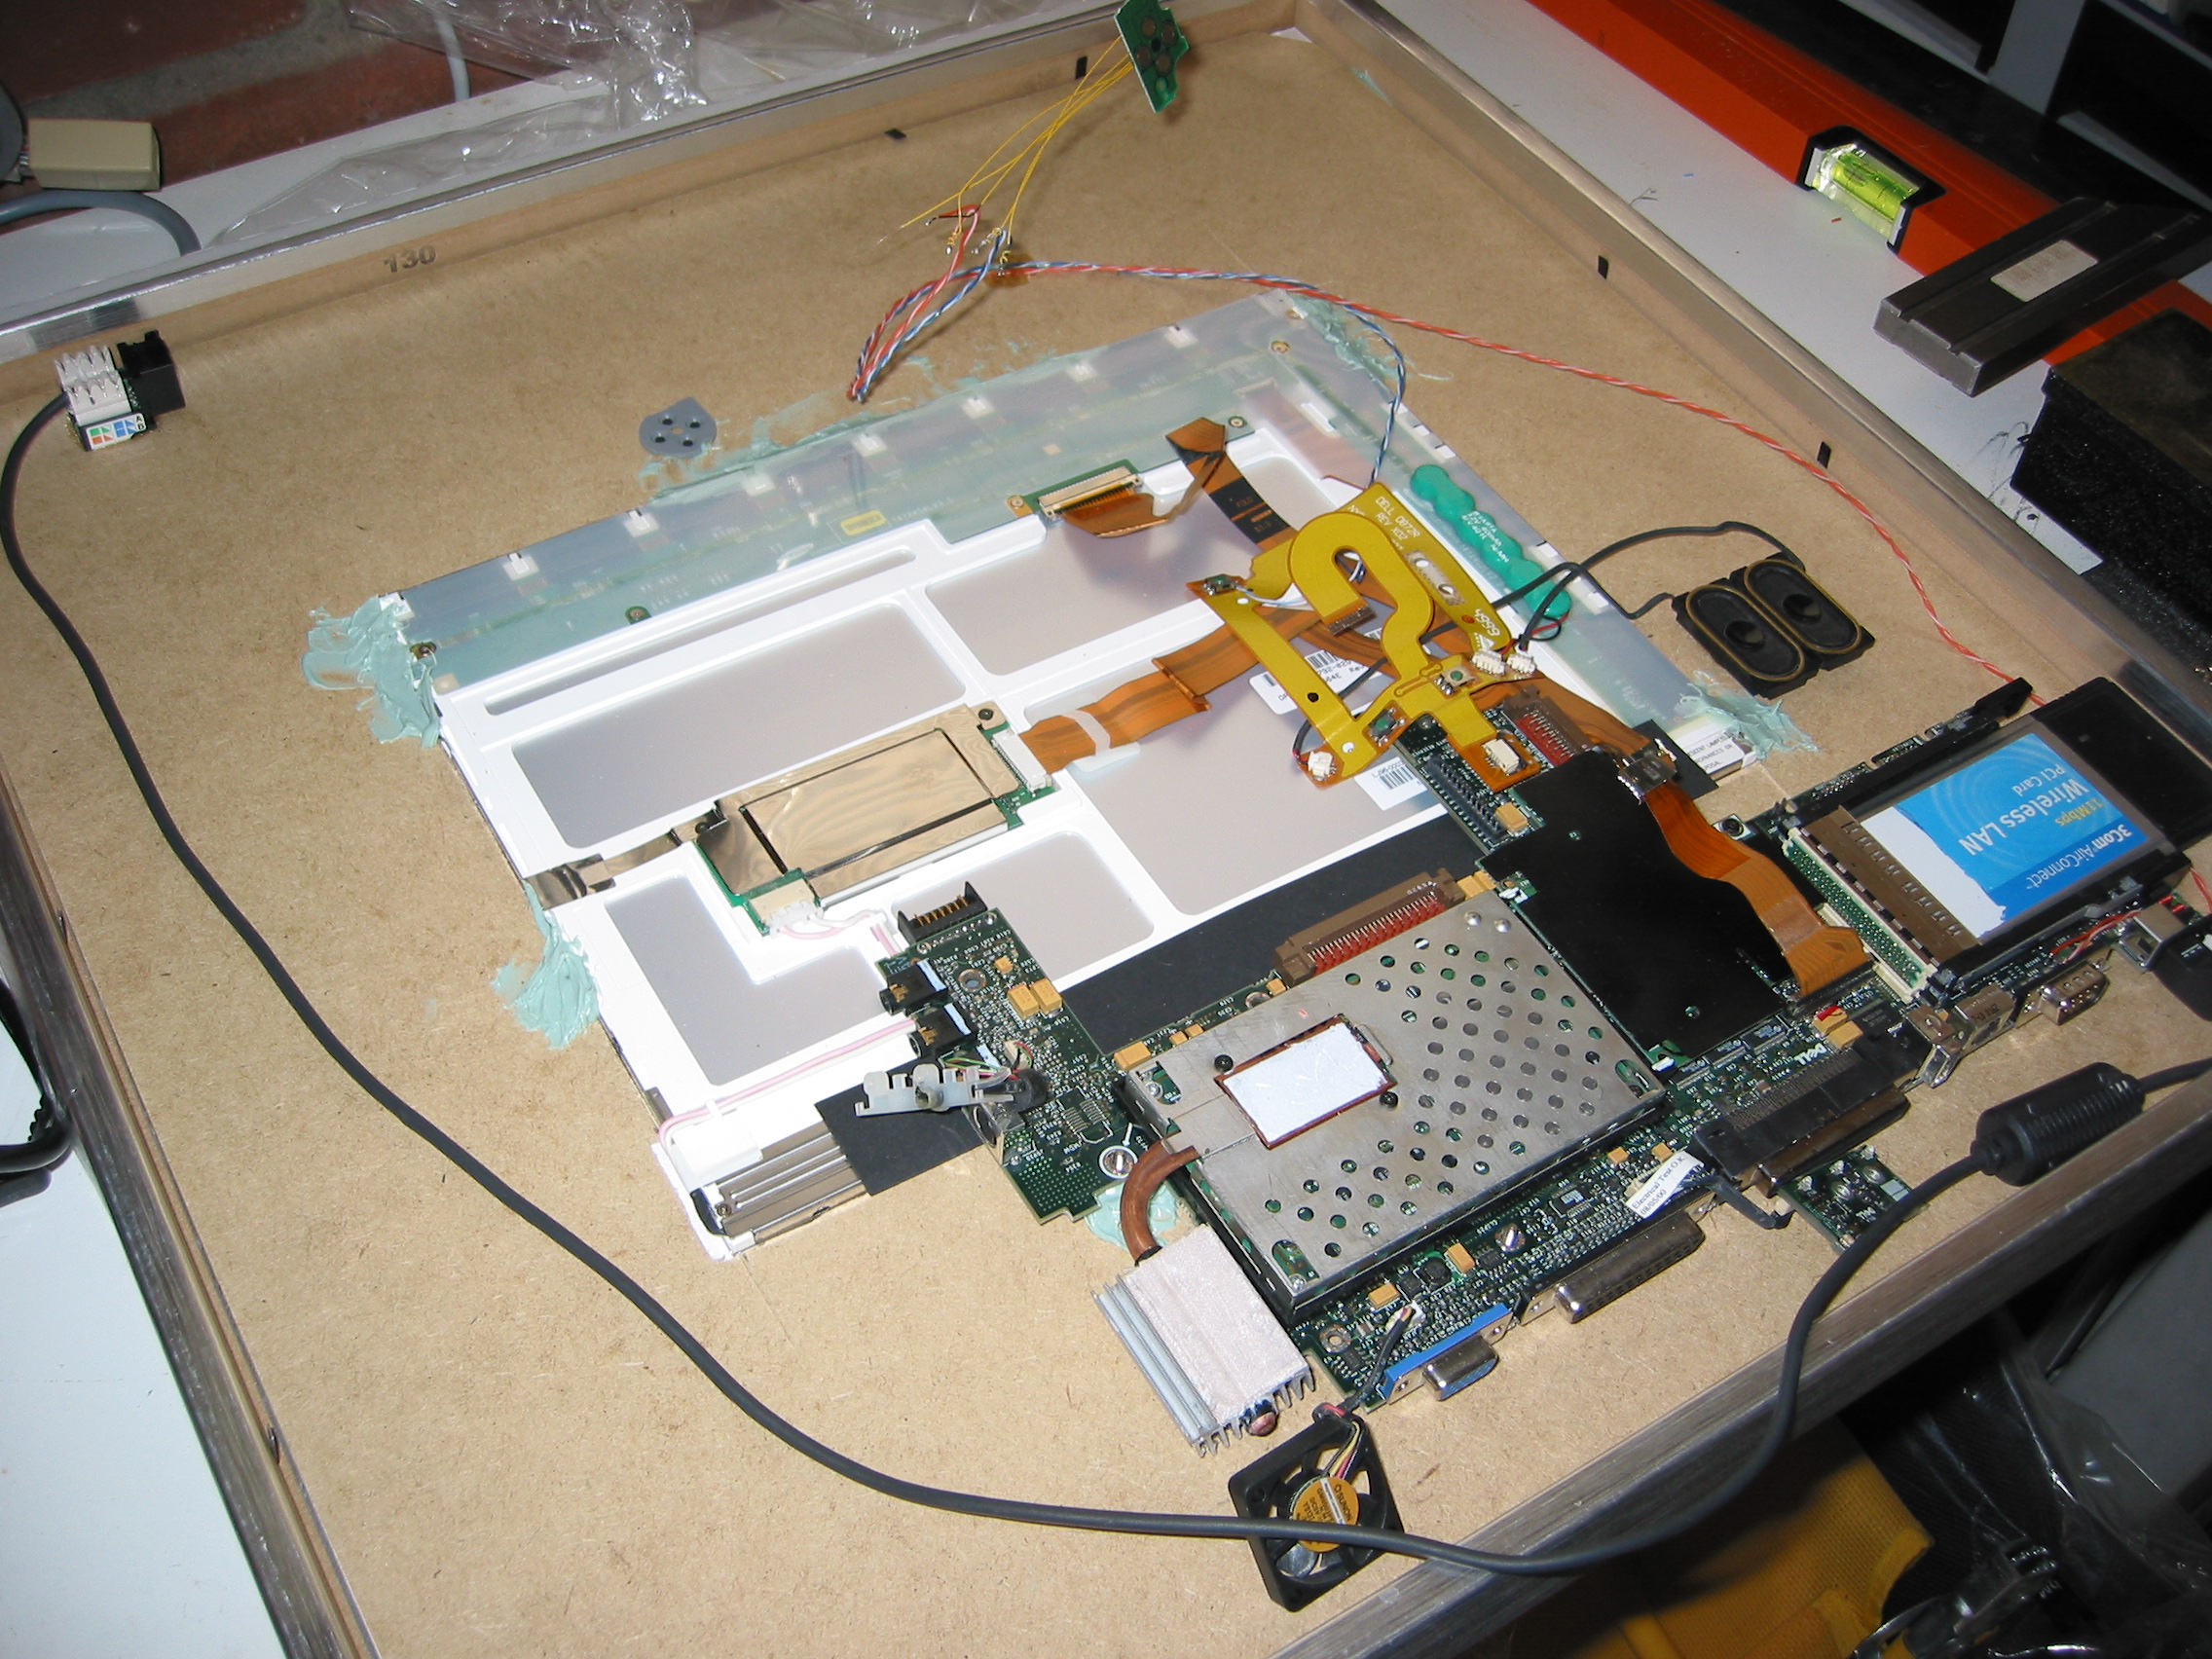
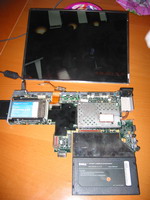
 Mounting the motherboard. Now it came down to applying some glue to fix the LCD as well as have something to mount the motherboard on. By using the nuts that held the com and printer ports at the back, I attached them on the motherboard and marked their location on the backplane. Then I made a small puddle of epoxy based glue on each of these locations and put down the motherboard again to let it dry. A note is on it’s place here. The puddle of glue should be as high as possible, but not to high so that it touches the motherboard. We don’t want it permanently glued huh? And also make sure that you actually want the motherboard where you’ve placed it, having enough room for any cables (power, USB, whatever). |
On the next page we’ll connect everything and see how we solve the power button problem.
Digital Picture frame. Second hand laptop. Touch screen, lcd frame. Modern art! eBay. geek, seconhand, used, cheap. Flat panel. LCD Monitor. Plasma
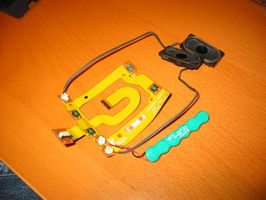
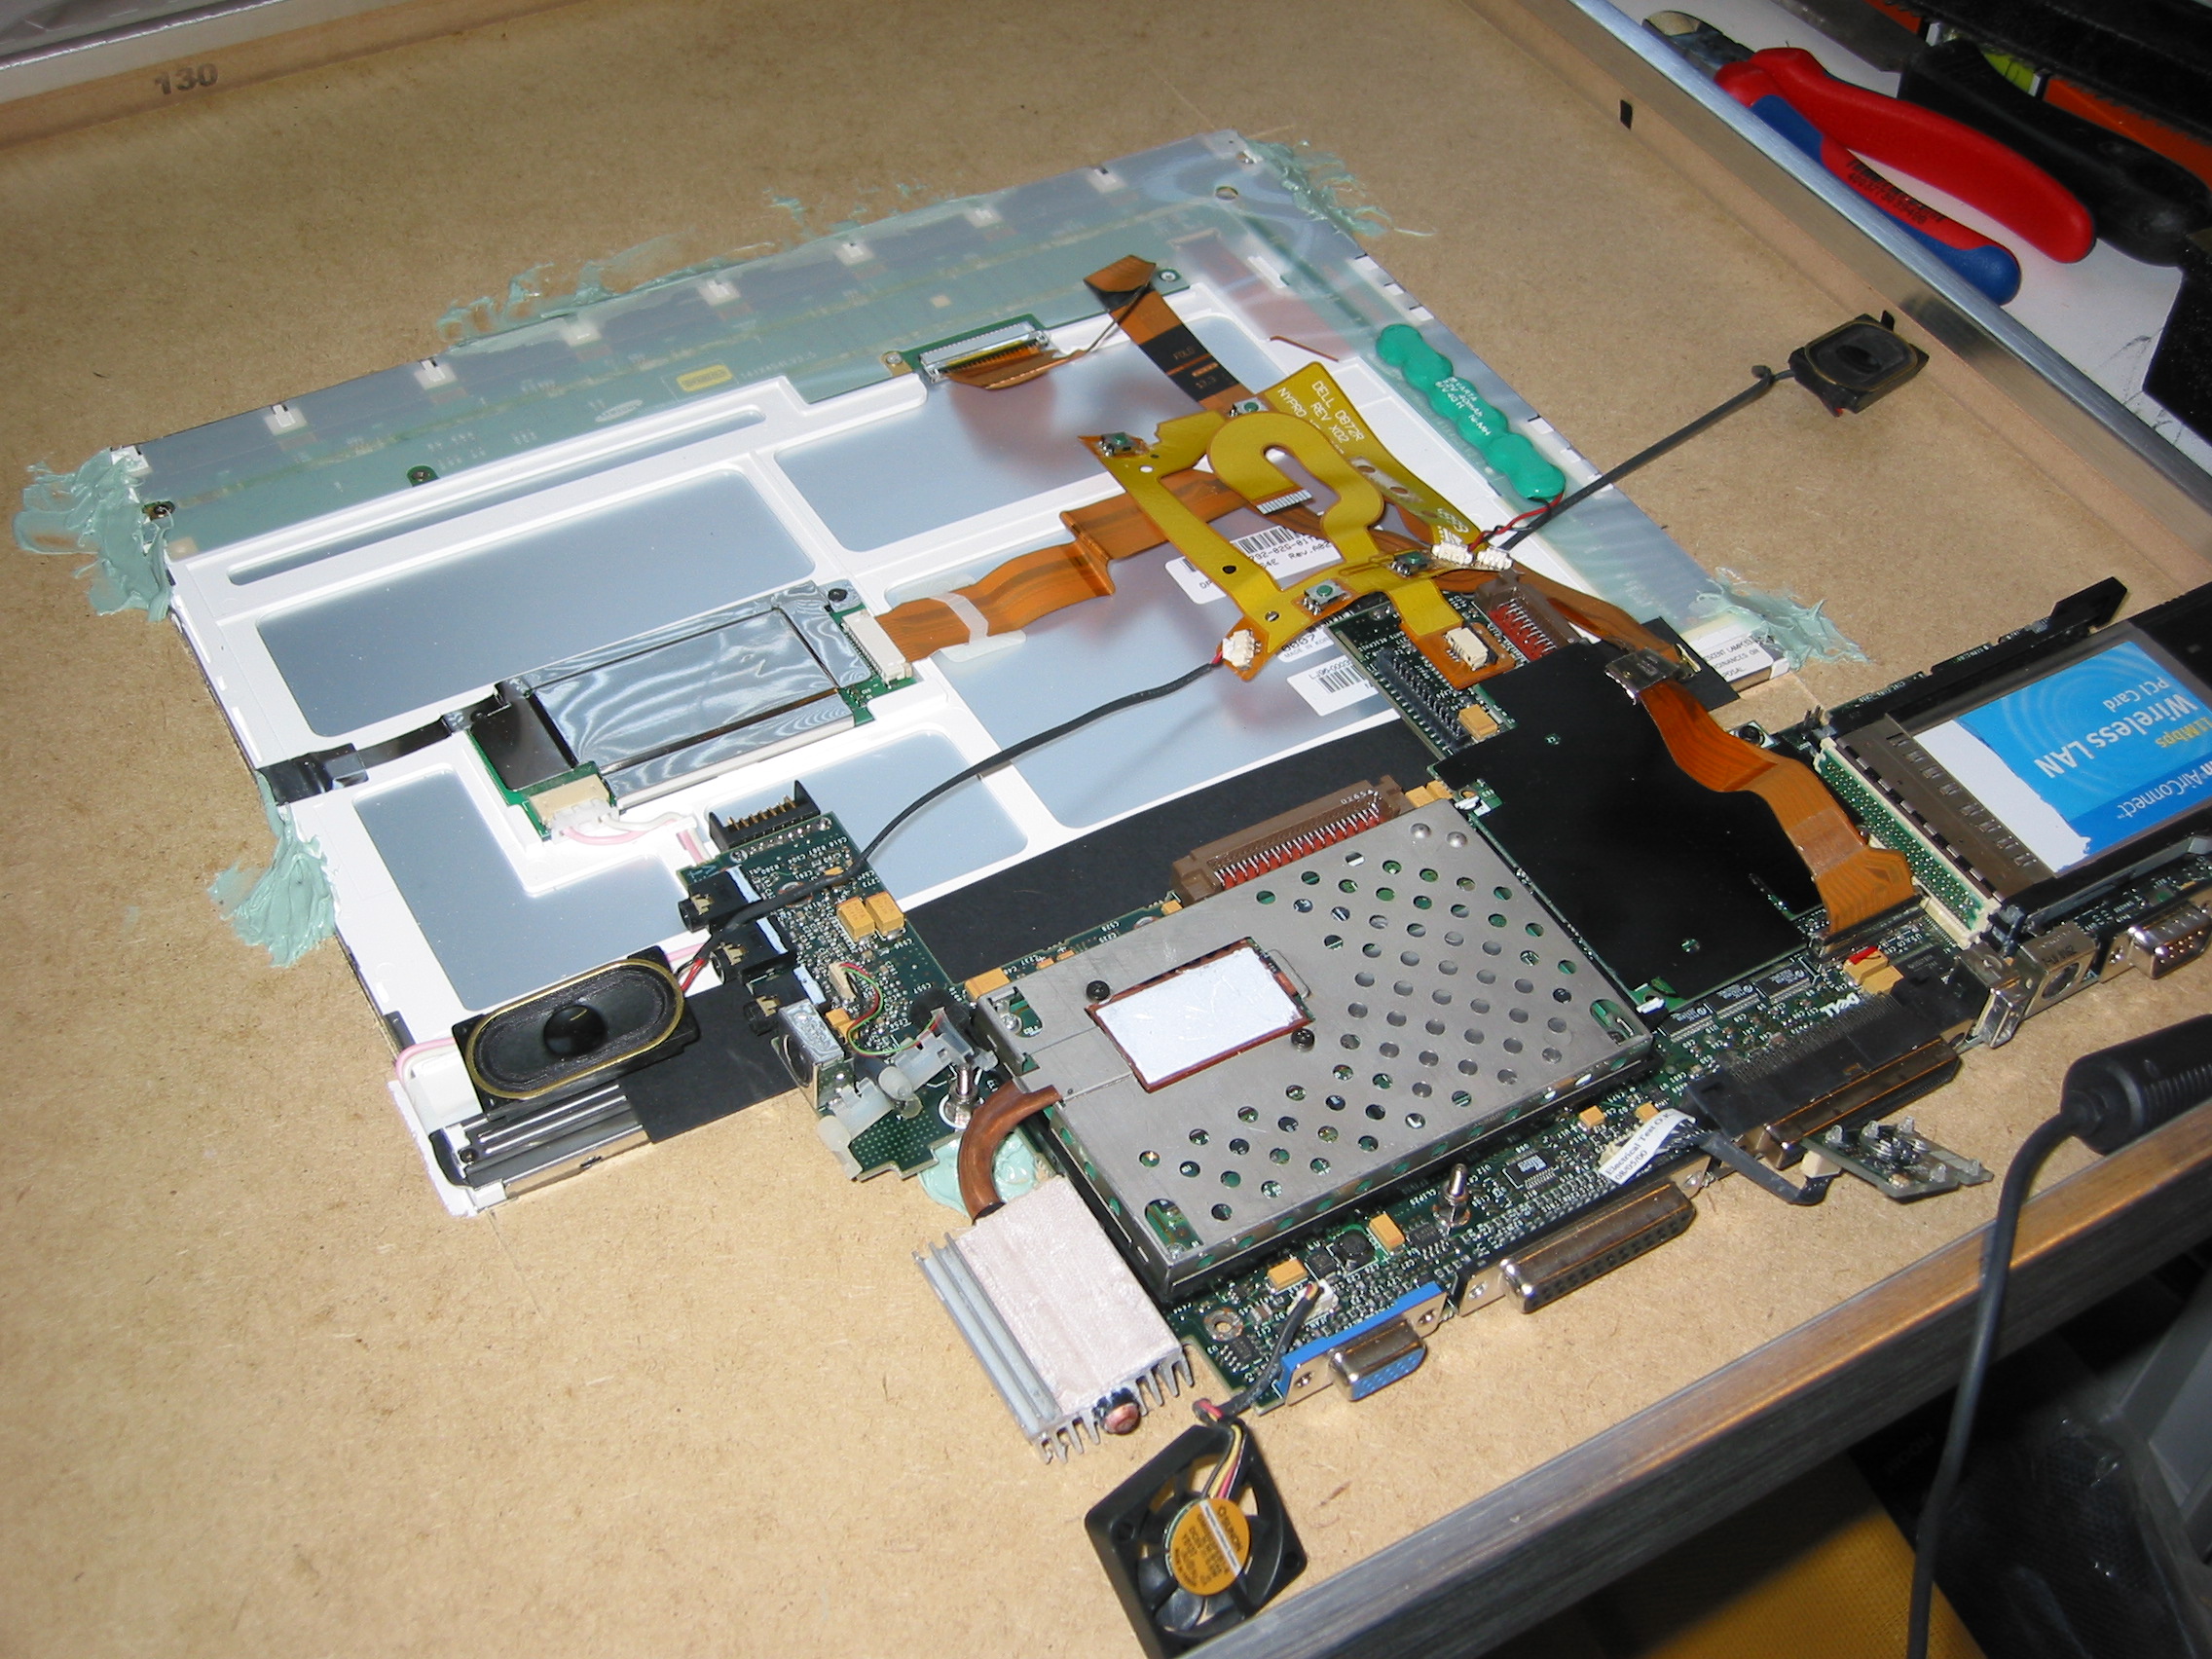 Now it’s time for testing again. Everything mounted, I nervously pressed the power button. And – it still worked, part from that the walltop didn’t boot. Duh, no cd player yet. Oh, and yes, that power button. It’s located between the pc card and the power plug. Not very handy when it’s hanging on the wall, so I soldered to wires onto the switch to later have this on a switch on the painting. I also attached two wires to the mouse buttons to provide some navigational skills later on. |
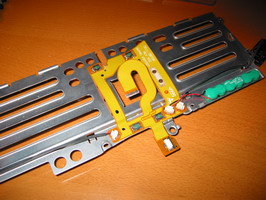
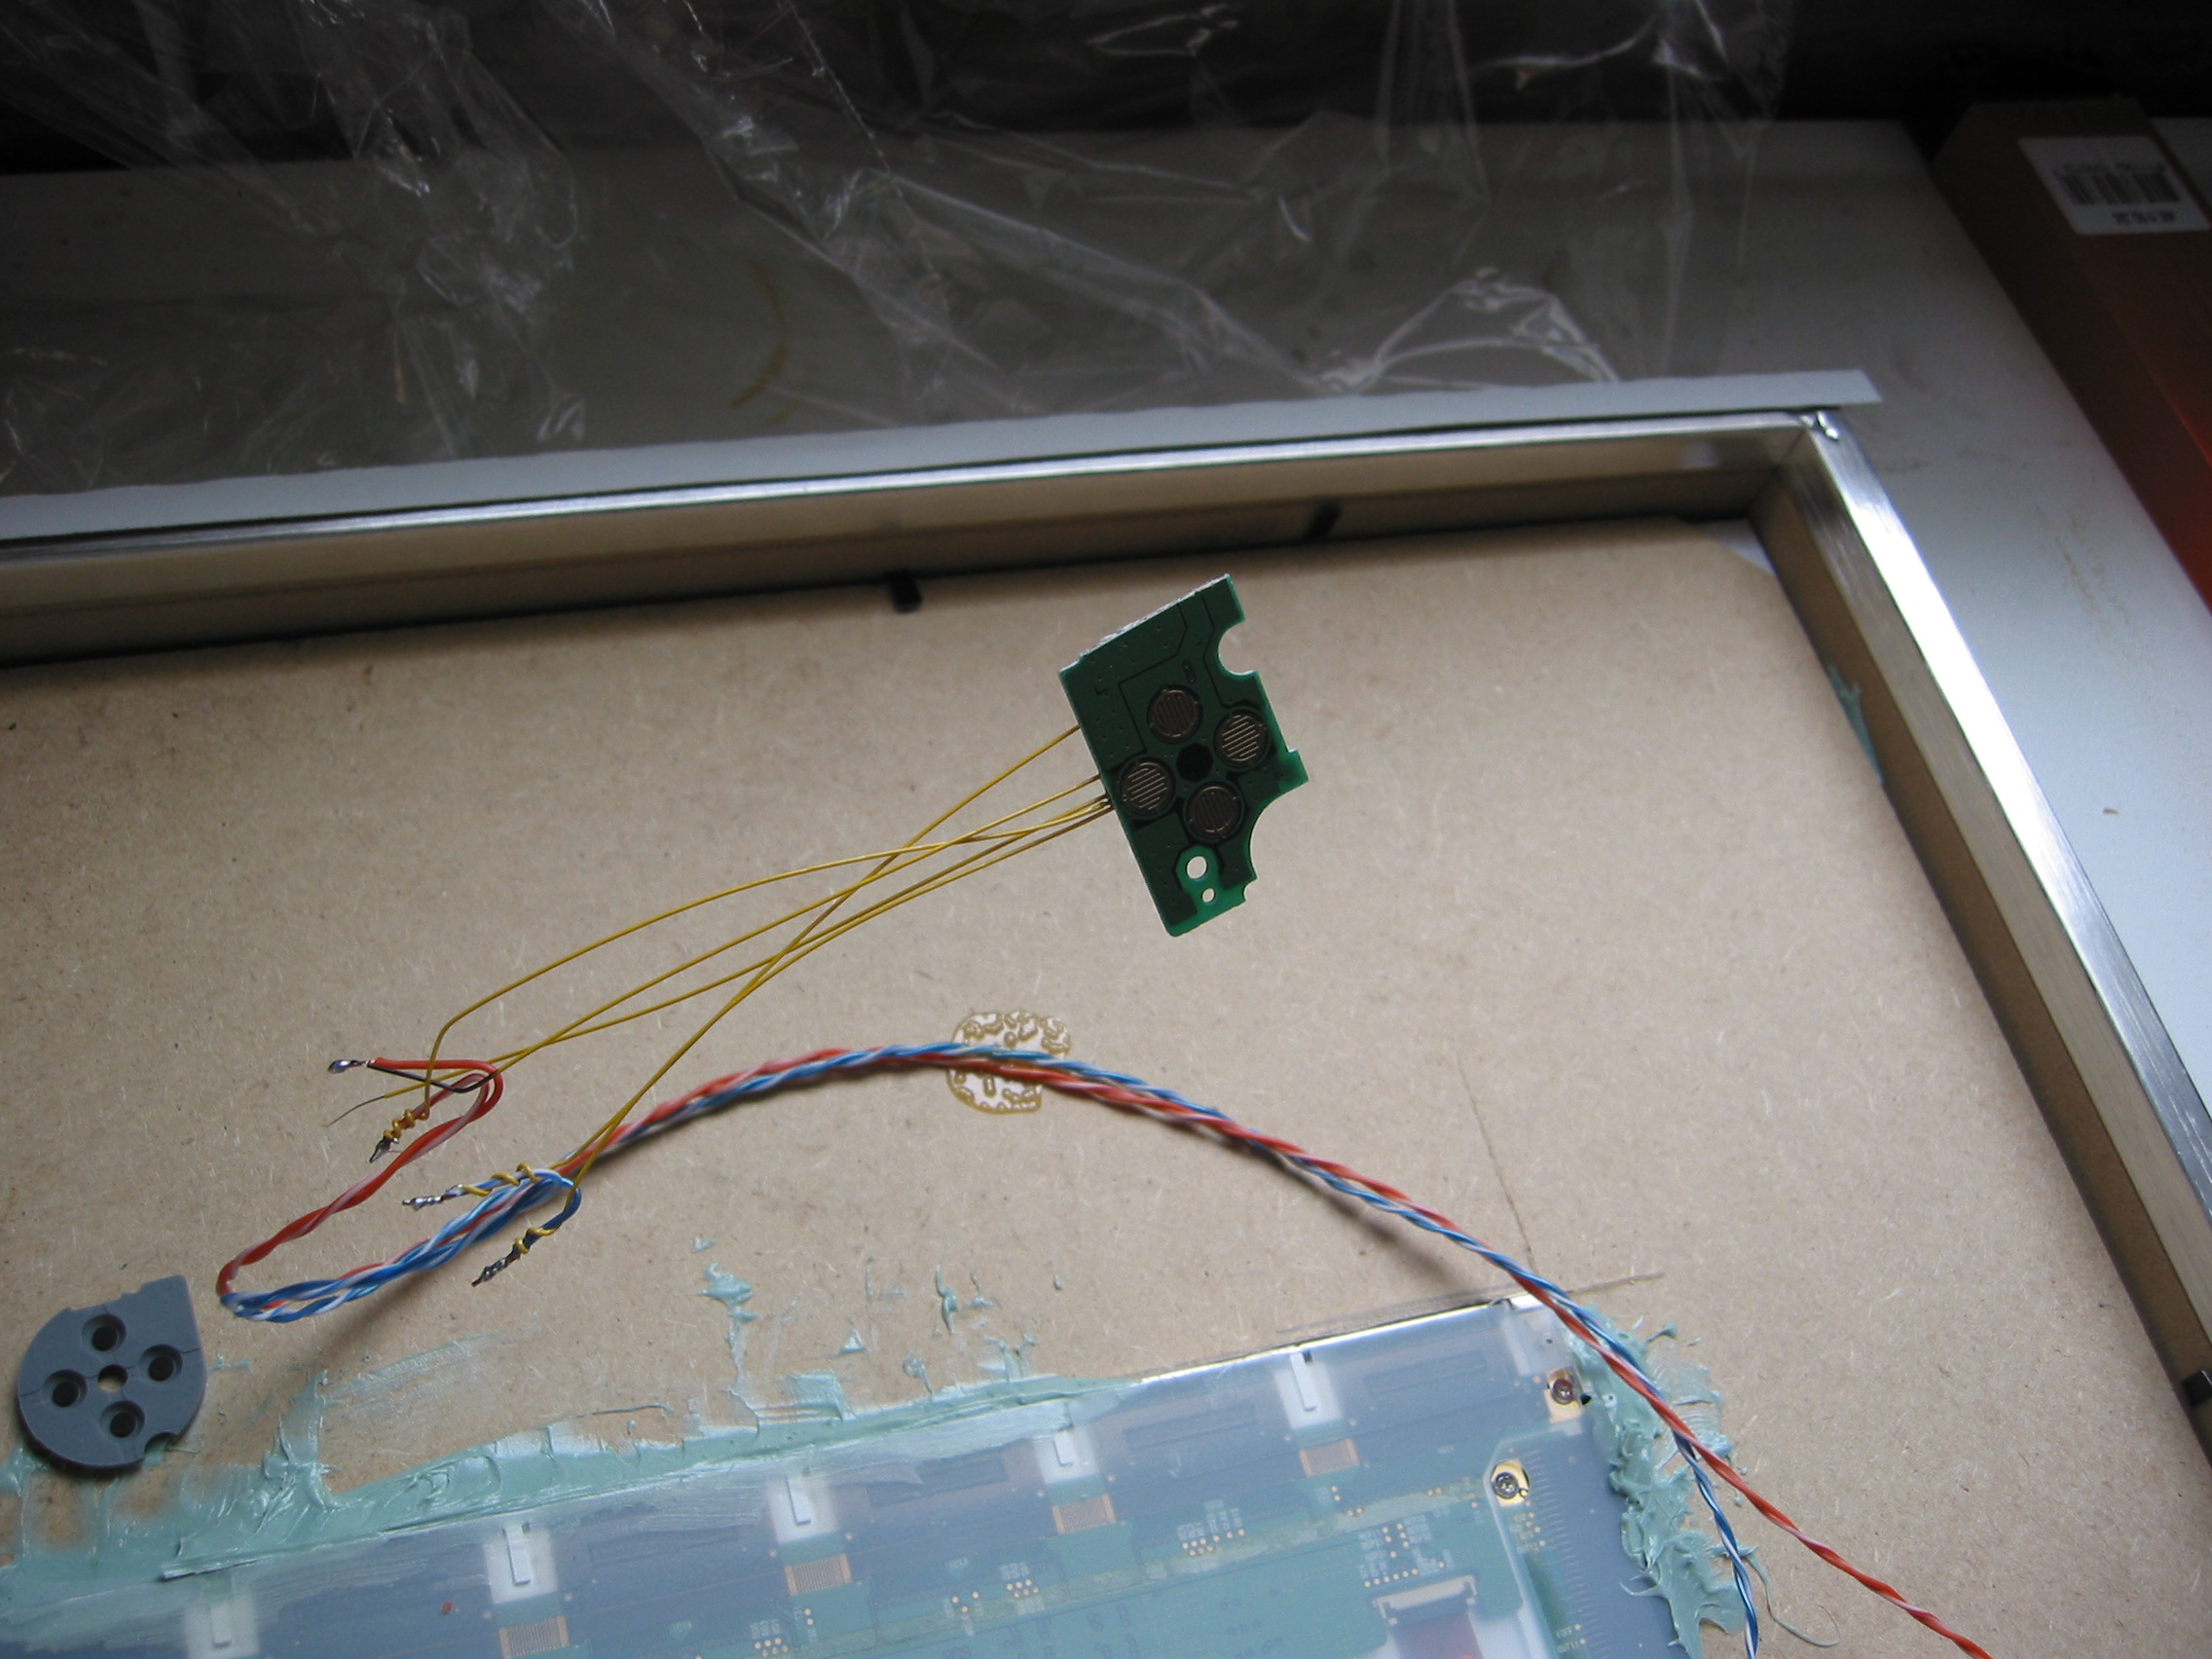 I needed a power switch. Something that was small and discreet, and that could be mounted on top of the frame and be almost invisible. First I looked at the nice little switches on the print layout from the touch pad. They were very tempting, but I didn’t want to break the layout as it provided the battery and speakers. Then I remembered that I had an old Casio Cassiopeia from the stone age. This one might have a couple of nice buttons inside of it, and surely that was the case. Taking it out and cutting of the unwanted pieces left me with the cursor key, which has four directions. |
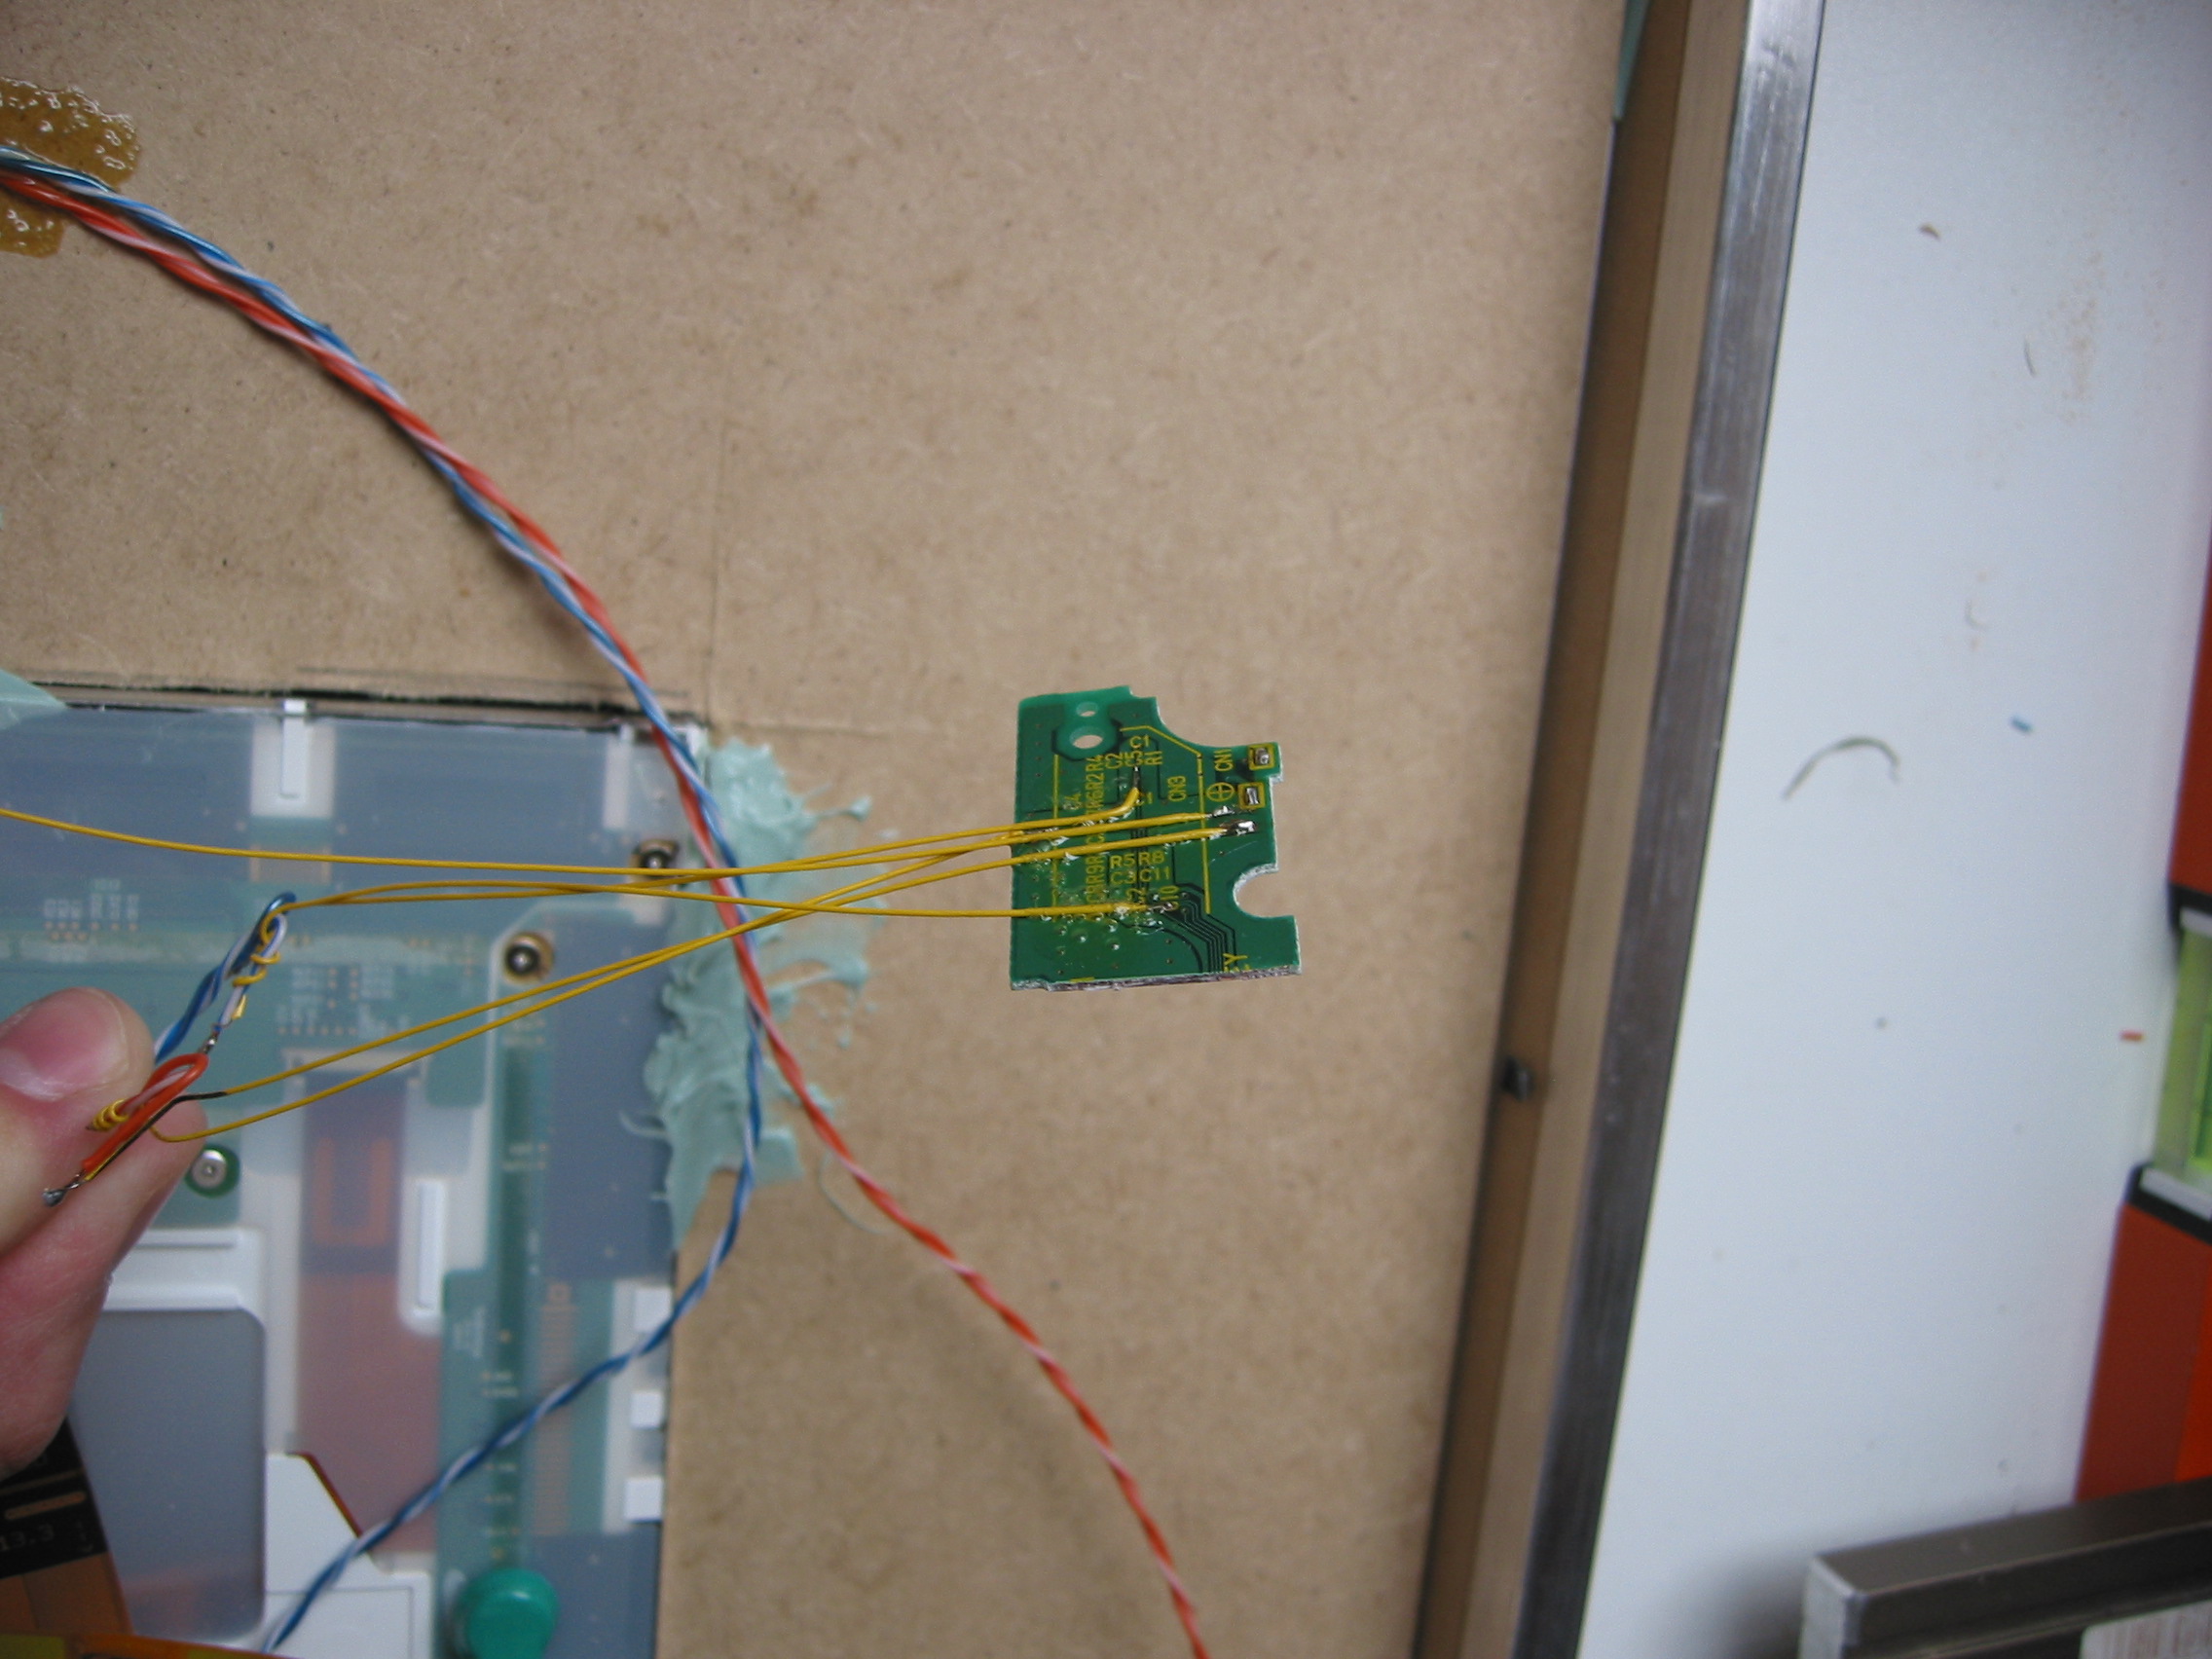 Carefully scraping of the paint on the pcb wires and then soldered the thinnest cables I could find to it. The trick here is to scrape off the paint, solder the copper strip and the wire, but not leave any leftovers. Then carefully putting the wire on the pcb strip and warming it until it sucks on to it. You don’t want any solder leftovers as you really don’t have the space for it. The wires are really not well attached and fell of when I started touching them. To prevent this to happen I poured some glue over the pcb to prevent this. |
So, we’re getting closer. To avoid that thick black power cable I cut it in half and attached both ends to a pair of RJ45 females. (Or/Wh and Br/Wh to be precise) This way I can use whatever cable I have, being a network cable of 10 meters or an orange cable like I later used. The orange cable by the way is the orange cable from a regular cat5 cable. If you look at the diameter of the inside of the power cable (not on the picture), you’ll see that it’s about 2mm. The cat5 cable is nothing like that and in normal circumstances using the cat5 as a replacement cable might not be a good idea. But, I don’t have a hard drive or any batteries that need charging so I figured that the little power I’ll need will come trough just fine on a cat5 pair. But – pay attention to this if you do it yourself. You don’t want your power cable to melt huh? |
Time to power up on the next page
Digital Picture frame. Second hand laptop. Touch screen, lcd frame. Modern art! eBay. geek, seconhand, used, cheap. Flat panel. LCD Monitor. Plasma
|
Beta testing. Note the yellow cat5 cable I used to power my walltop. I also mounted the speakers to the backboard rather then cutting them off. Who knows, I might want a boingk on every picture change in the future. The walltop works fine. Which is fine with me. Now what I had to do was to cut the paper frame that will be located between the glass and the backboard. Carefully measuring everything I finally got it into place. |
|
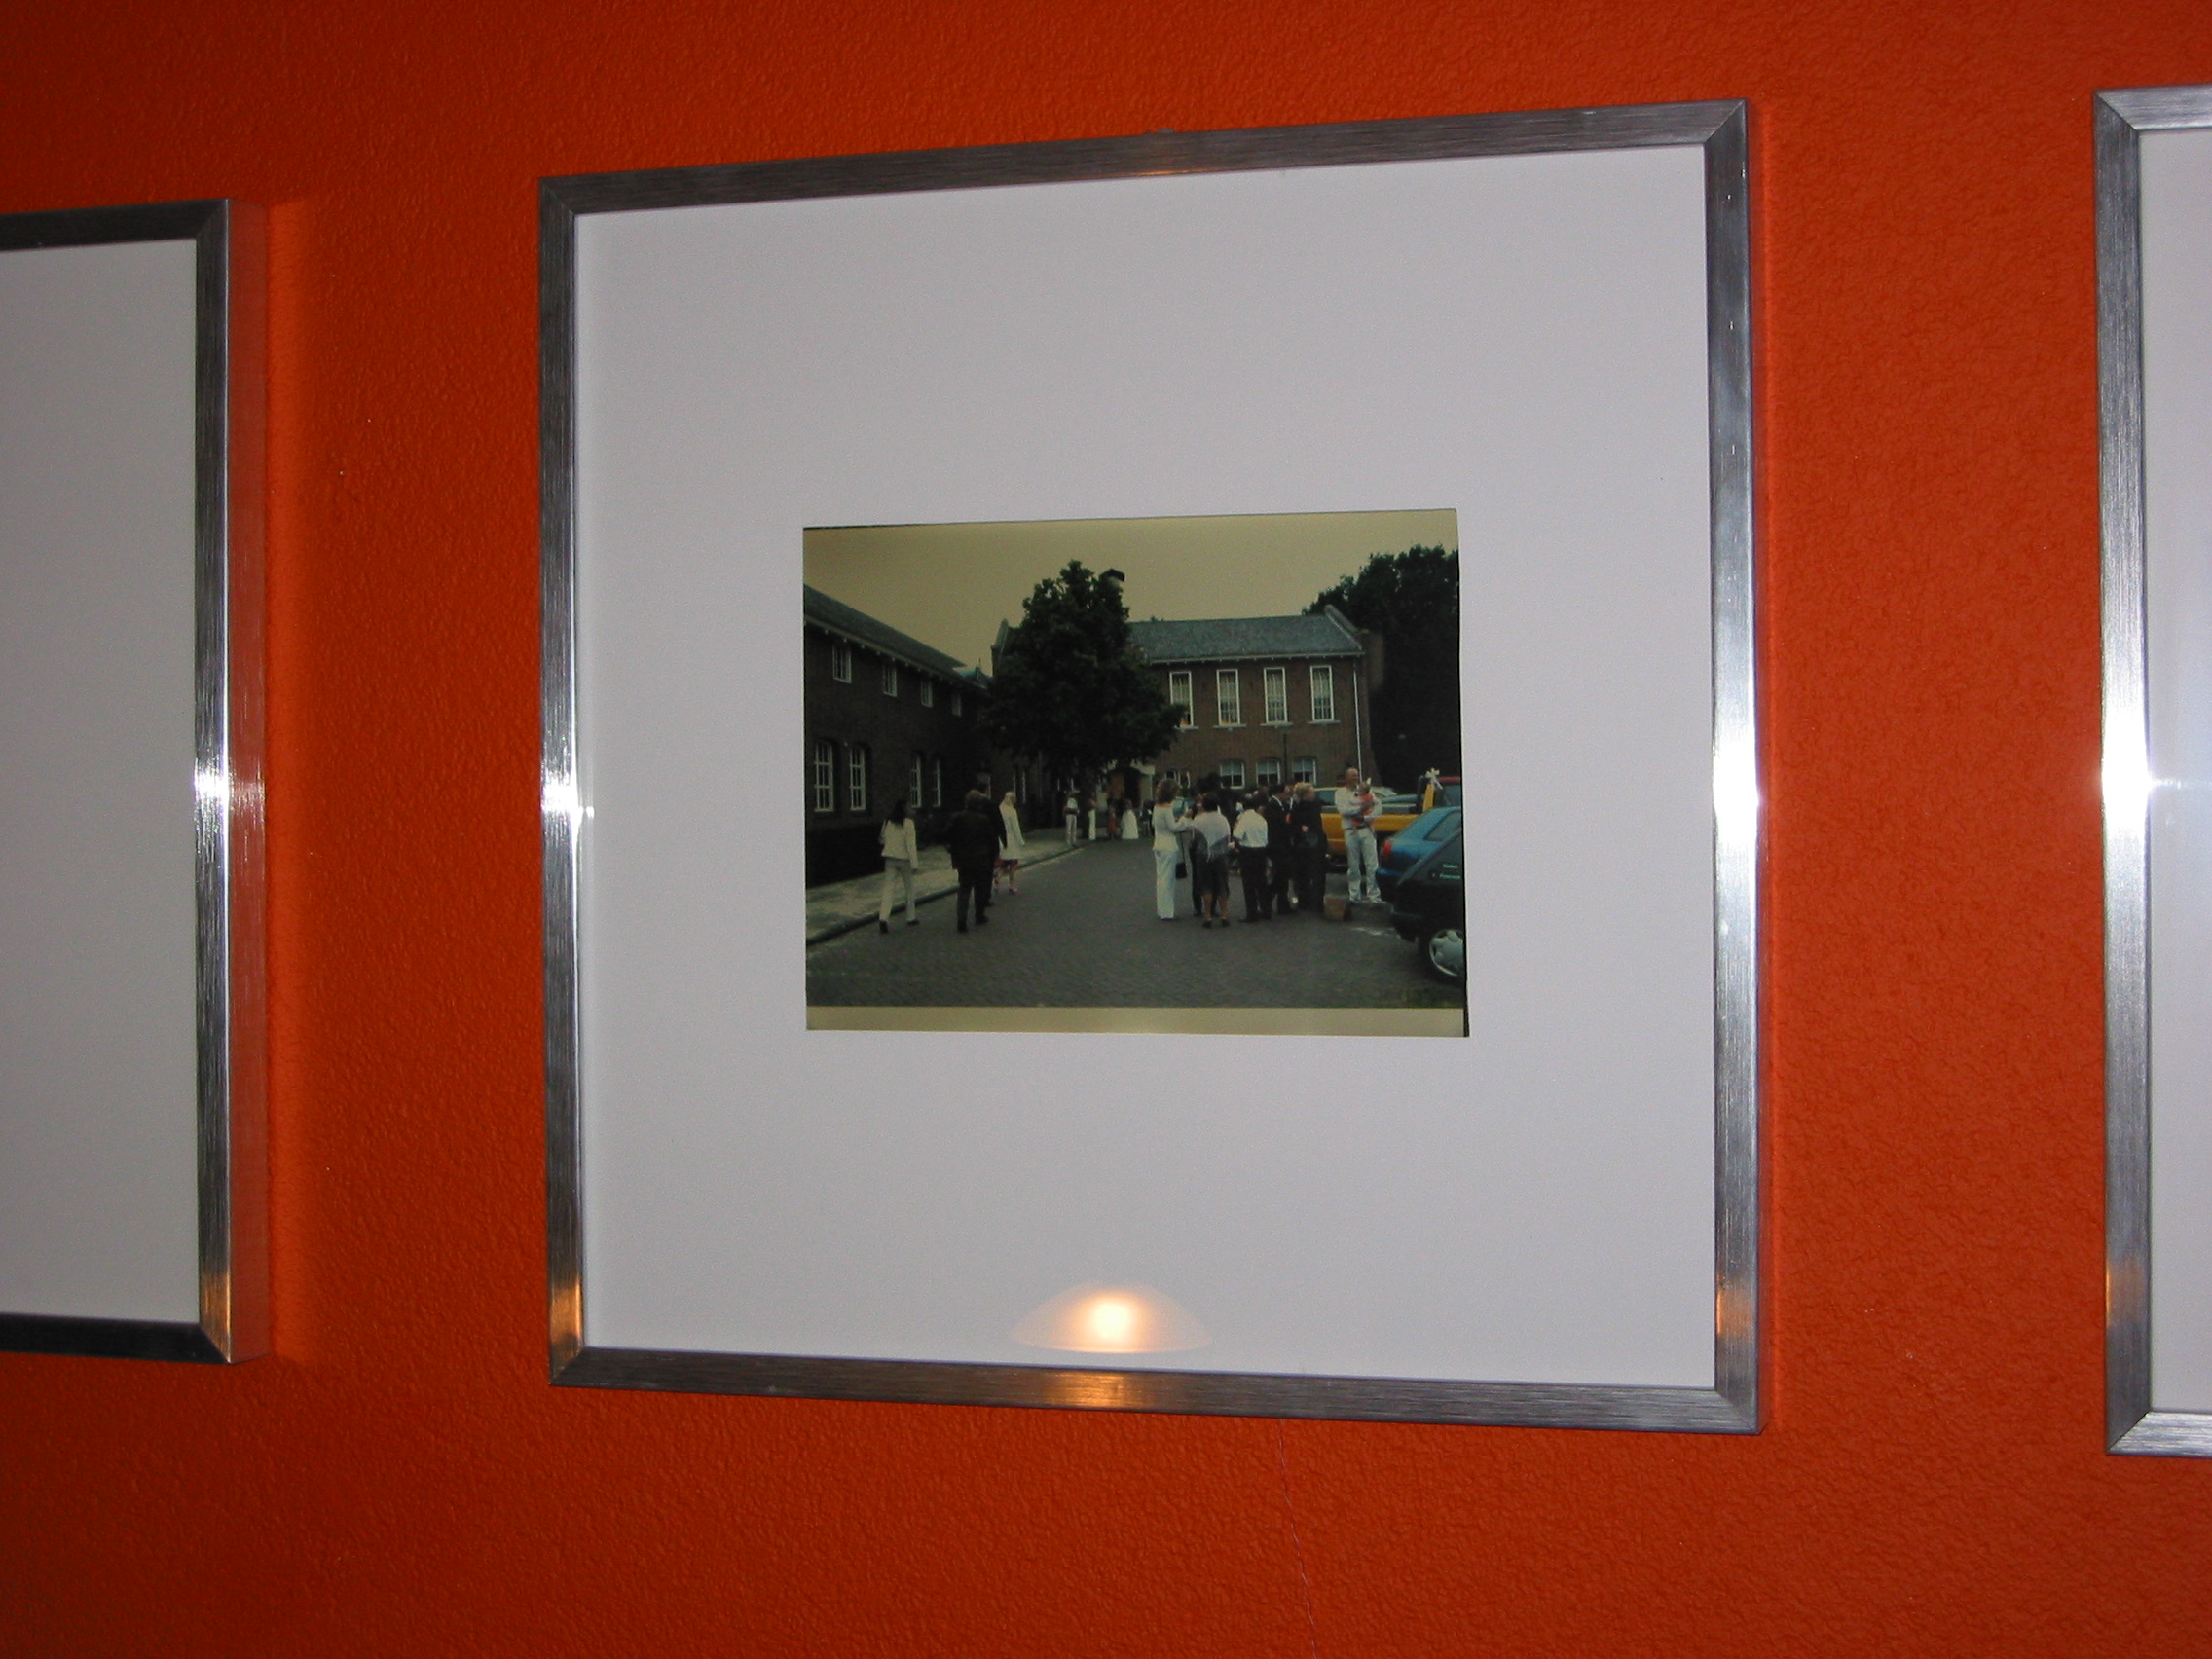
Voila! Done. Finished. And god does it look good. But wait until it hangs on the wall then it gets even better. |
|
Note the almost invisible power cable below the middle painting, and the almost invisible power and mouse button on top of it.
|
The final result in detail plus the conclusion – and the parts that we’re left over – on the next page
Digital Picture frame. Second hand laptop. Touch screen, lcd frame. Modern art! eBay. geek, seconhand, used, cheap. Flat panel. LCD Monitor. Plasma
 Conclusion. So would I say that I achieved what I wanted with this? Oh, yes. Oh, definitely! I now have my very own WallTop that is very discreet and completely quiet. Cost: ├óŌĆÜ┬¼21 (├óŌĆÜ┬¼20 for the frame and ├óŌĆÜ┬¼1 for the paper frame) Now, before you go and build one of these yourself – please keep this in mind: Take pictures! Then send me the pictures together with your text on what you did and then I’ll post it on a separate success stories page. Use the contact form. If you don’t want to slaughter you favorite laptop then I’m sure you can find a nice second hand laptop at ebay for a small amount. |
Digital Picture frame. Second hand laptop. Touch screen, lcd frame. Modern art! eBay. geek, seconhand, used, cheap. Flat panel. LCD Monitor. Plasma
You must be logged in to post a comment.
Help us continue our work with a donation
 Forum {beta} Forum {beta}Hatch ideas and help others with their ideas. |


20 queries. 0.174 seconds

June 17th, 2005 at 13:15
Nice one! I did one of these myself but this one is well polished! alsi you still have the keyboard and mouse working! ¤śē
I just control mine over VNC
Great job!
June 17th, 2005 at 20:53
DIY Digitial Photo Frame
This is a DIY that worth to mention about. You may saw some readily available digitial photo frame that can automatically show your digitial photos, or you may saw some hacks around that you can make a digitial photo frame yourself by using a lap…
June 18th, 2005 at 2:05
They did something similar with an ITX mobo @ Mini-Itx.com.
Your method is very cool as well.
June 18th, 2005 at 2:56
You made it on hackaday.com. Nice project, I wonder why you put in a wireless card though? Are the pictures stored on the network?
June 18th, 2005 at 8:30
Very nicely documented. Thanks for all the details. I am going to dig up an old IBM ThinkPad or maybe an old Dell laptop and give this a try. The integration of the wireless card is a nice touch (and prevents the need to constantly create new boot disks with slide shows on them).
June 18th, 2005 at 10:12
you fucking retard, if you have laptops and money to spare how about giving them to me instead. this is by far the most useless and stupid shit i’ve ever seen
June 18th, 2005 at 10:56
Very nicely done. Congrats on it working!
June 18th, 2005 at 11:06
La, do you want my 1994 Toshiba with busted motherboard or can I make a picture frame out of that?
June 18th, 2005 at 11:10
BlueCheez: Thanks! The reason for putting a wireless card inside it is indeed that the pictures are on the network. That way I can change the slideshow without burning a new cd. That also allows me to be more flexibe. (Showing other things as well like ‘todays weather from the internet’)
la: Thanks for your intelligent comment Keep them to yourself next time.
Meatgrinder, lectrohack and Alex: Thanks!
June 18th, 2005 at 15:43
This is very nicely done, i just wanted to mention that there are many others who have done laptop picture frames:
http://members.cox.net/fatbasta/dpf.htm
http://peach.mie.utoronto.ca/people/tsangc/frame100-index.html
http://channel9.msdn.com/ShowPost.aspx?PostID=9480#9480
http://www.awooga.nl/index.php?set_albumName=projectbling&
option=com_gallery&Itemid=26&include=view_album.php
What is interesting is how everyone changes the idea to make it unique.
June 18th, 2005 at 17:07
Nice! If i had an old laptop i would be cracking out the hammer and screwdriver, to build me one of those.
Well maybe not the hammer.
You mentioned that it is totally silent. Does that mean that you removed the fan for the CPU?
If so, can it stay turned on for a long time without overheating?
June 18th, 2005 at 17:21
Some Idiot: No the fan is still there. (see the pictures) It’s just that running a slideshow doesn’t demand that much cpu power and therefore the fan never starts. The other fact that helps to keep the system cool is that the mb is mounted in the lower end of the frame, so the air can circulate well.
June 18th, 2005 at 17:25
Zach: Thanks!
What I believe made this project a success is that this is a very thin frame. I only had 21mm (0.8″) to play with and if you look at the other projects then they’re all much thicker.
And if they’re thicker then they won’t melt in the interior, which was one of my goals.
June 19th, 2005 at 1:54
Nicely done. But wouldn’t it be easier to just remove the screen section, glue it to the bottom of the laptop and then put the whole thing in a frame? Unless you have an old laptop you’re still only using about 1.5″ of height max and that’s enough to fit in most standard wooden frames.
June 19th, 2005 at 13:11
Tom A: Thanks! Well, it would definetly be easier – but, not as thin.
21mm that I have here is 0.8″, and the laptop itself was 39mm which is 1.53″.
Surlely you can find frames that are 1.5-1.6″ thick but then it would not be as nice and slim (and melt into my interiour).
June 20th, 2005 at 12:47
Don’t think I need anything at all
Building a walltop [:o MeFi]
Not original but detailed: why crunch mode doesn’t work [:( BX]
Complete DC universe chronology [:o MeFi]
Robots: Lifelike android, Roach-controlled robot. [:o]
Time travel bans paradoxes? [:(]
Key: [MeFi] = Stolen fr…
June 20th, 2005 at 15:05
Wow that looks great! What a Partygag ¤śĆ
I would try it myself but I don’t have any laptops which I don’t need
June 20th, 2005 at 15:12
Your laptop: Hang it all
Ever wanted to rip apart a laptop and re-assemble it within a picture frame you can hang on the wall? Of course you have. Estimated cost: $25.
June 21st, 2005 at 1:21
“DIY Digitial Photo Frame
“This is a DIY that worth to mention about.”
What?
“…or you may saw some hacks around that you can make a digitial photo frame yourself by using a lap├óŌé¼┬” ”
Hey “lifehack.org.” LEARN. ENGLISH.
June 21st, 2005 at 1:56
aff q bosta…
June 21st, 2005 at 3:21
wait. I don’t get it. so you are gay, or not?
June 21st, 2005 at 3:41
NEAT! Company presentations should use this now
June 21st, 2005 at 4:44
wow. this is really nice, the cable is near to achieve invisibility.
About the button on the top, i just cant see them.. so thats god!
great job. if i get a cheap laptop some time, ill built my own walltop.
June 21st, 2005 at 9:21
Now all you need is a pair of triangulating motion sensors and you can have paintings where the eyes _really do_ follow you around the room. In fact, where the _whole head_ of the portrait swivels as you walk past…
June 21st, 2005 at 9:37
well
i did have some link from a dude who has mounted a flatscreen monitor to the wall for purpose like you did with the walltop ,but this is also a ceuwl idea.
June 21st, 2005 at 11:20
Great work & cool design.
I’m wondering how long does the LCD can last?
Do you ON it for 24hours x 7?
June 21st, 2005 at 12:47
Hey man, thats my Idea! (I’m from Germany) U have done a great work! looks beautiful!
June 21st, 2005 at 13:20
You are luck to have a notebook to that.
Here in my country even an old pentium 233mx is rip-off.
June 21st, 2005 at 14:01
Hey,
Very nice looking wall top. I think the next project should be a wall top that has touch screen and controls X10 devices. That would be sweet!
June 21st, 2005 at 14:28
Thanks all of you for the great feedback.
sxin: I guess the display will last as long as any laptop screen, and yes it’s on 24/7.
June 21st, 2005 at 21:37
I like this. I have an old Dell Inspiron that dropped off the couch and busted the power input on the motherboard. The power cable will no longer give signal to the board as the little flat piece of the mobo is broken. Is there a way to solder the power cable itself onto the motherboard so I can still provide power? I’ve held on to that poor old laptop for too long, not wanting to throw it out. Please tell me I can actually resurrect it.
June 22nd, 2005 at 0:48
Davedough: I would almost say it’s a no-brainer… but… if you’re unlucky then you’ve cracked the wrong things at the wrong places.
The power supply usually only provides 20vdc, so it should be simple enough to follow the wires from broken connector and see where you can solder the cable directly. You only have to find the one that contains the +feed. Ground I think that even a blind man could find.
You’ve got nothing to loose. Good luck!
June 22nd, 2005 at 3:12
This was a very nice presentation. Your layout is superb, content is clean, and the resolution of your pictures was great. I enjoyed reading your webpage and must say that I too will be building a walltop… New thing to add to the list.
Thanks and 73s!
June 22nd, 2005 at 9:30
hi.
Thank you very much. i never seen a good site like this .Proveding deep idea about all advanced technology. In this your expedition you gave as more precious knowledge about everything stuffed me.Would u mind to publish more catagories like u mentioned above.
June 23rd, 2005 at 16:14
Nice!
Btw: you have been buzzed!
June 23rd, 2005 at 17:09
I’ve seen these before, have you considered including a webcam to act as a mirror. I’ve seen laptops with a video in, but I’m sure there are USB webcams that would serve the purpose.
June 24th, 2005 at 0:29
What are the dimensions of the frame? I have a similar laptop that can go under the knife, but Ikea is 2 hours away, so I wan to make sure I get the right one.
June 24th, 2005 at 9:48
Stack: The frame I used was 50*50*3.4 (19″ 3/4*19″ 3/4*1″ 4/5) as outer dimentions. The available inner depth was 21mm (0.8″)
June 24th, 2005 at 12:40
NICE! id really like to try it but i havnt got a laptop handy. great work! really interesting & original. LA: what would you know. shutup.
June 24th, 2005 at 22:38
Chris, well done. Found you on HowStuffWorks.com. Also, it’s fantastic that you reply to questions posted. Very thoughtful.
Next project: you should mount something similar to your car, so you can post messages like Drive Faster or Get Off My A** or Now Listening to the Kingston Trio!
June 25th, 2005 at 4:58
Gr8 shit Chris. Would be nice if it was touch-screen.
June 26th, 2005 at 18:55
I have a question. How do you disable the keyboard, to get rid of the POST error? Thanks.
June 26th, 2005 at 19:25
somchai: Actually – I don’t know. I presume that the laptop doesn’t check for the presense of the internal keyboard, but only for ‘stuck keys’.
Maybe this is not the case with some other laptops, and in that case you might be able to disable this in the bios.
Another idea if you have post errors for the keyboard would be to dismantle the keyboard and only use the keyboard film. This way you can have the keyboard connected and avoid the post keyboard errors and still fit it as the keyboard film only takes a mm of space.
Hmm, but after thinking about it… I don’t think the keyboard in a laptop has any intelligens but only provides the keygrid and then the keyboard controller is placed on the mb. And therefore it can’t ‘see’ a missing keyboard.
Again, different laptops have different designs….
June 27th, 2005 at 5:18
hey, ive got a question… ive got a laptop thats come from the stone-age. its got a trackball and one of those screens that distorts the picture if veiwed from the wrong angle. 1st off, will the trackball be different to distruct & keep working? and 2ndly do you think that i should go ahead with it even though the screens like i said above?
by the way – it is REALLY cool. nice work.
June 27th, 2005 at 11:30
nice work!
June 27th, 2005 at 13:56
computerexpert: It will probably work even though it has a trackball. But if the screen is of bad quality then I wouldn’t do it because then it’s will not be that functional as a WallTop. I have one of these oldies myself that I’ve been thinking about converting – but the screen is too bad for it.
June 28th, 2005 at 4:30
ok
June 29th, 2005 at 5:00
hey, i have an idea. i didn’t really understand how you get it to start a slideshow with no HDD, so i thought you could just select ‘my pictures slideshow’ in the screensaver properties, and under ‘settings’ uncheck ‘use transition effects’. it worked fine for me.
July 8th, 2005 at 6:15
Laptop to Walltop
Take an old laptop and turn it into a LCD photo frame! With pictures and great instructions. MAKE GRYNX…
July 10th, 2005 at 22:01
Very inspiring project! I basically have the same problem with the broken IDE0 (except it broke while I was trying to build the thing!) so now Im trying to go the bartPE route. Im wondering how you can get your irfranview slideshow to launch automatically as well as any other details about your software setup that havent already been provided. Any help is greatly appreciated.
July 13th, 2005 at 0:11
woa..what to say ? nothing i supose !
very good job, awesome should i say.
someone would produce it and launch it for sure.
gratz from France man !
July 13th, 2005 at 14:26
I did something similar to this and was very happy with the result. But yours! Wow, stunning piece of work.
Looks like I’m going to have to redo it.
July 17th, 2005 at 17:31
Chris,
A great idea, a great job, and the best documentation I’ve found. I’m about to embark on converting my dell lattitude, but I’m not that strong on the software front. I’ve a working Dell with win xp, working disk, working wireless card, etc. So the computer is fine, just pretty useless in terms of power today when compared to my desktop or apple laptop.
Any chance you could walk me through some of the software mods needed to get this to run autonomously after boot and to disable any sort of screen saver or power saver type feature. I particularly liked the idea of storing and reading the photo files from my main desktop. I would like to use my Photoshop Organizer to create a pdf which would control all the fading, transition, etc.
Any help appreciated or if you know a web site better suited to post the question I’m all ears.
Thanks and congrats for such a fine job.
J
July 28th, 2005 at 4:46
#43, regarding the kb error possibility, you can use a wireless keyboard. Just get one with small enough of a transmitter.
Great article, I’ve been inspired!
July 28th, 2005 at 21:53
For those who want to take it easy
Digital photo frame
http://www.digital-frame.com
August 3rd, 2005 at 18:45
Laure,
You miss the point of techies doing what techies like to do. Build something geeky out of obsolete tech parts. Simply buying a digital frame that we all know about does not fulfill the geek side in us of creating something cool with our own hands. Plus, I cant help but think that link is spam and you’re trolling to make some money.
August 6th, 2005 at 22:08
What minimum system requirements are required just for booting XP/2k on CD with BartPE
and executing a slide show?
By the way: Very trendy and handy. You can always change your ‘painting’. Brilliant idea!!!
August 7th, 2005 at 11:14
DocOc: Good question! I’ve only tried it on 128Mb systems, but it might work with a bit lower like 96Mb.
August 13th, 2005 at 20:00
Hi Chris!
First of all, great job!
I was only wondering if, when you stick the mobo to the back of the lower side of the screen,
like you did, the mobo doesn’t overheat due to the warmth the screen’s lamp produces?
I got one of those huge Acer 1703s (17″) which produce a lot of heat when they are on for a few
hours. Or am I mistaking and is this heat coming from the batteries?
Keep up the good work and Greetings from Holland!
August 16th, 2005 at 23:17
2 sxin: Some TFT screens have lamp lifetime counter in OSD. I think, the standard lifetime is 35000 hours (source: Neovo F-417) which means about 4 years of 24/7 usage. I am now thinking about my own walltop solution, diskless, powered over ethernet cable and I will try to implement daily scheduled lamp power-off using command line tool NirCmd [http://www.nirsoft.net/utils/nircmd.html] BTW:Lamp power-off works fine, but any ideas how to turn it back on using cmd?
August 17th, 2005 at 20:46
Ron: The heat comes from the CPU (when working hard), the screens backlight, and the charger and batteries. I don’t use a battery so that’s less heat. I don’t use any CPU intensive applications so that’s even less heat.
But, the major thing is that there is a lot of space in the frame, and as the mobo is mounted in the lower part the heat will raise. So far I haven’t heard the fan kick in a single time.
August 19th, 2005 at 17:59
Hey Chris,
Nice job. Considering the same thing. My only problem is that I can’t get the BartPE to boot. The HD itself is totally fried but the IDE0 channel still works. I’ve been trying for a couple days to track down and answer as to how to actually boot with BartPE. If you could help me out in this area it would be greatly appreciated. it goes through the process of detecting harware and then the loader bar accross the bottom, but then I get a blank screen when I shoud be getting the Windows XP loader bar. Nothing happens at all after this. If I try the same cd on my desktop computer it works fine. Any ideas?
August 22nd, 2005 at 9:01
Starfox: I would have a look at the BartPE support forum for help.
You’ll find it at http://www.911cd.net/forums/
It sounds like you are having an compability problem with that computer.
August 27th, 2005 at 1:35
I have gone through all the bartpe sites and 911cd forums trying to find a way to get my dlink dwl650 card to recognise the ssid etc on boot. I am using a w2k3 version of bartPE which detects the card by default. I don’t want to add XpE to the bartPE cd just to get wifi zero config. You may not know the answer to the exact card i am using but would you mind sharing your INF file for your card. it may give me a starting point on how to edit the netprism.inf that appears to load my wifi card.
you can email me if you don’t want to post the entire file here (though I can imagine I am not the only one pondering it.) mrtorben “(AT)” gmail “(d0t)” com
thanks I appreciate it.
once i get it working i will link back to your site and give you proper credit for the help.
September 19th, 2005 at 4:40
Could I get the .inf file information that allowed you to run your wireless network.
Thanks.
September 22nd, 2005 at 22:56
Hey I was wondering as Ikea has many different sizes of the Ribba. What sizw did you use?? Thank you
September 26th, 2005 at 19:56
Kyle: It’s easy to forget the obvious! The frame is 50*50cm.
September 26th, 2005 at 20:04
Dave: I’ll send it to your email address!
September 27th, 2005 at 23:22
Can I also get the inf that you used for your wireless configuration? I’m having a terrible time finding info on it.
October 5th, 2005 at 7:23
g
October 13th, 2005 at 9:18
It’s great idea!! I must do it myself. I’m crazy about things doing myself! And that’s is amazing/ Tahnk you for great ideas
October 26th, 2005 at 15:15
brilliant! just fucking brilliant!
November 1st, 2005 at 2:57
grreat walkthrough!
Actually have wiorking on a project inspired by this in 2 weeks now
Want pics?
November 9th, 2005 at 4:09
Can I get a copy of the .inf too? I did something similiar with a D300XT but I have it booting on a HD, I like the BootPE idea and I’d love to give it a try.
November 24th, 2005 at 4:00
Great Idea, Just finished mine using an old dell latitude cpi and its great, I left xp load so that I could switch between the trippy windows media visualizations, picture slideshows, and animated gif files.
thanks for the Idea.
Hey La, your an ass!!
November 25th, 2005 at 9:53
graet job i think it turned out great
December 3rd, 2005 at 19:23
Hey Chris,
Nice conversion. My last DIY PC project (a Car Audio Jukebox using Unix (Cajun)) was way back in
1999 (http://oneironaut.tripod.com/) before the wave of modern MP3 players caught on (man was that
a huge wiring nightmare!). I eventually sold the car with much of the installation still in place
and the box has since been retired. Now I’m looking for a new project (or two) to work on.
I now have a damaged laptop which can be donated…
* Am I being stupid, or are PC tablets the ideal candidate for this kind of project?
* My new (working) M4438G Fujitsu-Siemans laptop will boot a Linux variation “Powercinema” straight out the box (instant-on for playing
media files, etc), complete with a remote control. I’ll probably try to do a similar software setup and by
adapting the REALLY useful IR serial device I built for the Cajun box, I can use any old remote control.
I doubt that I can pull apart the (OEM) Powercinema OS on the Fujitsu Siemans for my uses though…
* Are there any websites you’ve come across that focus on Linux based media installations that have professional
looking interfaces (like a free Powercinema interface)? Connecting that with wireless connectivity and a video-out
would make a pretty potent (and portable) “picture frame” media centre…
* does anyone have details of how to get a TV-sized video signal displayed on a laptop screen (security cams & all)?
Completely off subject, but a few months ago, I visited a friends house and saw they had created a frankensteinian
projector….. using an old laptop LCD and an old-school overhead projector to project a hi-res 9ft image onto a screen.
Nothing huge in terms of lumens (3000?) – hardly small and it requires cooling the LCD, but amazing detail for a projector, because
the LCD is so big! Definitely a future project to tackle. I’m trying to get him to create a website to document it.
Also completely off the subject – but media freaks may be interested – I see that various companies make 100% noiseless
enclosures now – using heat pipes, peltier heat junctions etc. See http://www.zalman.co.kr/eng/product/code_list.asp?code=020
& others. Ideal for a media centre for those so inclined.
Anyway – nice to see u’re still replying to messages. Any future projects ?
Regards,
Bob
December 4th, 2005 at 14:49
To BOB: I visited a friends house and saw they had created a frankensteinian
projector├óŌé¼┬”.. using an old laptop LCD and an old-school overhead projector to project a hi-res 9ft image onto a screen.
Nothing huge in terms of lumens (3000?) – hardly small and it requires cooling the LCD, but amazing detail for a projector, because
the LCD is so big! Definitely a future project to tackle. I├óŌé¼Ōäóm trying to get him to create a website to document it.
“I think this one is on TOMSHARWARE WEBSITE check it out.”
December 18th, 2005 at 22:34
Hey there,
I really like this hack, it’s very cool. So cool that I am trying to replicate it! I similarily have an old laptop with a busted HD (damn you, deskstar).
Anyway, my only trouble is that I’m having a hell of a time finding how to put wifi config info (WPA, too) into an .inf. Could you please send me your modded inf file? I’d appreciate it alot.
Thanks,
Paul
December 23rd, 2005 at 17:21
Do you have any more details on the software and script configuration? I am almost in exactly the same situation as you, I have an old laptop with a busted IDE chain that I have been booting with BartPE and my wireless card as a coffe table computer. I got a new laptop and I thought it would be a good idea to turn the old one into a picture frame. I wanted to keep the pictures on my network like you since I have no HD. My wireless card already works, I just need the details on running irfanview and how your script works.
Thanks a Ton!!!
December 25th, 2005 at 22:50
TOTALLY COOL. I am 12 and i am working on one of these myself. I am running linux on it
January 13th, 2006 at 17:11
Me too!
No pictures as they all look the same. Tosh T4900CT, unforch only 640×480, completely stripped down
to m/board & display module, no CD, hard-drive, PCMCIA, battery or anything non-essential.
Boots DOS from floppy, autoexec.bat makes a 2MB ramdisk, then copies command.com to ramdrive &
sets comspec, unzips about 50 jpgs from the floppy to the ramdrive, then runs an LXPIC slideshow
from the ramdrive. The floppy drive is unused once the slideshow is running, so its silent.
Works a treat & took less than an hour to do, apart from the shopping time (for the ├é┬Ż20 frame).
Thanks for the idea!
Phil
(Knottingley, UK)
January 14th, 2006 at 18:01
How bout trying this? Linux has that bootable Movix software to where you can make a picture slide show using any simple home video. You COULD use Movix to make a bootable CD that will load Movix and play the video you created…OR….you can have Movix put it on a cheap USB pen drive. Granted that would mean that you have to have the USB port mounted on the back side of the picture frame too but that shouldn’t be to hard…and the fact that you can easily remove the USB pen drive and redo the whole thing with new pictures. No network cables or drivers for network cards.
January 22nd, 2006 at 22:55
This was sooo cool that I had to rush to make it. It is going great but I am having the same problem getting my wireless network into my .inf file. Can you Please send the above mentioned .inf file to me as well please. This is one of the best DIY I have seen in a long time. Great Job!!
January 25th, 2006 at 12:56
Further to msg 82 above, heres a clip. Its a DOS based Tosh 4900ct, no network, hard-drive, CD,
battery, keyboard, PCMCIA, etc just bare motherboard & display module, and LXPIC software (which is
great & free)
video clip: http://home.btconnect.com/danewalk/other/phils_digi_picframe.wmv
Phil
(Knottingley, UK)
January 25th, 2006 at 15:10
Sorry chaps, one thing I forgot to mention… the connection between the motherboard & the display module is very short,
so normally you would have to place the motherboard towards the bottom of the back of the frame. Since a picture generally
leans out at the top, away from the wall, the bottom is where you have least the room for the motherboard.
My crude solution was to invert the screen, so I could have the motherboard at the top of the frame, and to invert all the
JPG pictures. You only notice whilst its booting up, once LXPIC is running, it all looks perfectly normal as you
can see from the video. Thats why LXPIC appears to be scrolling from the bottom up rather than the usual top down.
Also a note on keyboards – most lapop keyboard assemblies are just the switch matrix, not the electronics,
which are on the motherboard. Hence you can usually unplug the matrix & it will boot ok as the POST
sees the keyboard controller on the motherboard. I expect there will be exceptions where the controller
is within the keyboard module – I was lucky with the Tosh. The only downside was the screen res which is 640×480
and makes it look a bit too ‘framey’.
Cheers
Phil G ( philg at talk21 dot com)
February 21st, 2006 at 18:25
Chris,
I had started a smiliar project to yours before I ran into your website. I found you because I did d a search to solve a problem I encountered while taking my latop apart. I have been unable to remove the backplate from the motherboard (the backplate is the metal piece visible from the back of the laptop when it is fully assembled, the place where all the connectors are). I removed all (visible) screws and even removed the heatsink, but cannot remove the back plate. It “wiggles” a few millimiters, but will not come off, and I am afraid of using too much force on it. Is there a “trick” like a hidden screw or hinge, or does it simply take some force to get it out once all screws are removed?
Let me know if you need any more info!
Cheers,
William
February 22nd, 2006 at 15:12
William G: Sometimes a laptop is assembled as a perfect fit which means that you need might need to wiggle a bit more or apply some more force. When doing this you should be able to see where it’s stuck and then you might find another screw that you need to loosen.
February 26th, 2006 at 14:18
http://www.likelysoft.com/hacks/pictureframes.shtml has a number of resources for people wanting to do similar projects to this one.
March 10th, 2006 at 11:57
I have no idea how to script or do any of that stuff… could you send me links to it, or do you have a sample I could borrow???
Thanks a million!!!
March 10th, 2006 at 22:52
Hi Chris,
First of all, Good job, you have really made my day. I’m a person who likes to create strange stuff and this project was in my mind for a long time but always was wondering how I can boot the laptop with no HDD, and you have answered this question beautifully. The only question I have is how did you set your SSID and WEP setting in the .inf file.
Thanks,
Bakir
March 19th, 2006 at 16:47
i have a question the laptop i have dosen,t boot past the dell splash screen will this still work though
March 21st, 2006 at 2:28
Hey, great idea!.. just wish i had a laptop worth sacrificing.. my gf’s gor a new toshiba wiht a broken lcd.. but the damn thing is 500 smackers to replace. maybe ill go buy one from those ripoff people at the flea market… and btw chris.. a usb port ont heside of the frame would be cool. perfect for.. say a usb hdd or flash drive.. you could boot damn small linux from that. http://www.damnsmalllinux.org
March 21st, 2006 at 5:51
I really love this hack – thinking about doing one myself!
Maybe a *really* stupid question, but perhaps someone/Chris could enlighten me…
With all the cables loose and the motherboard out in the open, isn’t there any risk of injury/electric chock involved in touching the inner parts of the laptop? What about the flex cable from the screen to the motherboard? The touchpad print layout?
Or is it just the high voltage part on the screen that you should look out for?
March 21st, 2006 at 22:10
I think this is great and I’m venturing to do this myself. I’m just stuck on getting the SID and WEP into the .inf file. Could you send me your version as well? I would really appreciate it. Thanks.
March 27th, 2006 at 19:01
i find this sad, not the project,
the findings that i dont have any spare cash or parts to make this work lol
(or at least yet)
keep up the good work
for people who want to look at the bart PE site
goto
http://nu2.nu
for everything else id suggest live editions of linux
aka suse live disks
or ubuntu
or knoppix (this can be installed to hdd from the live cd as well)
suse 10 has sufficient wireless capabilities.
the only problem with the bart pe route, is if someone was devious to dob you in to MS for making an un-licenced pe disk you get litigation to the door, which is uncool
i preffer linux myself, as its open-sourced and this means basically in laymans terms, you do what you like , how you like, when you like, as long as u make ur mods available to others (if u do stuff under the GPL or LGPL)
you cant really do that with the ms software, its not really that configurable if you think about it, you only get an illegal oppertunity to mod a 16 color image on bootup on the pe disk
whereas on linux , you can theme it using millions of colours, so if u somehow make a remote startup (literally a remote or connect via network) you could make a fancy boot logo lol
e.g
the guy called chris could have some big penguin on it, and call it “the big linux picture frame, by chris”
and have some penguins walking down the sides of the screen while it boots up etc etc
and he could customise how the gui looks right from the login to what he would see within the desktop after he logs in.
its all about imagination, the possibilities are endless,
this frame is probably the tip of the iceberg
another idea i thought of , sounds like 2 suggestions above but its not in the end of it .
what about having a webcam wired in, so it shows through the frame on a little dot, as security based intruder detection system, like you could have some family photo showing on the screen (mabye as a screensaver) have some sort of second desktop (os independant saying) and have a wireless connection to it, (trapsing wires gives it away) and use it as a intruder cam (photos, videos, even if u have speakers on the laptops case put onto it, you could possibly somehow wire up a wireless mic and wind up a burgler in a dark room lol
lol i talk too much when i get all geeky lol (especially when im typing on my own lol, must be the geek-foo yeilding its light lol)
ok im gona go now, im tired (1:59 am GMT united kingdom)
laters
April 13th, 2006 at 13:05
Could I get the .inf file that you use for the autorun.inf and autorun-penetcfg.inf
April 18th, 2006 at 2:59
I had an idea though. A cheepo DVD player would be nice too. You can then use a remote, play video, and even more pictures on one disk.
April 25th, 2006 at 13:41
I just finished a write up on how I did much the same thing.
I have now made two frames from old windows laptops.
The laptops now run Damn Small Linux and sync with a
central file server. One frame is in my home the other at work.
http://www.thewares.net/item/33
May 4th, 2006 at 9:13
You have inspired me to follow in your footsteps. One Question though, the laptop I am working with does not have a CD-rom attached. What do you suggest? Many Thanks!
May 7th, 2006 at 13:07
Can you expand a bit on the network config you used? I’ve added the correct network drivers, but I”m not sure where you put the SSID and WEP key. Also, how did you get the auto configurator to not run, and instead, load the network automatically?
May 9th, 2006 at 11:43
i have a laptop and my keyboard has just broke down. what can i do?
May 9th, 2006 at 11:45
i need help! i was on my computewr when my keyboard on my laptop just broke down and now i have to use a screen keyboard which takes forever to s4end a messege to someone! what can i do?
May 9th, 2006 at 11:47
HELP ME !!!!!!!!
May 9th, 2006 at 12:40
Danielle: Well, simple. Get a new one…
No seriously, the easiest way to get your laptop functional again is to get an external keyboard. Either a normal one with a small round connector or a usb keyboard.
You could ofcourse also call the company which manufactured the company and ask then what it would cost to have it fixed…
Or – take your laptop apart and disconnect and reconnect the keyboard. Ruins the warranty and might ruin your laptop if you don’t know what you’re doing, but it has worked for me more then one time.
May 10th, 2006 at 23:33
Great project. I have a Presario laptop I found in the trash a few months ago and have been trying to find a way to convert the display into a standard desktop display for my son’s computer. Hardly as complicated a task as yours, but I have much less skill than you too. Where can I find a circuit diagram for the LCD display and tech requirements to drive it?
May 11th, 2006 at 13:08
Russ: I doubt that you will find a curcuit diagram on your laptop or the LCD screen.
I’ve followed several discussions about connecting a old laptop screen to a regular computer and what it all comes down to is that the converter (or components necessary) needed to get it to work is usually a lot more expensive then to buy a second hand LCD screen on eBay.
May 27th, 2006 at 21:10
You could wire in a USB port and dismantle a USB drive to store photos on instead of the network card… but you’d still need the drivers… This idea is great, i’ll do it when my hard drive dies… which wont be long since i’ve been using it on buses for the past two years.
I’m sure i’ll find a way around the network thing when i do it, since i don’t have a wireless hub and i don’t want to burn a new CD every week.
May 30th, 2006 at 6:52
Anybody ever heard of the “Magic Touch” touch screen add-on? I made my wall top a touch screen wall top with this ez add-on. Its just a piece of glass with plastic around the edges (pretty thin) made for just about any size screen. just velcro it on. plug it into the usb install the software and wammy!!! Touch Screen Power!!! Best thing about it is they are relativly inexpensive. I got a remanufactured one for under a $100. My walltop sits on my end table with a wireless keyboard in the drawer under it for surfing the web. This is the coolest diy project iv seen.
KEYTEC INC…
http://www.magictouch.com
June 16th, 2006 at 20:54
Hey, I have an old Dell laptop screen (without any wires). I cant turn into a hanging picture computer because all I have is the LCD screen itself. Although I would like to turn it into a desktop monitor. Any ideas?
July 6th, 2006 at 12:59
Just finished (well I mean have it running in a frame, still want to add stuff, more in a minute)
setting up a Dell C600 without a HD. Currently have the photos and Irfanview on a USB drive with a
wireless PS2 Keyboard/Serial Mouse. Works great.
My wish list is to get it hooked up to my network and have it start and cutoff
(the computer, no need to run it at night) at a predetermined time, and instead of using
Irfanview, use a scrensaver so that I don’t have to start and stop it when I want to use the internet.
Since I have a wireless keyboard/mouse, it would be nice to pull up a weather map or TV guide or
imdb.com (number of uses in the living room, BTW I have it setting in the entertainment center on a
shelf). Probably be simpler just to go buy a $65 HD and then I would not be limited by BartPE.
July 6th, 2006 at 15:28
This was part of the inspiration for my own walltop project. You can check it out at:
http://walltop.blogspot.com.
July 15th, 2006 at 17:52
WOW – You solved an irksome problem converting a Dell laptop with me – got the post error – figured the BIOS battery was just shot – never thought to look at the trackpad for the battery, but there it was! Thanks!
July 19th, 2006 at 8:47
Very nice job. I’d also like a copy of your .inf file which auto joins your wireless network. Once this is automated I should be up and running. Thanks!
July 22nd, 2006 at 9:34
Great job. I too am looking for a copy of your .inf file with your wireless network configurations. Thanks in advance
July 28th, 2006 at 5:23
i’ve created something like this also last year.
pics are at:
http://members.aol.com/pofrani/armada01.jpg
http://members.aol.com/pofrani/armada02.jpg
http://members.aol.com/pofrani/armada03.jpg
July 28th, 2006 at 7:12
Can you expand a bit on the network config you used? How do you get it to autojoin and not run the autoconfigurator thingy?
How and where do you put the SSID and WEP key in the .inf? I have everything but the network portion working. Thanks!
email: nrtimpan@gmail.com
July 28th, 2006 at 14:48
I can’t be bothered to read all the comments, but if you want to know what i used with mine, windows XP – using a wireless pc card. the picture frame contains a 20gig HD, cd drive (that i can pull out), battery.
i am using dameware to control it from another computer (to put new pictures in or movies)
i am using an OSX screen saver version for windows XP. i forget where i found it now..but it’s on
the web somewhere.
i am planning on putting a webcam on it as well (for my second version) (i have a couple more old laptops
that i got from work) and a better picture frame
August 1st, 2006 at 2:01
**** .inf file attached ****
Fleeb: By putting the information of the network into the .inf file it will default to this even though it’s over WEP.
Have a look at it here.
It├óŌé¼Ōäós all in the .inf file that controls the wireless card. If the settings in the .inf driver work then it will never ask for any more settings. The file attached is a modified version of the original driver for my card. I├óŌé¼Ōäóve added line 353 and 399 and you├óŌé¼Ōäóll need to fill in the appropriate information at the end (Wep key and sid) for it to work.
Cheers,
Chris
August 5th, 2006 at 23:55
Here is another one I came across. It looks clean. Though, this one boots off a hard disk and not the network.
http://farookh.spaces.live.com/
(It is a blog so read it from the first post for proper sequence.)
September 11th, 2006 at 17:06
Really cool, would love to do something like that one day, probably one year later, when I gwt into grade 10…need
to learn more. =-)
September 15th, 2006 at 14:39
I am in the process of creating a digital picture frame and I have created and BartPE boot disk and need more information on which files to edit to get it to auto run the slide show program and map a Network drive. Any help will be greatly appericated. Thanks.
October 8th, 2006 at 3:12
Great idea. Thanks for the inspiration. Here is mine:
http://blog.existenceexists.com/?p=39
October 18th, 2006 at 19:25
Hi I Want to make a walltop. I have downloaded Bartpe and that works fine. I’m not sure how to get
a slideshow working (It has no harddrive ) and how to map it to read a card reader (USB) or photos
(JPEG) from the cd or card reader. Can anyone help!!!!!!! warwick
October 23rd, 2006 at 12:18
Great work, and inspiriation to make my own:
http://privat.bluezone.no/toreb2000/picframe.html
Regards from Tore
October 29th, 2006 at 15:55
Hi, I’ve solved the problem. I load Inview on a 1gb pen drive plus 460 photos (jpeg) I now run it off the pen. Works fine Warwick
October 31st, 2006 at 10:51
Im liking these projects! I stumbled across this page because I am looking to do something a bit wacky. I want to make a games console using laptop technology because the boards are small, low powered, can use batteries so it would be good to take anywhere. I wont need a keyboard, mouse or screen. Just a cd/dvd unit, the board with cpu & ram plus a power source (batts or mains).
Question to anyone here is where do I start?
November 3rd, 2006 at 14:40
Chris, you were my inspiration. I made a DPF using a Dell Latitude CSx (yours is not a CSx, by the way) and it turned out awesome. That IKEA frame is the best frame I’ve come across for this project. If anyone wants to see how I made mine, I documented my steps in detail at http://www.ferhoodle.com
December 12th, 2006 at 9:42
This is some really creative stuff. There was a talk (myth?) some time ago about pictures in Bill Gates’ house that would change according to mood. May be it was just a desktop hidden behind the frames? There’s some other weird stuff people can do with old laptops — http://www.obsoletepc.org/?bw4553df72c3ff6z — people who have the time anyway. Sacha, would love to hear what comes of your ideas. Game console sounds like fun!
December 27th, 2006 at 17:02
i am planning on putting a webcam on it as well (for my second version) (i have a couple more old laptops
that i got from work) and a better picture frame
December 27th, 2006 at 17:39
Im liking these projects! I stumbled across this page because I am looking to do something a bit wacky. I want to make a games console using laptop technology because the boards are small, low powered, can use batteries so it would be good to take anywhere. I wont need a keyboard, mouse or screen. Just a cd/dvd unit, the board with cpu & ram plus a power source (batts or mains).
March 19th, 2007 at 13:50
Great inspiration, amasing. See my walltop, made from HP Omnibook [ http://www.proluka.net/walltop ]
BTW: Anyone sorted out the problem with automatic PowerOn / Off on given time?
April 11th, 2007 at 22:16
Does anyone have a copy of his launch.cmd?
April 16th, 2007 at 14:16
Duane G.: There isn’t that much to it but here it is…
@echo offecho Batchfile started...
net use P: \\gerado\public
x:\Programs\Nu2Menu\setres.exe h1024 v768
if exist == "\slide\slide.exe" goto slide
goto end:
:slide
pskill nu2menu.exe
\slide\slide.exe
goto end
:end
exit
April 16th, 2007 at 18:09
Chris can you shoot me an email with a copy of your inf for Wireless card to add the SSID and WEP Key at startup.
May 6th, 2007 at 22:58
Here is mine (work in progress) —
http://kedardamle.blogspot.com/2007/05/my-very-own-digital-picture-frame.html
http://kedardamle.blogspot.com/2007/05/digital-picture-frame-contd.html
May 7th, 2007 at 14:30
I did a laptop-to digital-picture-frame project using my wifes broken Vaio Laptop. I first repaired her laptop and then I converted it into a frame. It’s based on XP since it already had XP installed. Uses Slickr and wifi so that updating photos is done entirely on the internet. Fun project and didn’t cost me much.
Here’s my writeup on it: http://brentevans.blogspot.com/2007/05/converting-old-laptop-into-digital.html
May 8th, 2007 at 1:36
Hi Chris,
I’ve always wanted to build one of these and this post pretty much inspired me and motivated me enough to get off my lazy butt and get it done.
Mine is still a work in progress but has many similarities to your build. You can see my write up on my blog at http://blog.dimensionzero.ca/?page_id=254
@Brent: It’s pretty funny, I just saw your build and it’s really similar to what I have planned as well. VNC, SlickR and a Sony VAIO on a timer except that yours is much easier than what I’ve got going on, lol.
May 8th, 2007 at 19:00
looking at your digital photo frame, I wanted to know if it was possible to run it over eithernet? like power over ethernet. There are laptop that have pcmica card slots and you can use CF to replace the Cdrom drive. plus with a wireless card you can connect to it and change the pics on it. Let me know!
June 13th, 2007 at 10:41
[Quote]
# TJ Says:
May 8th, 2007 at 19:00
looking at your digital photo frame, I wanted to know if it was possible to run it over eithernet? like power over ethernet.
[/QUOTE]
Power over ethernet would burn not only the cable but also the NIC and ultimately the motherboard.
June 28th, 2007 at 15:26
Chris can you shoot me an email with a copy of your inf for Wireless card to add the SSID and WEP Key at startup.
July 2nd, 2007 at 4:30
Hi,
I built one myself, you can see it booting on youtube:
http://www.youtube.com/watch?v=LQFT2ZaFOjI
March 4th, 2008 at 20:02
anybody know where i can find instructions to put a built in webcamera lens and built in microphone into my old laptop? sounds cheesy but i love my laptop (use it for work) and don’t want to change it. I have the instructions for how to take it apart and get to the mother board. thnx.
April 5th, 2008 at 13:14
It’s a great idea for recycling old laptops. I recently found an IBM thinkpad t30 on the sidewalk, with no battery, but I can’t make it work only on the AC adapter. Is there any way to fool it?
Greetings from sunny Spain.
June 19th, 2008 at 16:48
What an excellent idea, I was browsing for ways to use a laptop display as I have an old Vaio with the ‘instant death’ power problem and I couldn’t be bothered to fix it. Also I have used this machine sitting on my coffee table with the my pictures screensaver on buy it is abit naff to see the whole machine. I have some pretty thick frames and I expect i could mount the whole laptop folded out behind one. With maybe another still picture below the screen to balance the frame.
Many thanks for the idea.
October 22nd, 2008 at 9:38
Ha I just came across this — to funny
August 31st, 2009 at 11:56
Hi,
I’m desperately looking for XP drivers for my Latitude CSX H, exactly the sound card driver. Does anybody own the same laptop? If so, would he/she be so kind to send me a copy of this driver?
Thank you very very much.
November 6th, 2009 at 12:11
just fabulous. the local university sells drive-less laptops for a few bucks each, and this can put up season-appropriate family pictures all in one, can swap at will, and not take up every inch of wall space. I like your three frame arrangement, though instead of matted artwork I think I will use one way glass in the digiframe and mirrors in the other two so if we have a powerout, it will only show three mirrors instead of artwork-null-artwork.