
Bluetooth audio in the caror iPAQ audio without wiresor Hacking the FA303A HP Bluetooth headphones |
By Christoffer J├ā┬żrn├ā┬źker |
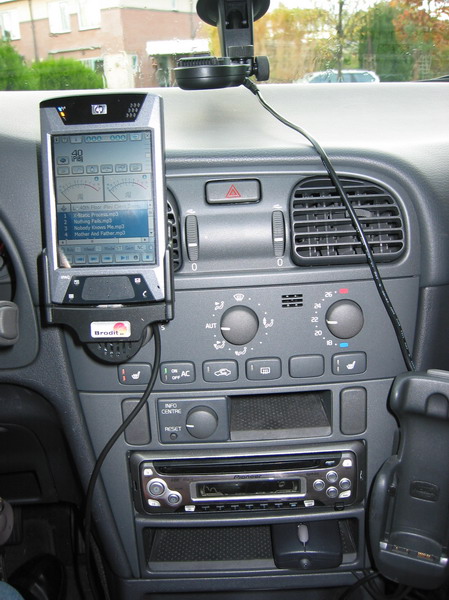
 In a previous project ( iPAQ car mount ) I finally got my iPAQ easily transferable between my cars. I mean, the iPAQ is such a great little companion of mine in the car, it shows me the way and it entertains me when someone else is driving. But mostly what I use it for is to play those mp3’s as I’d rather have them with me all the time instead of burning them on a cd (that gets scratched and finally lost). Every time a jump into my car I slide my companion into it’s cradle were it gets some juice and then I attach the 3.5mm plug for the audio. Fine – so far. But when I exit the car and pull out the iPAQ out of it’s cradle it has happened more then one that I forget the audio cable and I seriously wonder how long his health is going to accept this. Either the cable will break (big deal..) or the headphones output will break (now that’s a big deal!). |
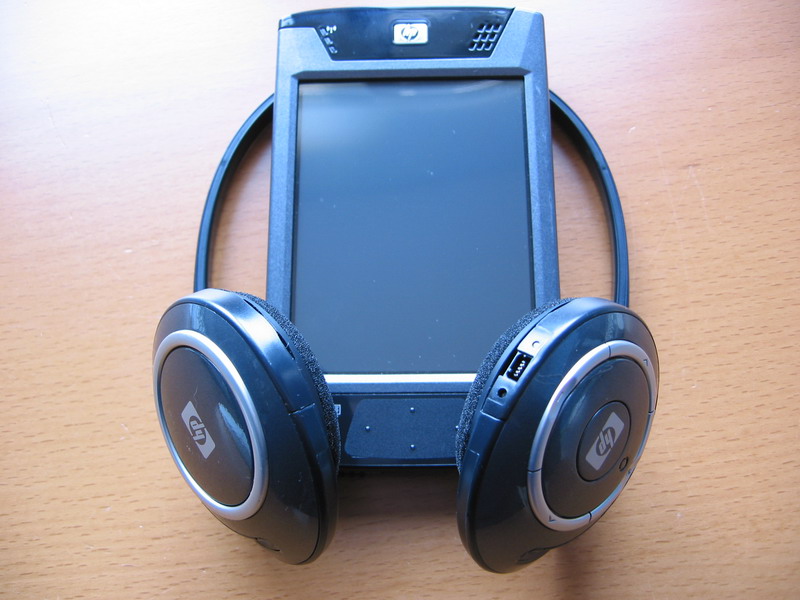 Well this is problem that has to be solved and the solution is a Bluetooth audio receiver and can be bought for a price varying between $75-$150, but (there’s always a but) they’re (1) not designed for the car so they don’t accept a noisy 12v and (2) they don’t state that they work with my iPAQ. HP has set of wireless Bluetooth stereo headphones ( HP FA303A#AC3 ) and they have one drawback which makes this project happen. The headband snap! So tons and tons of people has gotten a new replacement set sent to them and HP hasn’t asked for the broken one back. The broken one usually ends up in a drawer or are rebuilt onto a regular set of headphones ( like Jonathan did ). You could of course also buy a new set just to take them apart and get your hands on the receiver, they’re right now sold for about $57 ( ├óŌĆÜ┬¼49 ) including shipping at many places. Frankly I’ve read that this headset works with a majority of smartphone running Pocket PC on them. The only thing you actually need to do is to manually get and install the Broadcom / Widcom Bluetooth audio stack and you should be able to use the HP Bluetooth headphones – or it’s dismantled alike. |
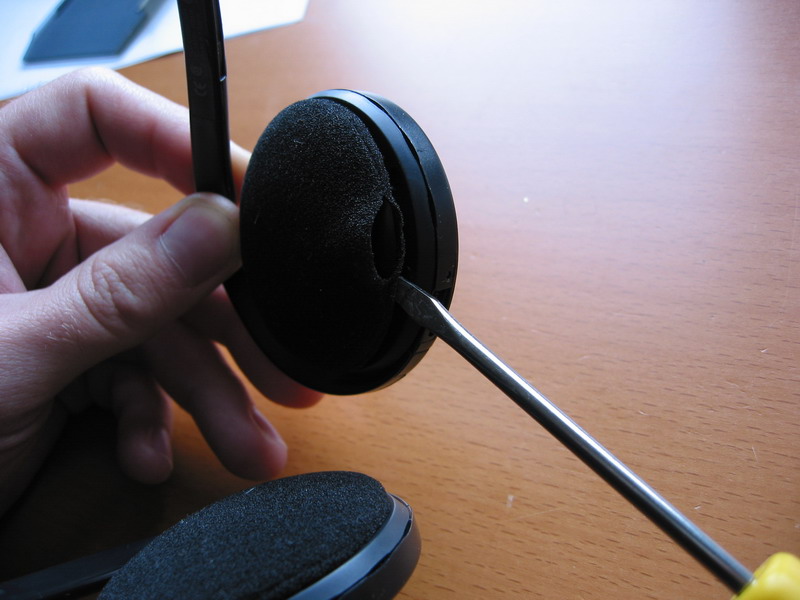 Not that it matters but when I wanted to open up the headphones I just pulled the fabric out as there were no apparent other ways to open them up. This resulted in a nice tear in the fabric and I soon realized that inserting a screwdriver where the fabric turns inside was a better solution. |
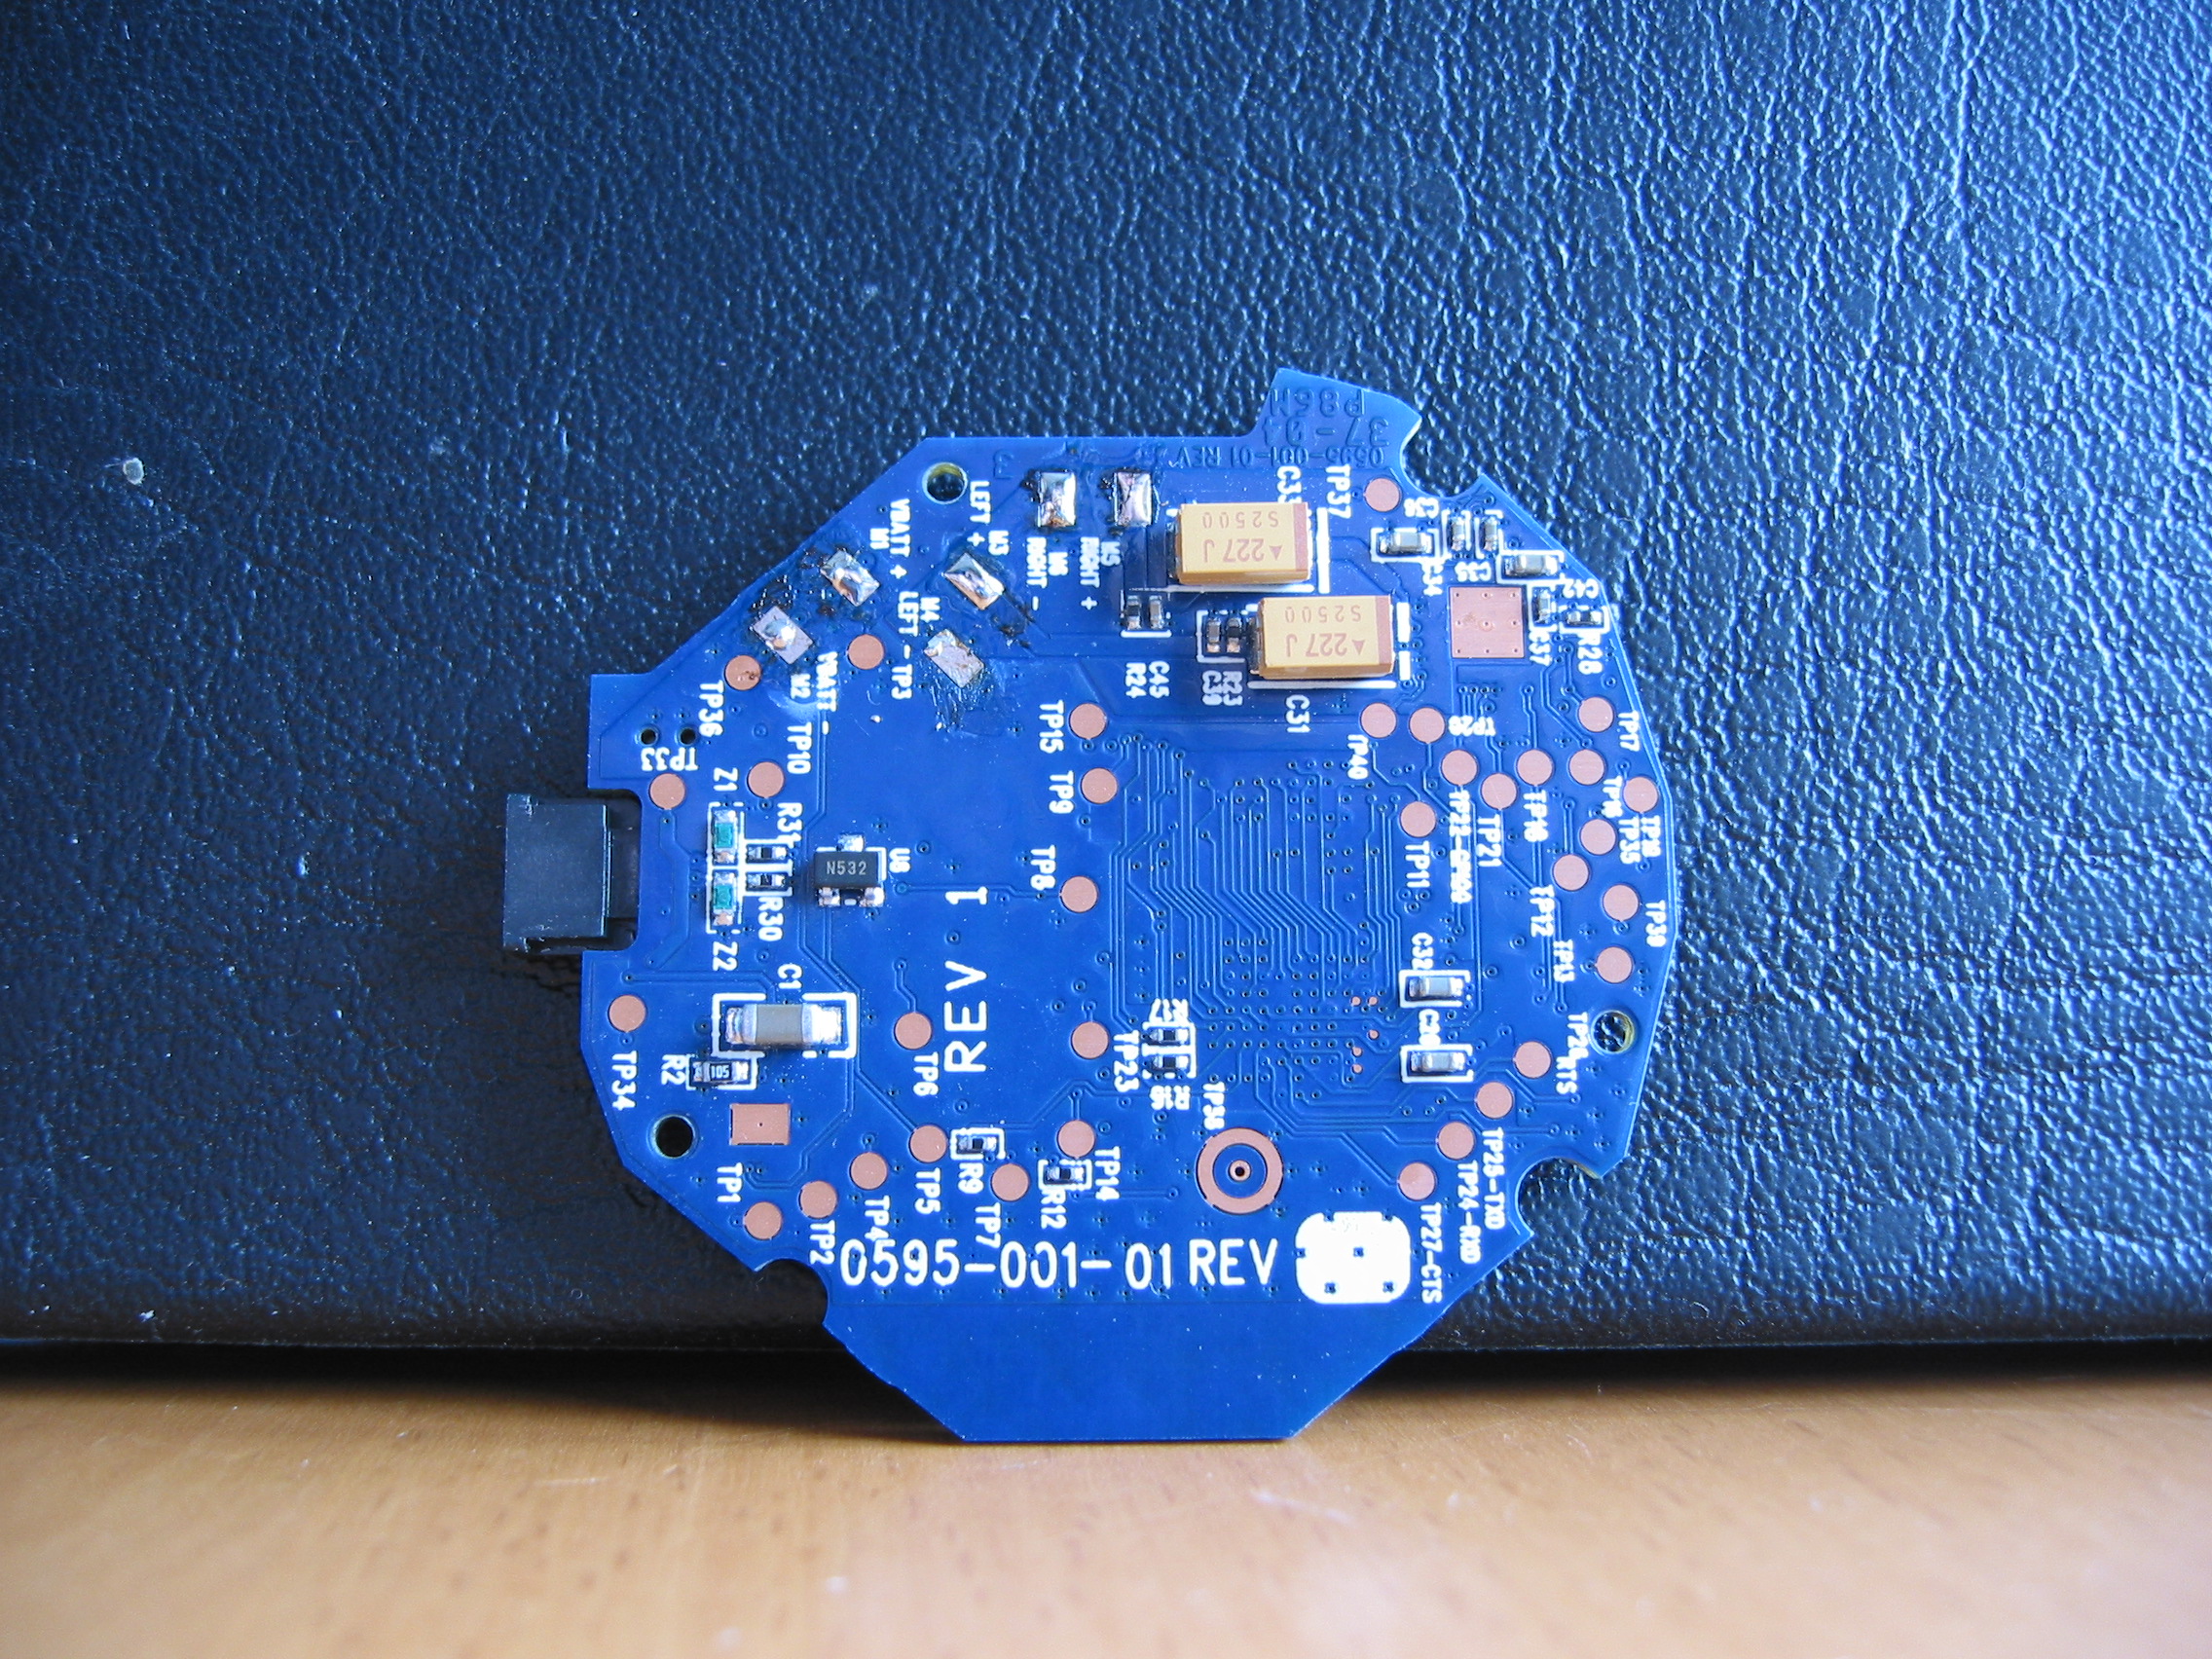
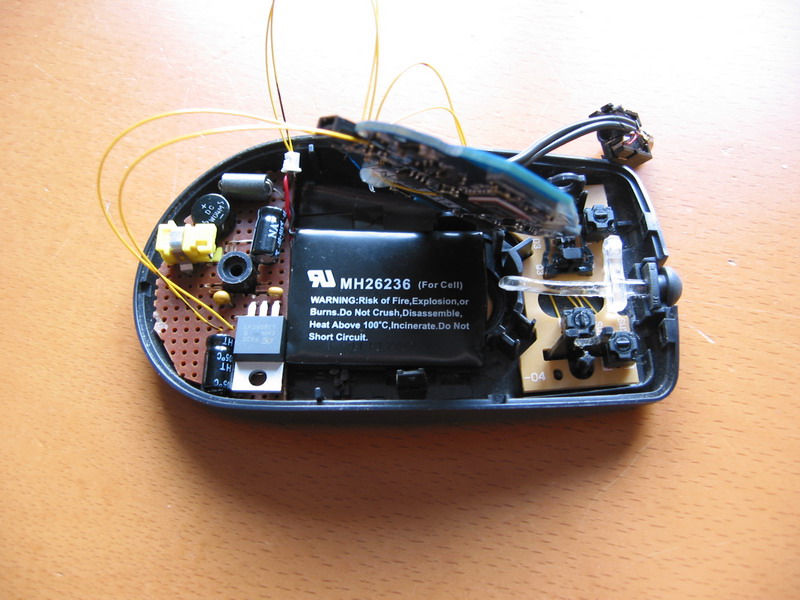
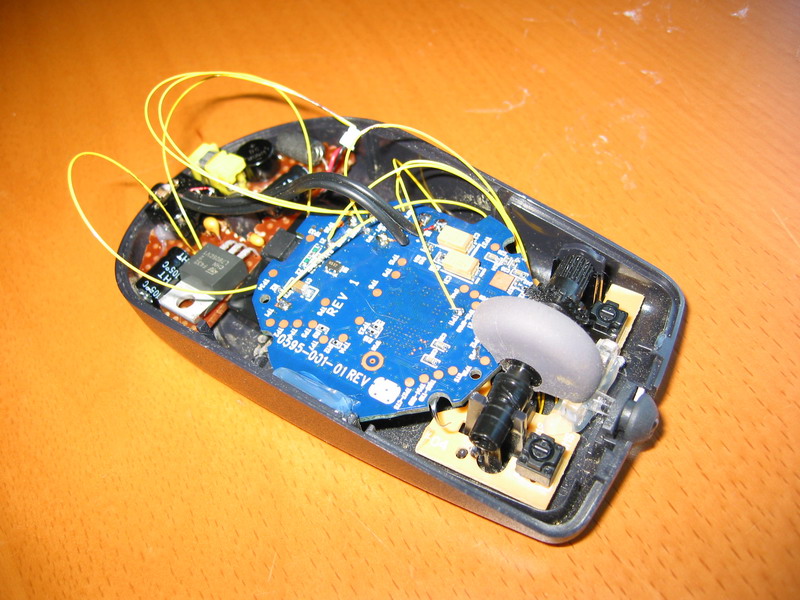
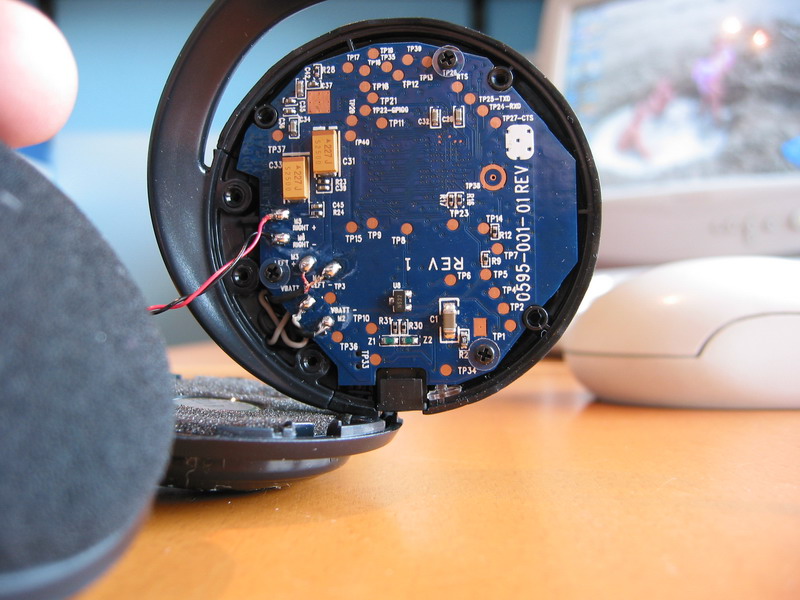 Opening the headphones up reveals the back of the PCB that contains everything except for the battery. The battery is located on the other side of the headphones. The connections for the speakers and the battery are very clearly marked so I just desoldered the cables and took the board out. Have a look at the following high-res pictures of the circuit board. |
 |
 |
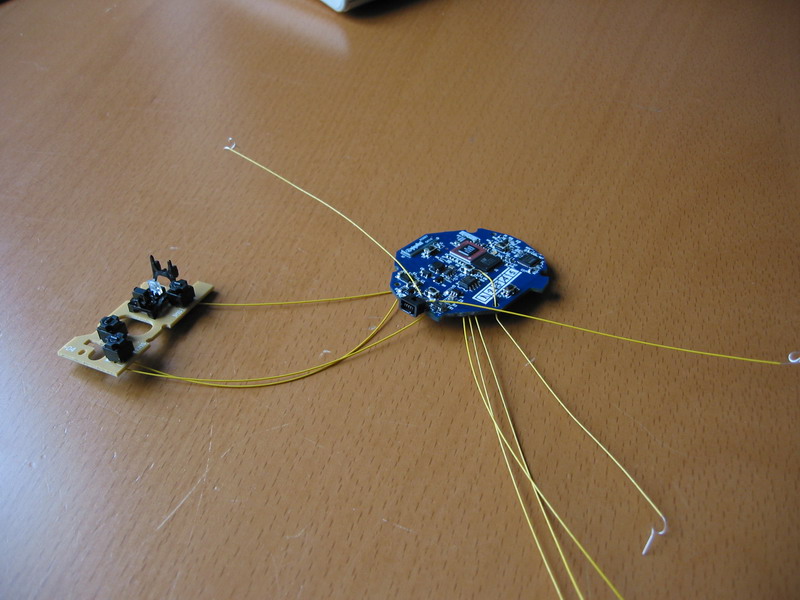
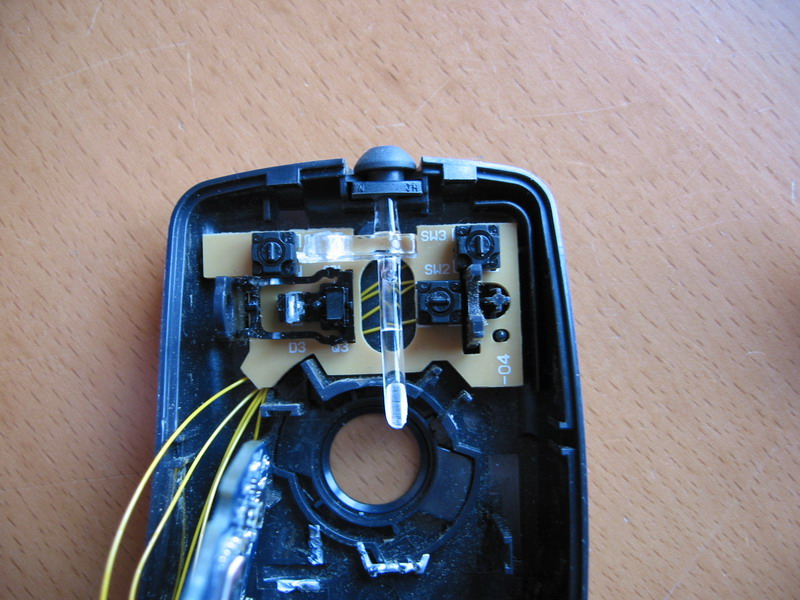
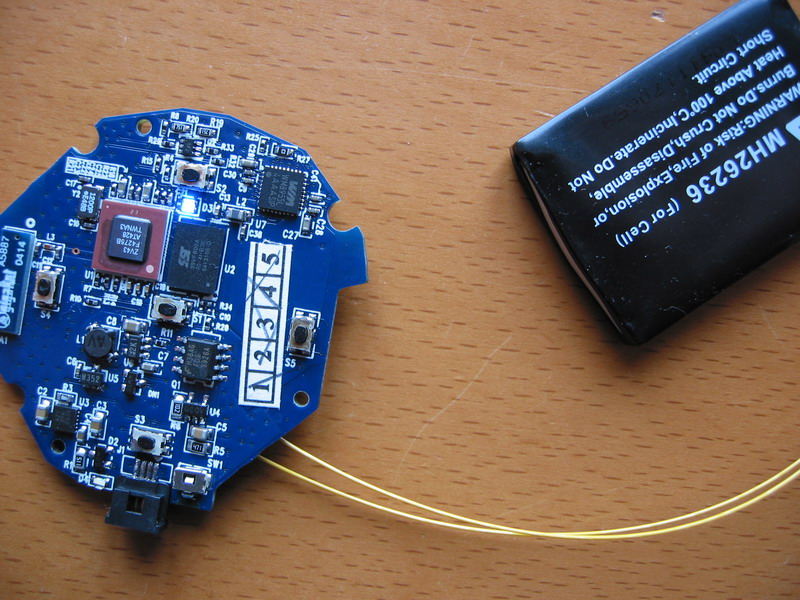 After taking everything apart the natural step was to see if it was still working. I started to sweat slightly when I connected the battery and tried to turn everything on – it was dead. But apparently you need to jumpstart the device after disconnect the battery and that was easily done by just connecting the 5v external power supply. The next problem was to connect the wires. The speaker and battery connectors are not a problem, but what about the rest as buttons and the LED’s? I tried to solder some very thin cables to the buttons but that was a no-go. So by taking everything a step further I measured my way trough the buttons and came up with the following.
The multifunction button in the middle closes trough to battery + and is not accessible trough an test point strangely enough. This also means that you can’t start the device without the battery! Oh, and mains input and battery input are completely separate so don’t connect the two grounds. I guess you could design a small powering device that runs on the mains but simulates the battery but having the battery there has it’s advantages. To start with it will remember the pairing which is good so that you don’t have to re-pair it every time. And the fact that it’s also battery powered means that it will be mobile. |
 I actually had a nice box in mind for this project. But what makes a good project good is the finishing touch of the product. No-one wants to have a standard square box with ugly self mounted buttons in the car or next to the TV (more about that thing with the TV later). So I went down to my garage to see what I could find and my eyes fell on a box of old black Dell mice. The benefit with housing my project inside a mouse is that I have two buttons for volume up and down (left and right mouse button), one for the multi function (scroll wheel button) and a nice little hole in the front for the LED’s. |
 As I needed the space inside the mouse for the battery and the circuit board I had to cut off the part of mouse PCB. Not really a problem, but as the buttons share one ground I had to cut off the ground wire to the middle button as that was to be fed by the battery +. Remember the list above of how the buttons are connected? Yepp that’s right – the multifunction button lacks a test point so I had to solder a wire directly to one of the legs. This is not to recommend but I couldn’t find another way out. It took me a good 6-7 minutes of fiddling around before I got in place without shot cutting anything. I then led the wire through a hole and used the glue gun to secure it as it would fall off otherwise. |
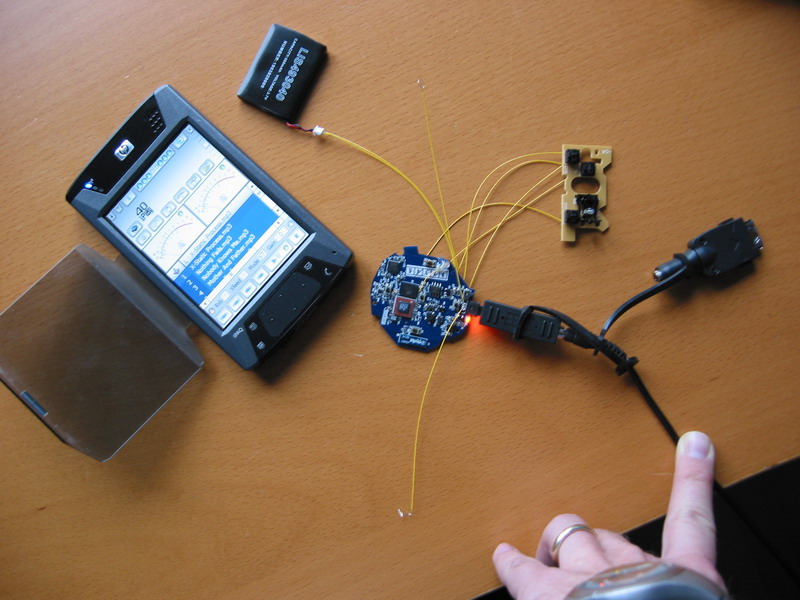 Then again it was time to see if I killed the board in the process. That was not the case and the buttons worked fine. I started playing some music on my iPAQ and started the ‘headphone’. The sound disappeared from the iPAQ so I had to assume that was right now in the ‘headphone’. |
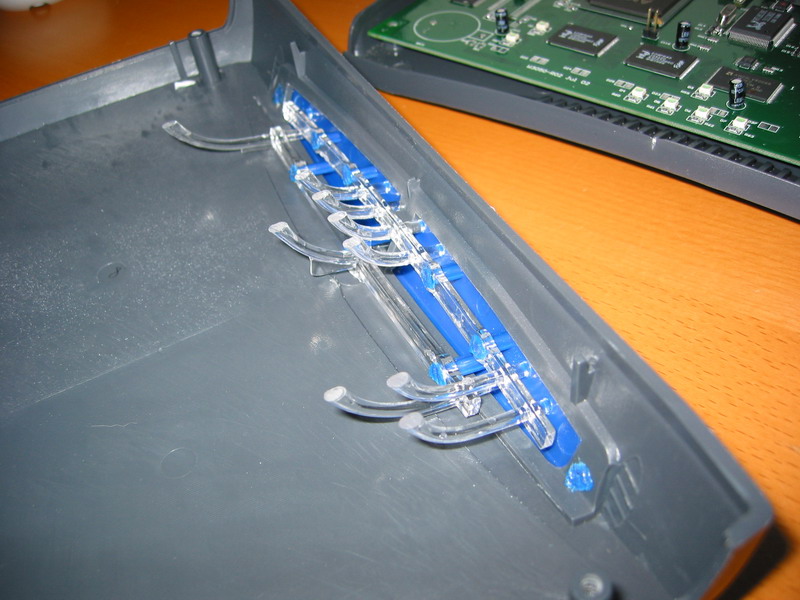 At this stage I realized that as I had not been successful in finding any test points for the LED’s it meant that I had to solder the wires directly to the surface mounted LED’s. Two words – Forget it. Unless you have a microscope and some special equipment to do it. Look at this picture and consider that the whole PCB is 52mm wide (2.16inch) on the widest place. I would estimate the solder points to be about 0.5mm (0.019inch) and the LED itself about 2mm across. Dissecting an old VPN box I found these small tubes the lead the light from the LED’s (in the top right corner) out of the box. Perfect! A bit of dremmeling (I doubt you’ll find that word in Oxfords) and I would nicely lead the light out from my Bluetooth receiver to the exit hole for the mouse cord. |
 And this is how the front piece of the mouse looks after some cutting and polishing. The problem to be solved later is to actually position the receivers LED so that they shine into the tube. |
 As I now have the Plexiglas tube running where the wheel is I had to trim it off a bit. Not really a problem as I do not intend using the scroll function but only the click. |
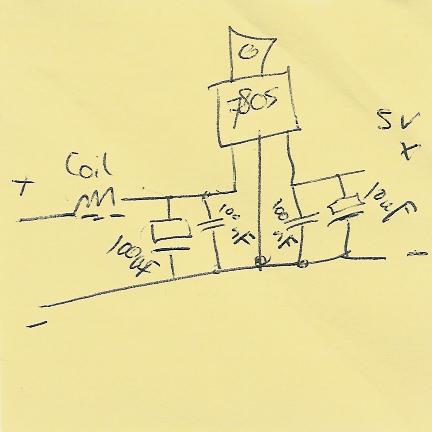 Running the device on battery is of course an option but as it’s supposed to be placed permanently in the car I also need an voltage regulator that feeds the main with a stable filtered 5v. The design is pretty straight forward and the only specialties are the coil and the capacitors in the beginning. Together they’ll form an low pass filter which should filter out all the noise from the alternator. I also added an rectifier bridge just to make sure that you can’t connect the external power wrong. That’s not really necessary as the 7805 blocks a reverse current, but it definitely doesn’t hurt, right? Have a look at the component side and back side if you feel like it. |
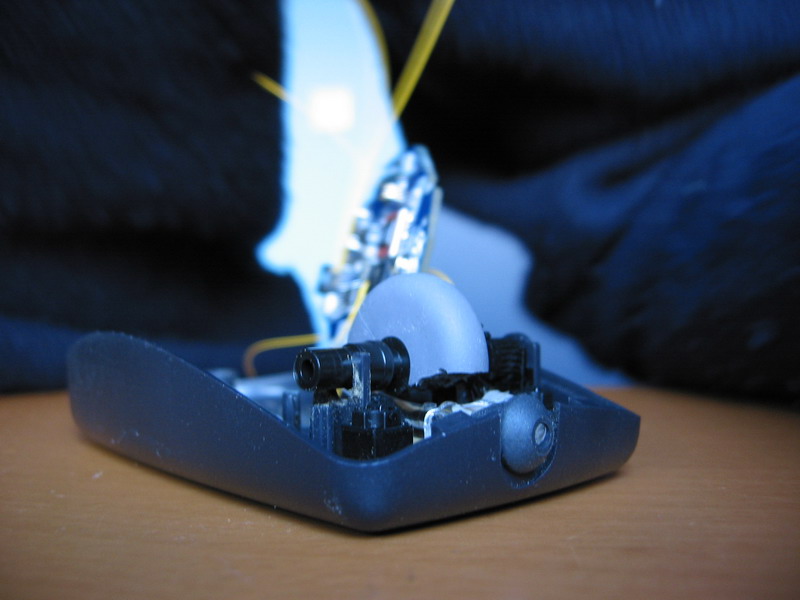
 This is what it comes down to after another test run to see if the voltage regulator worked. It did. Notice how the Bluetooth receiver folds over on top of the light tube. It actually aligns! Mounting the connector for line out / headphones out was nothing more to mention then that I did it… |
 Behold the beauty! I needed to trim the mouse wheel a bit more to allow the light rod to slide under it and so that the main circuit board could slide forward as much as possible for the alignment of the LED’s. I also glued the board into place using a glue gun so that it can’t shift. Yes yes, I know. In the summer the car will get warm and the glue will melt. But that actually doesn’t matter as when the mouse is mounted the top will hold it into place. |
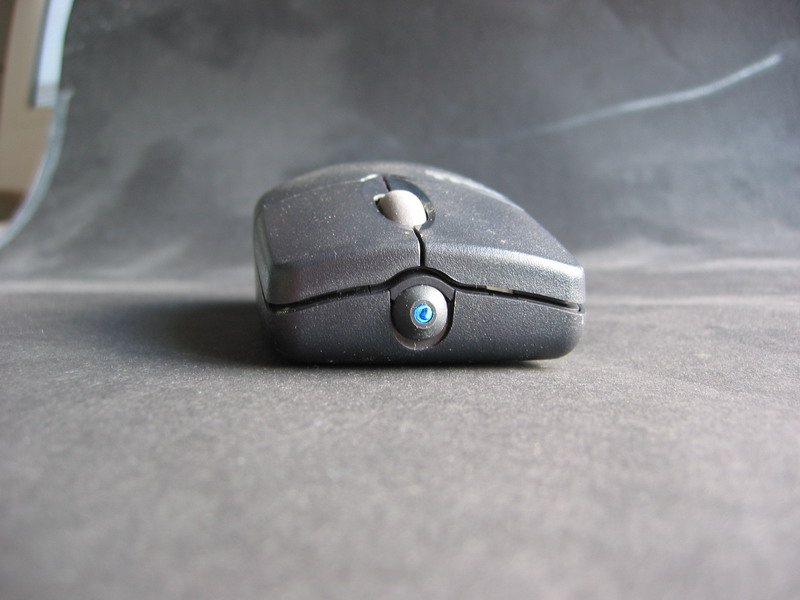 This is the finished Bluetooth stereo mouse. I took this picture while it was starting up hence the blue light coming out. The light in itself is strong enough to be seen clearly in normal light. I would estimate it to be 30-40% weaker then the original light but it’s enough. |
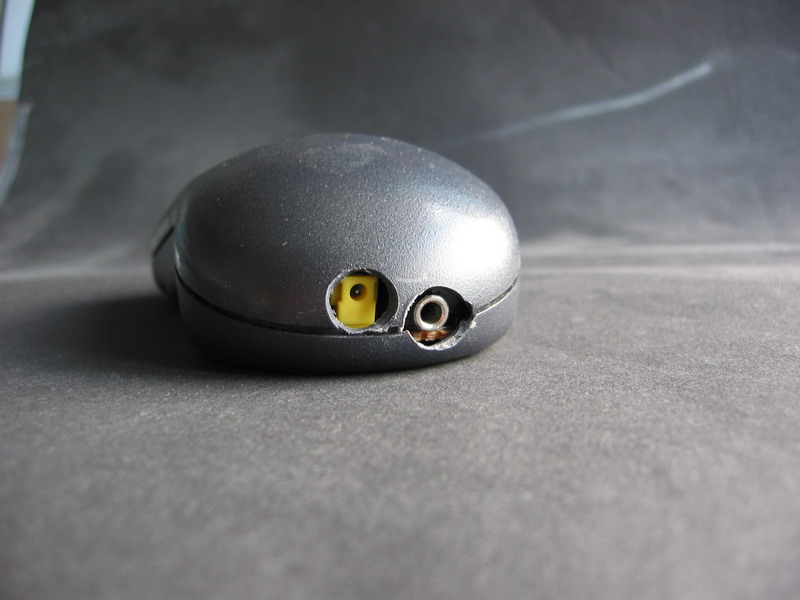 I could have done this neater. It doesn’t look very nice and I guess this is something I’d do better the next time I build an device like this. The left one is external power and the right is line out. |
 Voila! Connected to my car stereo and playing music from the iPAQ without wires, just as promised. And if you can’t see it – it’s in the lower right corner with the cables going straight back into the dashboard. One thing that I noticed in this test was that there’s a bit of extra bass. This is most probably because the amplifier in the device is expecting some resistance (the speakers) instead of being connected to a line in. This shouldn’t be a problem to solve, just add a 32ohm resistor to each channel to provide the proper load. But then again a little extra bass doesn’t hurt so I choose not to add them. |
 Remember that I talked about the TV? Well as the device is also battery powered this means that it’s easy enough to take out of the car and just plug in at home. I did and it sound awesome! I don’t know if it’s just my imagination but it seems to me that the quality of the sound is better through the Bluetooth device then through the iPAQ’s headphone outlet. Maybe the D/A in the original headphones are better? Okay, here it comes. Things that I would do differently the next time:
|
You must be logged in to post a comment.
Help us continue our work with a donation
 Forum {beta} Forum {beta}Hatch ideas and help others with their ideas. |


20 queries. 0.114 seconds
November 22nd, 2005 at 21:09
Comment to “page 3”, the word dremmeling:
well, I am German, and we have the word (verb): dremeln or rumdremeln, which is used as in the text.
The Noun “Dremel” names (per German definition) a piece of wood bigger than a bar but smaller than a baulk. In conclusion the verb (which is not findable in the german dictionary, but used) meant the manipulation of wood and its shape.
Together with the brand name “Dremel” (a favourite tool for all kinds of works), which somehow rewoke the old word, it is now used for any kinds of works concerning not to big alterations of something.
I think dremmeling is just the english translation (but now it makes sense).
How lovely it is to find time to write such things… i mean i finally have a few days off and can enjoy doing nothing…. wonderfull
anyway… very nice project. I always thought of buying a mp3 player and now I know which.
thx
Nils
November 23rd, 2005 at 0:16
I am from Germany too. Nils is right with the word “dremeln”
God project, good job
November 23rd, 2005 at 3:49
Hallo Nils,
Ich bin ein Americana. Der Englische wort “Dremel” oder Phrase “To Dremel something” bedeutet die Dremel zu Benutzung auf ein Projekt. Hoffentlich, Sie k├ā┬Čnnen mein Deutsch verstehen. Ich war ein Austauschschueler in Bad-Harzburg (100km entweit von Hannover). Englisch ist gerissene, na?
Bis Spaeter!
-Ken
November 23rd, 2005 at 13:58
si, vabb├ā┬© se tutti usano la lingua madre, mi metto anch’io!!
Bel lavoro, nulla da eccepire. Se non fosse che qui nn c’├ā┬© troppo da hackkare data la bassa tecnologia in cui [non] ├ā┬© immerso il paese (in sostanza: si va’ pel 2├é┬░mondo!).
Good project,nice work! ¤śē
Un saluto anche agli Eurocompatrioti tedeschi!
Ciao!
November 23rd, 2005 at 19:49
iam impressed…nice work!!
November 23rd, 2005 at 20:54
HOW TO -Bluetooth stereo in the car
Chris writes “Considering how many people bought the HP Bluetooth stereo headphones and got disappointed when the headband snapped, I thought that it was time to do something useful with the ‘broken’ headphone. We’ll take you through all steps of d…
November 28th, 2005 at 20:23
Looks good! I’ve got 2 pairs and a third on the way, mine just dont work but if they snap i’ll try bulding one ¤śē
November 28th, 2005 at 20:26
By the way, could you tell me what program your running on you iPaq for audio?
November 29th, 2005 at 18:09
Ohhh!!!
Nice project. Very very HI-TECH.
I have a headphone and want made this mods.
Thanks for your time.
Michieletti Mauro
December 1st, 2005 at 22:22
Miles: In this project I’ve used a demo of the iPlay client. Great player and especially if you want glitch free sound when listening over Bluetooth.
Another good player is Pocket player from Conduits. I actually prefer this one as it ‘works’ better for me, even though it’s kind of ugly.
December 6th, 2005 at 5:38
can anyone here know how to make 2 hp bluetooth headphone to work at the same time, i’ve ordered 2 set but can only operate one at a time..
January 18th, 2006 at 22:55
this HP hearphone work with Dell Axim X30 ?
January 19th, 2006 at 19:10
JiPi: I don’t know. If it has bluetooth then you should be able to load the bluetooth stack manually. I believe widcomm is the manufacturer of that one so do a search on Axim X30 and widcomm and see what you come up with.
January 21st, 2006 at 19:08
I am about to do similar project
but the way I do is different
I have promate headset (supports headset/handsfree/a2dp/avrcp), but I am not satisfied the sound
and I plan to do mod, ordered Koss R-80, will put the electronic unit and transplant to R-80
February 8th, 2006 at 15:35
Hello, many thx Chris J for the test pinoutsand mouse idea! I too have many of these HP bluetooth headphones all which the head band has cracked!
I have finally completed my audio bluetooth mouse. I used an old 5 button Genius Optical mouse for my project. Although bigger than your audio mouse, I have wired the extra test points so I have full AVRCP access on the unit (play/pause,track advance, rewind, volume up and down). All worked like a charm. Did not bother wiring the LED as I thought it would not be required as u can hear tones through the speakers. Another difference is I put in a 2.5mm DC socket in mine requiring the standard 5v supply which I got from some old Sony Ericsson Chargers which I have heaps too rewired to 2.5mm DC plug. Have not notices the excessive bass u mention of, but will do further testing today :).
Many thanks again for the schematics, in the past was thinking of transplanting into new headphones, which would be a task and a half, but I find this mod easy, and fast to make up. All up I took 2hrs to make the bluetooth audio mouse.
Well done!
Mazor
February 24th, 2006 at 15:22
I was wondering how the reception is. When you drive around does the audio cut on and off once in a while? How good is the quality compaed to a straight line in.
February 28th, 2006 at 12:36
Michael Lin: I haven’t noticed that it cuts off, no. And as I wrote in the article I actually think it sounds better over bluetooth. That’s probably because the DA converter is better in the headphones.
April 18th, 2006 at 15:16
Hi Chris, what a great project and very nice tutorial, this has given me an idea how I can use the headphones or similar to receive phone calls in my car by using bluetooth and the line in interface of my car radio.. hmm!
June 13th, 2006 at 21:47
I was wonedering if it is possible to install a bluetooth car kit, override the internal speakers, and use the car speakers without using the car stereo. I am a novice, I have a “83 OEM stereo and do not necessarily want to upgrade. Thought if I used a palm computer to play my music through a bluetooth, good sound and portable music.
July 5th, 2006 at 5:08
Chris,
Have you concidered adding an iPod connector to your project? (or to a new project)
Many newer cars have iPod connectors that allow easy access to their audio systems and allow the car’s stero to control the iPod. The iPods control system is a simple serial format (the protocol is available with a websearch).
I’m sure a simple microcontroller interface project is not beyond your capabilities.
Regards Bill
July 31st, 2006 at 14:51
can any one guide me on HOW TO CONTROL A SIMPLE ROBOT USING BLUETOOTH
a simple robot could be a toy car
September 1st, 2006 at 23:50
Chris,
Dude – your a rock star! thank you for the excellent documentation… any more detail on the actual connection from the new bluetooth mouse to the actual car stereo – I’m about to try this using the old tape casette adapter
January 15th, 2007 at 18:16
Interfacing to the car is fairly simple to figure out. Remember how there are speaker outputs on the circuit board? These of course, originally go the the bluetooth headphone speakers. Instead, just hook them up to some RCA cables and run those to the AUX input of your car’s CD deck. Almost all decent aftermarket decks have an AUX input, which RCA cables will plug into.
Using a stock car stereo, these generally don’t accept auxillary input so you’d be out of luck.
One thing to be carefuk of is ensuring the AUX input lines for the stereo don’t draw too much current from the speaker outputs of the bluetooth receiver (this will break your bluetooth receiver, not the car stereo). I doubt this will be a problem though (there are extremely low current draw input buffers on most inputs).
May 9th, 2007 at 11:57
Good stuff! Thanks to this info about opening I could fix my defective headset without
damaging. The Volume down switch was inoperative so the thing blasted full power. I could
readjust the microswitch actuator movement and it works perfectly now. Thanks to this message
I dared to try fix it. Especially the tip how to remove the cushion was helpfull, the testpoints too.
May 12th, 2007 at 6:46
anybody know if you can do this but with a bluetooth headset with a mic? would love to try and hack one of those…
July 12th, 2007 at 9:06
Hey, i’m trying to read what components are needed for the voltage regulator on your schematic. Would you mind listing would parts you need, I can’t read them
July 13th, 2007 at 1:45
Ryan: It’s a standard 7805 voltage regulator with a couple of components around. This picture says it all.
Cheers,
Chris
December 18th, 2007 at 0:36
Chris,
I’ve a Logitech branded Bluetooth headphones. This one does not have the skip buttons. It works fine but I noticed that it the charger is plugged in, it powers down and goes into charging mode. Did you not have the same issue?
June 17th, 2008 at 22:01
Mojo you say that you can take the speaker outputs from the circuit board and “hook them up to some RCA cables and run those to the AUX input of your car├óŌé¼Ōäós CD deck.” Is that right? So I can hack any bluetooth headphone to connect to the aux in of my head unit in my car? The voltage/levels going into headphone speakers is the same as the line in that the aux in needs?
July 1st, 2008 at 18:12
Are the buttons required? Is there any chance the entire unit can simply be embedded in the dash? I guess that I’m assuming that the device wakes up with a reasonable audio volume and that is turns on when it receives power. Perhaps not a good assumption given your warning about separate grounds for battery and DC-IN.
August 19th, 2008 at 19:44
Hello, great article! I have the same HP headphones, and I haven’t completed the project yet.. The main reason is (like Alan #30 said), the unit starts with a low volume when you first pair or connect to it. You (the user) must then set the volume louder manually.
I would like to design some kind of circuit to close the “Volume Up” switch a few times, shortly after the initial powerup.. Maybe a 555 or cheap PIC16 or something, who knows?
–weasel5i2
August 4th, 2009 at 17:58
Hi !
Last nigth i make a similar project with one Nokia BH 501.
Now i have the mod almost done, the problem is the interface to car input.
The PCB contains 2 wires to each speaker (left, rigth), and the output line have only 3, GND, Left, and Rigth.
I assume there is not a common GND, so i got rigth or left sound more loud, depending wich wire i connect to GND of the output. If i connect both sounds ugly.
Any ideas ?
Thanks